Wet Rudder Repair
Spring 2022

GET STARTED
FREE PRINT & DIGITAL EDITIONS

Spring 2022
My friend Chris bought a 33′ fiberglass sailboat, a Cal 33, to use as his family cruiser. Because it was an older boat, he knew he had a few projects ahead—including drying out the wet rudder. Here in Michigan, we haul our boats out of the water for the winter and it gives us a chance to do repairs and inspect under the waterline.
After hauling out the boat and storing it in the barn for the winter, Chris asked me to advise him on repairing the rudder.
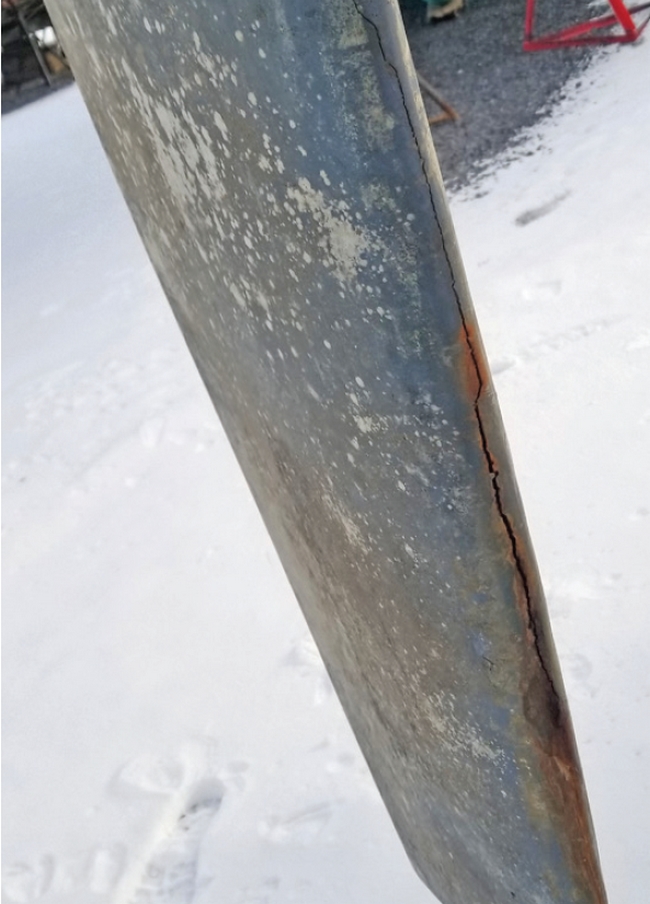
We found two smaller delaminated spots on one side of the rudder and a sizeable one on the other, along with a 6″ crack near the rudder shaft. After drilling a few 3/8″ drainage holes through the fiberglass skin and into the foam core, we saw that it was still in good shape even though the foam was wet.
With the boat already in the barn and not blocked high enough for us to remove the rudder, we made a plan to do a temporary fix to get through the next sailing season, then could wait until the next fall to complete permanent repairs.
Over that winter, I had Chris use heat lamps whenever he was at the boat in order to help dry the rudder as much as possible. In the spring, we chamfered the 3/8″ drainage holes and sanded the chamfer with 80-grit sandpaper. We then filled the holes with WEST SYSTEM® Six10® Thickened Epoxy Adhesive and smoothed it with an 808 Plastic Spreader. The next day, we sanded the cured epoxy and painted the rudder.
Getting the rudder completely dry was not the plan because we knew it would absorb more water over the summer, but we did it to prevent further damage during the winter freeze. Rudders can hold enough water to make them crack open from the ice expansion in cold weather.
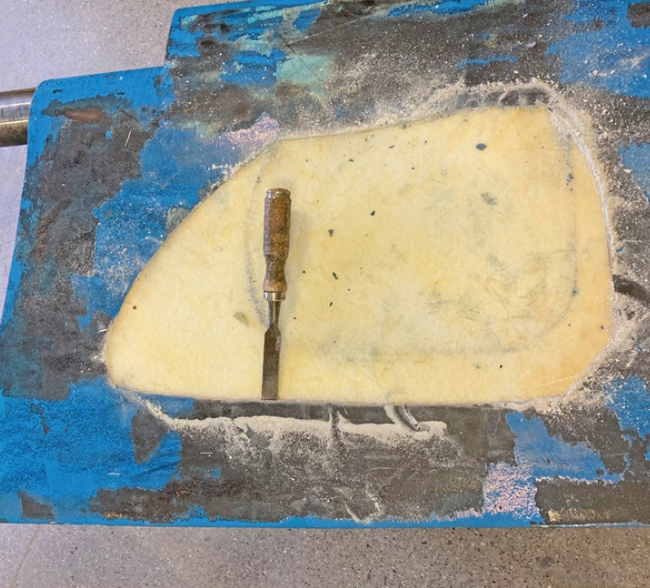
The next fall we took the rudder off the boat and brought it into the Gougeon tech shop. First, we sounded out the areas of delamination. For this high-tech operation, we used the handle end of a screwdriver and a felt tip marker to mark delaminated areas. I followed the marker lines to cut and remove the delaminated fiberglass skin with an oscillating saw. I also drilled out some of the drying holes we’d temporarily filled to get through the summer sailing season.
The rudder was wet, but not as bad as I thought it would be. It still had water in it, but it wasn’t running out like it had the year before.
The most basic way to dry out a rudder is to drill a hole in the bottom and let gravity do its job. This works well for draining most of the water and should reduce moisture content enough to prevent ice from cracking the rudder open during the cold months. If you store the boat outdoors, a good method to dry the rudder is to tape a black plastic bag over the rudder. On sunny days this will increase the temperature of the rudder to help it dry. This works great in temperatures around 25°F (-3.8°C). The added heat brings the wet rudder above freezing to provide it with extra days of drying.
Taking the rudder off the boat and bringing it into a temperature-controlled environment, like a basement or heated workshop, is another good way to dry it out. Warm, dry air will help the moisture evaporate. If there is damage or delamination to be repaired, remove the fiberglass skin to expose the foam core. The more exposed the core is, the faster the rudder will dry. A heat lamp warming the area will also help.
The most efficient way to dry a rudder is to vacuum bag it. This works best with the rudder off the boat and placed in a controlled environment. This is how I dried Chris’s rudder. At a vacuum pressure of 29 inches of mercury (Hg), water boils at only 76°F (24°C). This lets you boil the water out of the rudder without causing damage from excessive heat. It still takes some time, and I had to open the vacuum bag (which is like a big envelope) to dry out the breather fabric a couple of times. After the bulk of the water was out of the rudder, I added a heat lamp because our shop was at 72°F (22°C) and I was only pulling a vacuum of 27 Hg. At 27 inches Hg, the boiling point moves up to about 120°F (49°C), which is still cool enough to prevent damaging the rudder laminate. Drying the rudder this way removed all but the last little bit of moisture. For more about vacuum bagging, see “Vacuum Bagging Basics” by Rachael Geerts in Epoxyworks 49.
The moisture meter indicated the bottom of the rudder was still wet, so I removed some of the fiberglass in areas where the readings were still high. It turned out that the high moisture readings were from the laminate. The foam core was now mostly dried. Ideally, I’d want the moisture meter to read 0 but a reading anywhere in the green is good.
I didn’t remove the bottom paint and what looked like one coat of VC Tar2TM osmosis protection primer before trying to dry the rudder. When I did sand down to the gel coat, I found that the rudder had a few gel coat blisters, which we would need to sand open and fill with thickened epoxy after the laminate was dried. This would account for the moisture reading in the laminate.
With the rudder dry, it was time to put it back together. In some cases, you can reuse fiberglass skin that was previously removed. We outline this procedure in our Fiberglass Boat Repair & Maintenance manual in section 5.2.1 “Re-bonding the skin.” However, the skin I’d removed from Chris’s rudder was deformed and couldn’t be saved, so I had to replace the fiberglass laminate.
In order to calculate the thickness of the fiberglass replacement laminate, we first needed to measure the original laminate thickness. Grinding back the fiberglass that was still attached to the rudder allowed us to count the number of layers. We measured the laminate with vernier calipers and it was 0.070″ (0.0625″ is 1/16″). Taking off a little for the gelcoat makes it an easy number to work with.
For a typical fiberglass repair, you taper back the existing fiberglass 12 times the thickness (12:1 taper). In this case, the 1/16″ would be 12/16″ (¾”) all the way around. It’s not a bad idea to taper more than 12 times on thin skin laminates. You want a nice even taper over ¾”.
Once we knew the laminate thickness, we had to determine how to match that thickness for our laminate repair. How many layers of a given weight of fiberglass would we need?
It’s not surprising that different weights of fiberglass cloth have different thicknesses. But even the same weight of fiberglass can vary in thickness depending on the amount of epoxy applied to the cloth. For example, saturated or laminated, 10 oz. fiberglass can range from 0.0014″ to 0.0019″ thick. The range in thickness adds a degree of difficulty to calculating the number of layers of fiberglass required to match the thickness of an existing laminate. For example, 10 oz. fiberglass that’s 0.0014″ would reach a laminate thickness of 0.056″ with four layers. But if the 10 oz. fiberglass you had on hand was actually 0.0019″ thick, it would reach a total thickness of 0.057″ with only three layers laminated.
Using fabric weight alone to determine the number of layers means estimating the repair laminate thickness. The result may be a laminate that’s too thin, requiring you to buy and apply additional fiberglass. Or the laminate could be too thick and need to be sanded down, turning the epoxy and fiberglass you paid for into sanding dust, not to mention the “fun” of sanding fiberglass.
The method I used to determine the fiberglass weight and layers is simpler and more reliable. I made a laminate thickness gauge.
A laminate thickness gauge is a strip of a specific weight of fiberglass laminated in graduating layers that takes the guesswork out of comparing laminate thicknesses. To make mine, I used scraps of fiberglass cloth I had on hand. I began by cutting a few strips of fiberglass into graduating lengths. I used WEST SYSTEM 105 Resin® and 205 Fast Hardener® to lay up the fiberglass strips, one layer at a time. I started with the longest strip and left a 1″ drop-off between layers. My gauge had four layers but I could have added as many as six. You can also make separate laminate thickness gauges for each weight of fiberglass you have on hand, making it easier to explore all of your laminate options.
Once the laminate thickness gauge had cured, I simply held it near the edge of the repair area to compare it to the thickness of the original laminate.
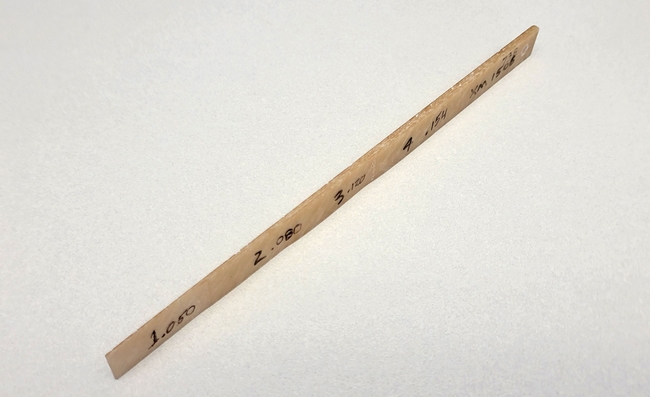
The variance in thickness at different levels of the gauge reflects both the fabric thickness and how you laid up the laminate, making these gauges especially accurate. You can laminate the repair area in the same way you laminated the gauge to reach the same thickness results. Using my laminate thickness gauge, I decided that two layers of 17 oz. 737 Biaxial Fabric would be closest to the original laminate thickness. Any low areas could be filled with WEST SYSTEM Epoxy and 407 Low-Density filler. High spots would be minimal and easily sanded fair.
At two layers, I calculated we’d need 1 sq. yd. of 737 Biaxial Fabric to make the repairs. The type of laminate I wanted to create doesn’t call for filling the fiberglass weave, so we needed only 1 oz. of WEST SYSTEM Epoxy per oz. of fabric. Since 737 Biaxial Fabric weighs 17 oz. per sq. yd., 17 oz. of mixed epoxy resin and hardener was enough to get the job done. I added 15% to this calculation to account for waste, bringing us up to 19.55 oz. of epoxy. An A kit of 105 Resin® and 205 Fast Hardener® or 206 Slow Hardener® contains 38.4 fl. oz. of epoxy—enough to complete this repair with plenty epoxy left over to do the fairing.
The coverage quantity chart available at westsystem.com and in the WEST SYSTEM User Manual & Product Guide is a good reference for determining how much epoxy you’ll need when laminating fiberglass. Because the figures on the chart pertain to filling the fiberglass weave and I didn’t intend to do that, my epoxy coverage calculation was considerably lower.
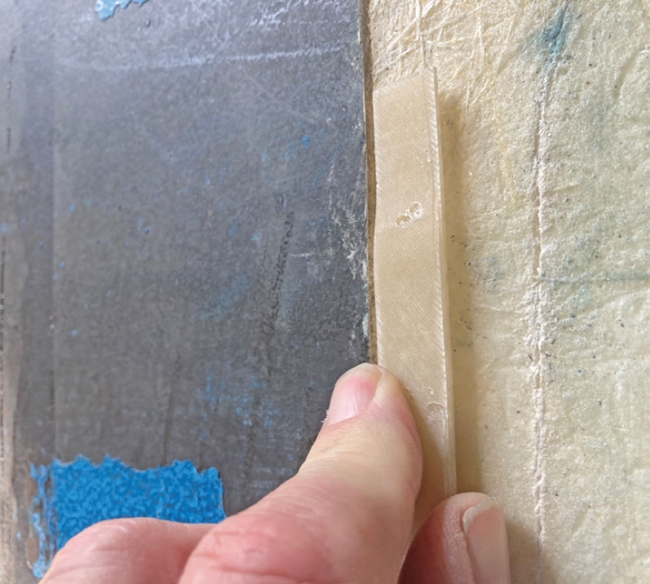
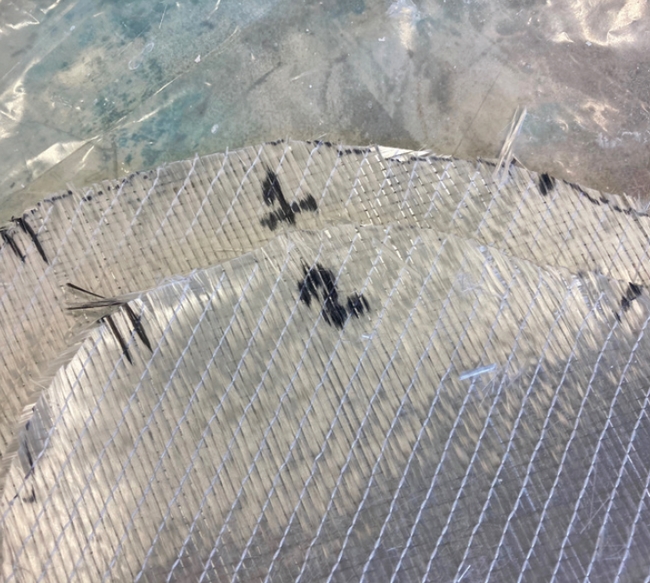
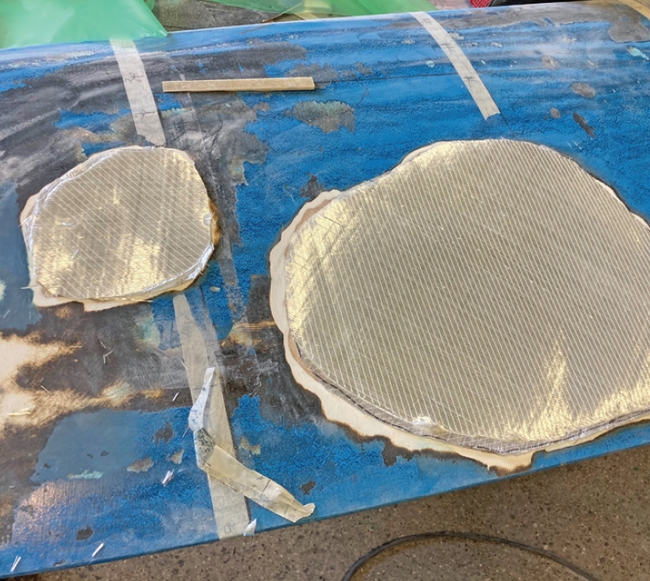
To cut the fiberglass to the correct size and shape, I laid clear plastic over the repair area and used a felt tip marker to trace the outline of the repair area. This is very effective when doing a repair around a corner, such as the leading edge of the rudder or the chine of a powerboat. Cutting the plastic on the line, I now had patterns for cutting my fiberglass. You can also lay these patterns out on your fiberglass to determine the most efficient way to cut it, minimizing fiberglass waste.
Using the felt tip marker, I traced the pattern on the fiberglass and cut it out. I used the same pattern for the second layer on this project and cut inside the line a little to make the piece smaller. For repair with numerous graduated layers, you can draw each size on the pattern and cut it back for each fiberglass layer.
For large or complicated repairs, it’s good to number your layers of fiberglass. Use alignment marks to ensure you’ve placed the fiberglass in the right spot when you lay it on the repair area.
The repair area should be clean and dry, and any exposed foam should be hand sanded with 80-grit sandpaper. The fiberglass around the edge should already be ground back at a 12:1 taper.
Coat the repair area with a mix of 105 Resin and 205 or 206 Hardener thickened to a catsup consistency with 406 Colloidal Silica filler. This will fill small holes and imperfections while helping prevent air voids under the first layer of fiberglass. Starting with the largest piece of fiberglass, position the fabric on the repair area. Use a plastic spreader to smooth the cloth and remove trapped air. Wet out the fabric with unthickened epoxy using a plastic spreader or foam roller to spread the epoxy, saturating all areas of the fiberglass. Repeat for each layer of fiberglass until you have bonded the smallest piece in place last, centered over the repair area. Bonding the patch into place in a large-to-small-piece sequence eliminates the possibility of sanding through any of the fiberglass layers while fairing the surface.

It’s a good idea to apply 879 Release Fabric over the final layer of fiberglass. Cut the release fabric several inches larger than the repair area and smooth it in place over the patch. To remove excess epoxy and smooth the patch, drag a plastic spreader over the release fabric, pressing firmly. Before the epoxy cures, use a beveled mixing stick or a paper towel to remove any excess epoxy from the surrounding areas. Allow the patch to cure thoroughly.
Remove the release fabric. Release fabric will not bond to WEST SYSTEM Epoxy and will leave an evenly textured surface. Release fabric will also remove any amine blush, a waxy byproduct of the epoxy curing process. Sand the repair area to remove any high spots. Fair the repair as described in section 14 of Fiberglass Boat Repair & Maintenance, then finish it as described in section 15.1.
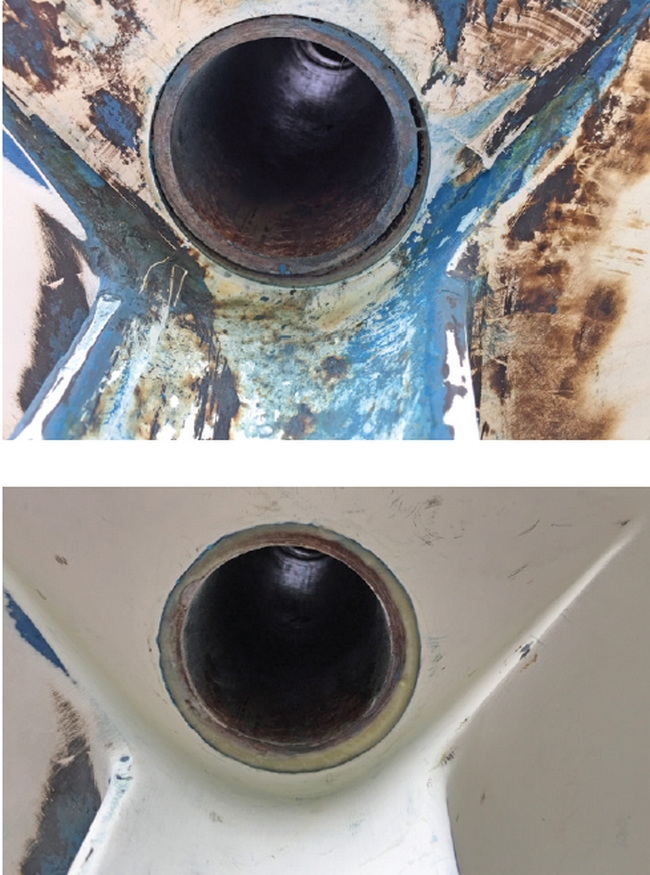
Another area of concern was around the rudder shaft, the most common place I have found rudders to leak. On Chris’s rudder, the water intrusion was from a failed repair near the top of the rudder shaft. I should also note that this rudder was used in freshwater. Saltwater is much more corrosive, and further inspection should be done on saltwater rudder shafts. Areas of core foam can be removed down to the shaft to check for corrosion
With the rudder removed from the boat, it was a great time to inspect areas rarely seen. We found a small gap where the rudder tube was bonded to the hull. We cleaned the void area with a rotary tool then injected Six10 Thickened Epoxy Adhesive into the void.
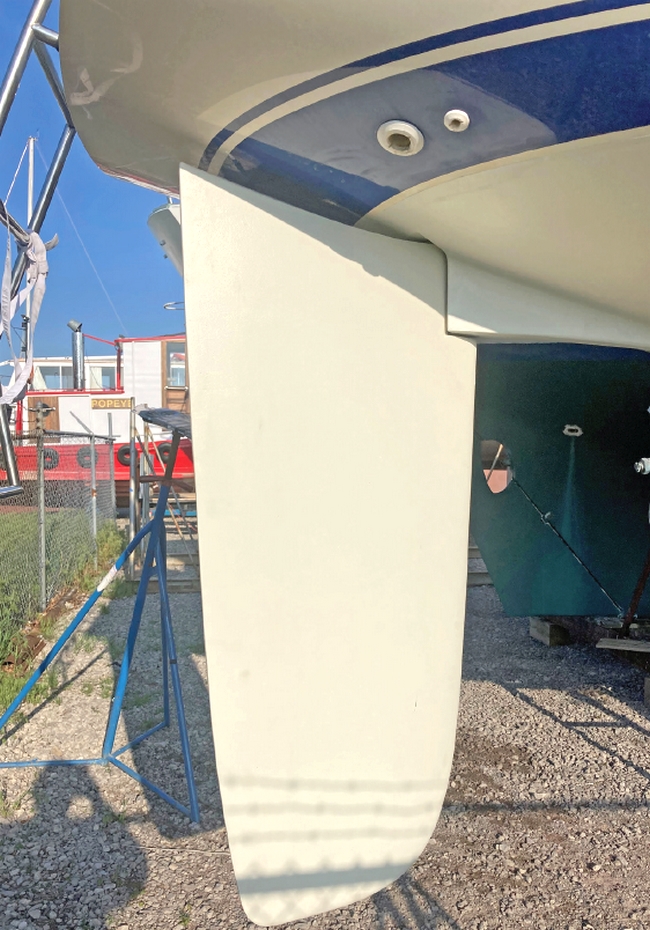
A new rudder would have cost around $3,500. These repairs were completed for under $300. The dried and repaired the rudder is as good as new and ready to tackle whatever the Great Lakes has to throw at it.


