By Rachael Geerts – GBI Composites Materials Engineer
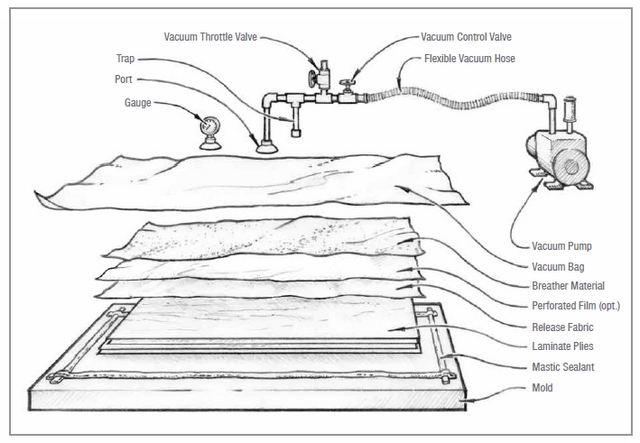
Featured image (above): A typical vacuum bagging setup.
What is vacuum bagging?
Vacuum bagging is when a composite that is laid up and wet out by hand is then put under vacuum to compact the laminate and force out excess epoxy. Vacuum bagging has been a choice method of manufacturing and repairing composites for a long time.
Why vacuum bag a laminate?
The process of vacuum bagging allows for the ease of hand lamination while producing a part that has better properties because of its compaction. Vacuum bagging a laminate removes air voids and increases the fiber-to-epoxy ratio. All in all, it is a great process to improve your composite laminate.
What materials do I need for vacuum bagging, and how do I use them?
Let’s dive deeper into what materials are used in vacuum bagging and how to use those materials to achieve a great composite part. The materials and how to use them will be described in the order they should be put down on the mold or laminate.
Sealant tape
Lay down a layer of sealant tape around the perimeter of the part, leaving some space between it and the laminate. The area where the tape is put down should be clean and free of epoxy residue and stray fibers. Sealant tape is also commonly referred to as tacky tape or mastic sealant.
Release fabric
Release fabric should be laid directly on top of the wet laminate. This fabric leaves a textured finish when it is removed, reducing the need for surface prep before secondary bonding.
Release fabric is also commonly referred to as peel ply. The most common types of peel ply are made out of nylon or polyester fibers. Some peel ply is coated with release agents.
Release film
Perforated release film is a thin plastic with small holes that control how the excess epoxy moves from the part to the breather fabric. This is an optional layer in the vacuum bagging process.
Breather fabric
The function of the breather fabric is really two-fold. As vacuum pressure consolidates the laminate, the squeezed-out epoxy goes through the peel ply (and the release film if you are using it) and is absorbed by the breather fabric. Because of its open structure, air flows easily through breather fabric allowing the air to be evacuated from the consolidated laminate. Breather fabric is also referred to as baby blanket.
Pleating the vacuum bagging film
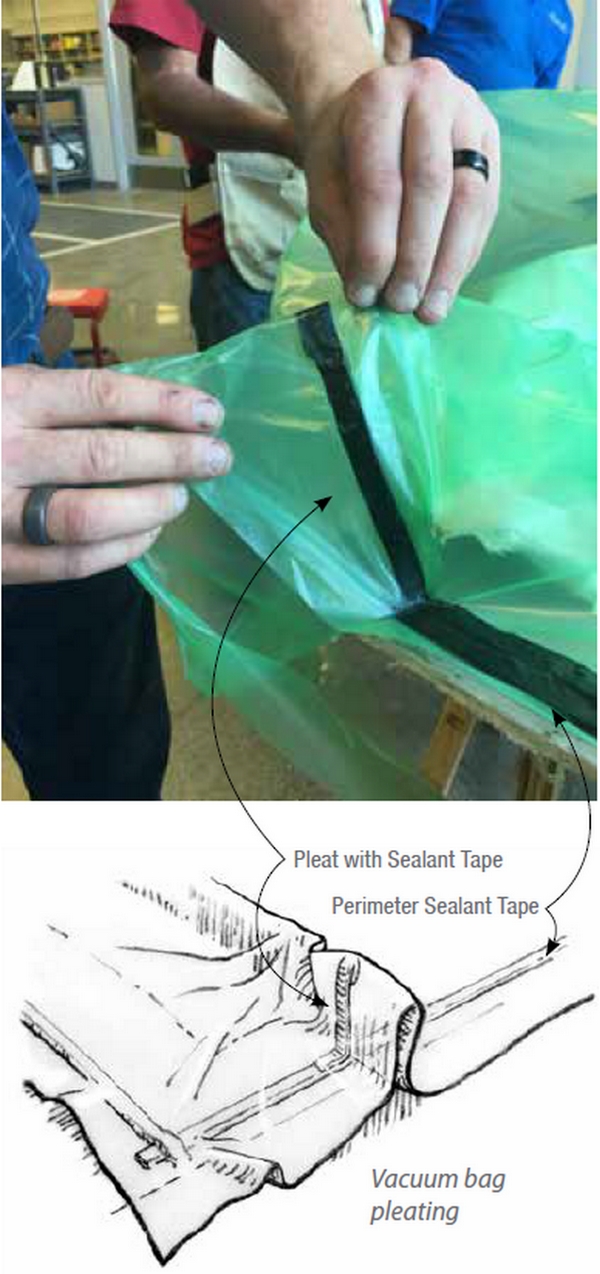
Where there is a corner or bend in the part, put a pleat in the bag. This is a fold that sticks up and allows the vacuum bag to move and conform nicely to the part under vacuum.
Without pleats, you may get bridging or cause a tear in the bag. Bridging occurs when the bag does not fold down completely on an edge and makes the edge more rounded (it will look like a filleted edge). This fillet area will not be compressed by the vacuum pressure. If there is no pleat on a corner, it may poke a hole through the bag and cause it to rip, depending on how much force is on that spot.
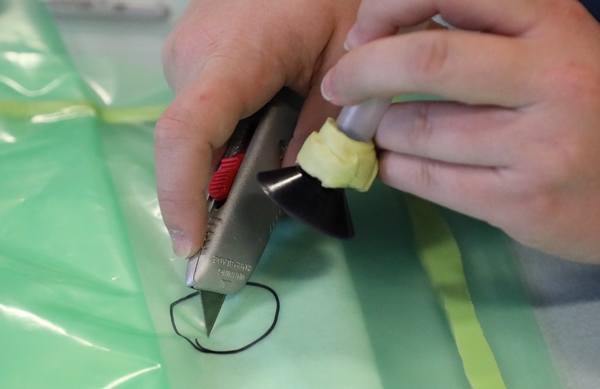
When laying down the bag on your laminate, you will also have to take into consideration where to position your vacuum port on the bag. The hole for the vacuum port should be small and easy to seal well so no air will leak into the assembly.

Vacuum port
The vacuum port is a fitting used as the transition point between the materials under the bag and the vacuum line.

Vacuum bag
The vacuum bag is a plastic film sealed to the mold so a vacuum can be pulled. This layer will need to be cut oversized to accommodate for curvature in the part.
Vacuum line
The vacuum line is an airtight, flexible hose that connects the vacuum port to the vacuum. Other types of wire-reinforced hose may work, but they should be rated for crush resistance or tested under vacuum for the length of the expected cure time. Semi-rigid plastic tubing with adequate wall thickness can be used for a plumbing system, but it is often awkward to handle. If the laminate is to be cured at an elevated temperature during vacuum bagging, the tubing must also be heat resistant. Plastic tubing that withstands vacuum at room temperature may soften and collapse when heated. Rigid plastic elbows and Ts can be used for changes in direction in the vacuum line to prevent collapsing the line. A vacuum line is also commonly referred to as a vacuum hose.
Vacuum gauge
The vacuum gauge shows how much vacuum you have pulled on the part. Vacuum-bagged parts should have at least 10″ of Hg of pressure acting on them to properly consolidate the part. The vacuum gauge gets added to the assembly the same way the vacuum port does.

Vacuum source options
The purpose of a vacuum source is pretty self-explanatory, however, there are many different types of vacuums. Vacuum pump types include reciprocating piston, rotary vane, turbine, diaphragm, and Venturi. They may be of a positive or non-positive displacement type.
Positive displacement vacuum pumps may be oil-lubricated or oil-less. Oil-lubricated pumps can run at higher vacuum pressures, are more efficient, and last longer than oil-less pumps. Oil-less pumps, however, are cleaner, require less monitoring and maintenance, and easily generate vacuums in a range useful for vacuum bagging.
Of the several types of positive displacement vacuum pumps useful for vacuum bagging, the reciprocating piston type and the rotary vane type are most common. Piston pumps can generate higher vacuums than rotary vane pumps, accompanied by higher noise levels and vibration. Rotary vane pumps may generate lower vacuums than piston pumps, but they offer several advantages. While their vacuum ratings are more than adequate for most vacuum bagging, they can move more air for a given vacuum rating. In other words, they can remove air from the system faster and tolerate more leaks in the system while maintaining a useful vacuum level. In addition, rotary vane pumps are generally more compact, run more smoothly, require less power, and cost less.
Non-positive displacement vacuum pumps have high CFM (cubic feet per minute) ratings, but generally at vacuum levels too low for most vacuum bagging. A vacuum cleaner is an example of a non-positive displacement or turbine type pump.
Air-operated vacuum generators are simple, low-cost Venturi devices that generate a vacuum using air pressure supplied by a standard air compressor. Their portability, relatively low cost, and the accessibility of compressors in many shops and homes make Venturi generators ideal for smaller vacuum bagging projects.
Single-stage generators have a high vacuum rating, but move a low volume of air, limiting the size of the vacuum bagging operation. Larger two-stage pumps are comparable to mechanical pumps for most vacuum bagging operations, but require a proportionately larger compressor to run them.
Whichever vacuum generator you choose, it must hold a continuous vacuum until the epoxy reaches an effective cure. This may take 8 to 24 hours depending on the hardener selected and ambient temperature. After all the materials are in place, turn on the vacuum source and allow vacuum to be continually pulled until the epoxy has cured.


