
by Brian Knight—GBI Technical Advisor
Modern strip composite construction uses narrow strips of wood or foam to make a low density core material. These strips are easy for one person to handle and are readily assembled into complex shapes. However, this assembled structure does not have much strength until it is covered inside and out with a high density fiber reinforced skin—usually fiberglass cloth. The process of making and fitting the narrow strips together is more time consuming than bending a sheet of plywood, but the technique allows for more creativity in the design.
Strips for strip planking are available pre-made or you can manufacture them yourself. The strips can have a wide range of density and geometry. In this article, I will discuss commonly used strip materials and geometry, and sources for and about strip planks and strip plank construction.
Wood and foam are the most commonly used materials for strip composite, but any material that will machine easily and conform to the required shape is fair game. Wood, by far the most popular material, is an “active core” that provides longitudinal strength and stiffness. The beauty of wood/epoxy construction is that you do not need prime, endangered or environmentally controversial woods.
Foam strips make an “inactive core” and do not provide directional strength like wood does. They may need stronger skins to carry the same load that wood strips do. Below are some commonly used materials and their density.
Material Density
Cedar, redwood 23 lb./cubic ft.
Mahogany, Douglas fir 32 lb./cubic ft.
Ash, White oak 40 lb./cubic ft.
Foam 2 to 6 lb./cubic ft.
DuraKore™ strip 15 lb./cubic ft.
Speed Strip™ (wood) 23 to 40 lb./cubic ft.
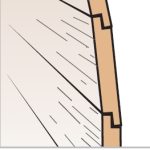
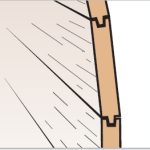
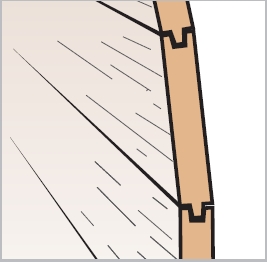
The strips are available in a variety of profiles. Among these are rectangular or square cross section, bead and cove, ship-lap and tongue and groove (left).
Advantages of each profile
In tight bends, the strips tend to twist out of plane between the mold stations. The tongue and groove, the bead and cove, and to a lesser degree the ship-lap, use “nesting” geometry to keep the planks aligned between mold stations. Bead and cove leave no gaps on the outside of the hull. Rectangular cross section shapes are easy to manufacture on a table saw.
Disadvantages of each profile
Rectangular strips require support between stations to keep them aligned with the previously applied strip—especially in tight curves. There are a variety of methods to accomplish this. See Edge Fastening.
Rectangular strips leave a gap on the outside of a curve, which needs to be filled. Beveling eliminates the need for filling the gap, but it requires a great deal of skill to make a perfect bevel the entire length of a plank.
The tongue and groove and the bead and cove require special cutters to manufacture the edge.
DuraKore™ and Speed Strip™
DuraKore strip is made of end grain balsa sandwiched between 1/16″ hardwood veneer. It is available in strips 3/8″ to 1″ thick, 3/4″ to 1 3/4″ wide and 8′ long. The ends are finger jointed so no scarfing is necessary to make long strips. It is rectangular in cross section and its main advantage is low weight and its ability to provide some longitudinal strength.
Speed Strip is wood that is machined with a special tongue and groove profile. There is just enough clearance between the tongue and groove to allow the planks to rotate slightly. The product literature states that no scarfing is needed to make long planks. The tongue/ groove geometry of the adjoining planks is enough to reinforce the butt joints. Speed Strip is available in most wood species. Standard sizes range from 1/4″ x 3/4″ to 1 3/4″ x <R>2 3/4″—lengths from 10′ to 18′.
Making your own strips
Many people decide to manufacture the strips themselves. For a large project, the process can get tedious. The following suggestions will make the job go more smoothly.
Make enough material. When figuring how much stock to buy, make allowance for material lost when machining. If you are making 1/4″ thick strips, up to 50% of the original material is turned into saw dust when you mill it, depending on the thickness of your table saw blade. Thicker strips result in less waste.
Machining edge treatments creates additional waste. For example, if you want tongue and groove on a strip that is 1 1/2″ wide, you will have to start with a strip that is 1 3/4″ wide because the tongue requires 1/4″ of extra stock.
Calculate the number of strips carefully and add 10% or so more. We all make mistakes and it is important to have additional stock available. Natural-finished projects require more wood to allow for color-matching the strips. The fussier you are, the more material you’ll need.
Cut all the strips using the same machine set-up. One set-up makes all the dimensions consistent which is very important during assembly and fairing. Make the set-up as solid and rigid as possible. You do not want vibration or pressure to move the saw fence or vibrate the saw blade to a tilted position. Use feather boards to hold work against the fence and down to the table. Finish machining the strips as quickly as practical. The longer the job takes, the more likely “gremlins” will show up in the dimensions of the strips.
Cut wood strips from the edge of slab sawn wood. A flat grain board is cheaper than vertical grain boards and when you saw a strip from the edge, it yields vertical grain strips. Vertical grain is dimensionally stable and easier to finish than flat grain.
With few exceptions you will have to scarf the strips to make them long enough to build your project. Make allowance for material lost when making scarf joints. It is generally easier, faster, and more precise to scarf the parent material before sawing the strips. You will spend less time making each joint and it eliminates the “doglegs” that can result if the wood is not perfectly aligned when the scarf is assembled. There are, however, situations where the color or grain orientation of the strip may be important and you may have to scarf individual planks.
When figuring the length of the strip material, It also helps to make the planks a foot or so longer than they need to be. When you are trying to force a plank into position, it is nice to have the extra length for leverage. Allow for the extra length in your calculations.