Tips for Clear-Finished Wood
Spring 2024

GET STARTED
FREE PRINT & DIGITAL EDITIONS
Spring 2024
By Don Gutzmer – GBI Technical Advisor
The beauty of naturally finished wood on a boat is appealing to many boat owners, but the maintenance of clear wood finishes is an ongoing task. One way to reduce this task is to stabilize the moisture content of the wood with epoxy. Residents in Michigan or Florida may need to varnish their clear-finished wood surfaces yearly. In this article, we share expert tips for applying epoxy and fiberglass to wood surfaces for a clear, bubble-free finish.
In our WEST SYSTEM® product line, we have developed a clear epoxy specifically for use as a clear finish on wood surfaces. This product is our 105 Epoxy Resin® paired with our 207 Special Clear Hardener®. Many epoxies have an amber tint as a result of being developed to achieve specific performance requirements. However, 207 Special Clear Hardener is formulated to remain clear and still offer excellent physical properties.
105/207 can be used for structural bonding, in addition to coating. The viscosity is low enough that it will release entrapped air bubbles effectively and self-level. We have formulated 207 Special Clear Hardener so it does not leave a waxy amine blush during curing. The only surface preparation that needs to be done once the epoxy is cured is to lightly sand the surface dull before recoating. If you are recoating within six hours of the previous application, at 72°F (22°C), no surface preparation is required. Another advantage of the 207 Special Clear Hardener is that it is compatible with many UV-stable top coats, so there are many options for your final UV coat.
With any epoxy system, the epoxy needs to be on ratio and fully mixed for optimal performance. As you mix 105/207, it is helpful to mix at a steady pace, scraping the sides and bottom of the container. Avoid lifting the mixing stick to minimize entrapping more air bubbles in the epoxy.
The epoxy will start to crosslink as soon as you begin mixing, generating heat. To avoid the epoxy generating heat too quickly, which can cause the epoxy to cure too fast, it is best to mix smaller batches that can be used within a short period of time. Fresh epoxy has a lower viscosity and is easier to apply to your surface. To maximize your working time, once the epoxy is mixed, you should spread it out over a larger area to increase surface area, like transferring it into a roller pan.
There are a variety of ways for air to become trapped in your epoxy. Stirring too vigorously or lifting your mixing stick can introduce bubbles into your epoxy. Air can also be introduced by transferring the epoxy, outgassing from a porous surface (such as wood), or applying a thick coating.
When I’m transferring epoxy from my mixing container to my roller pan, work surface, or another container, I find it helpful to pour the epoxy onto my mixing stick, directing the epoxy into the pan. This reduces the distance traveled, and helps to minimize air bubbles.
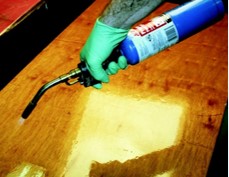
Porous surfaces, like wood, can outgas into your epoxy. This is caused by the wood warming up due to the increasing temperature of the epoxy during the curing process. I recommend pre-sealing your surfaces with just a thin seal coat of epoxy. Once cured, the epoxy coating will be a barrier, preventing out-gassing. This coating should be lightly sanded before applying more epoxy.
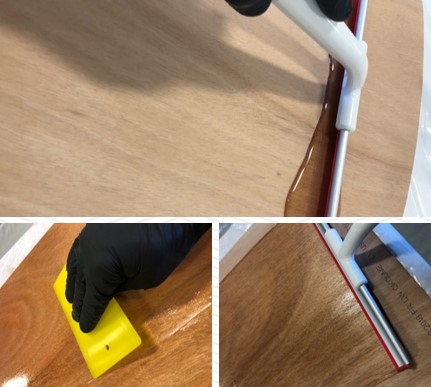
If you want a thicker coating, like a bar top finish, our 809 Notched Spreader could be used to maintain a uniform thickness.
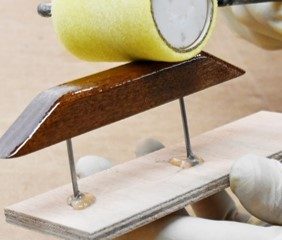
In addition to a thin seal coat of epoxy, another effective way to avoid air bubbles getting trapped in your epoxy finish is to apply multiple thin coats and build up to your desired thickness. Our 800-2 Roller Covers have an extremely low nap that makes them an excellent option for applying thin coats of epoxy.
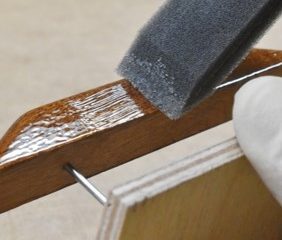
Once the epoxy coat is applied you may find air bubbles entrapped in the wet, uncured epoxy. A foam brush, or a section of the 800 Roller Cover, can be lightly dragged over the wet epoxy to help remove those air bubbles.
Using a heat source, such as a propane torch or heat gun, can also help remove air bubbles near the surface. The heat temporarily lowers the epoxy’s surface viscosity, allowing the air to escape. Releasing the air involves passing your heat source over the surface at a rate of approximately 12″ per second to prevent scorching the surface.
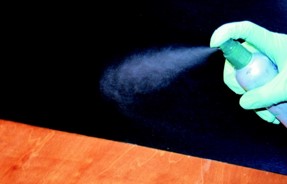
Another option to remove these bubbles is to lightly mist the surface with denatured alcohol. The alcohol lowers the surface tension, allowing the air to escape from the epoxy.
If your 105/207 coating cures and you still have entrapped air bubbles, you really only have two options. You can sand or grind the epoxy down to expose the offending bubbles, or just live with it.
If the bubbles are located on the surface of a small area, or there are many entrapped air bubbles, you may consider sanding the entire surface until you expose the bubbles.
The alternative is to grind away the epoxy just where the bubbles are located until the bubbles are exposed. In either scenario, once the bubbles are exposed, use compressed air or a vacuum to remove any sanding debris within the air bubble cavities. Then apply more 105/207 with a spreader at a low angle to force the epoxy into any voids. After a few hours, you can continue recoating the entire surface to build up to your desired thickness.
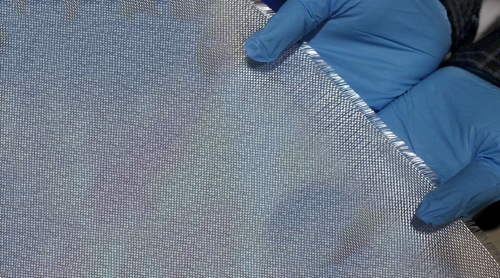
If you plan to apply fiberglass cloth over wood, it’s best to use fabrics that are 6 oz./yd2 or lighter. Heavier fabrics tend to show, even after being fully wet out with epoxy.
Strip plank construction with thicker planking, or unstable woods, have a greater degree of wood movement. In these applications, it is beneficial to orient the fabric at a +/- 45° angle. This minimizes the possibility of the fiberglass buckling if there is wood movement. If the wood does move over time, it is possible to see small white hash marks from the fiber bundles breaking and buckling.
Another tip is to avoid any pooling of epoxy under the fabric. This can cause your surface to look like it has a hump or waves. Also, if you’re sanding the surface, you are more likely to cut into the fiberglass with your sandpaper. This can leave white marks where the fiberglass is damaged, even if you recoat with epoxy. To ensure your fiberglass is flush with the surface, use a squeegee to press it firmly against the surface. You should still see the weave of the fabric after you have wet out and applied your fiberglass. If it looks shiny, you have too much epoxy on the surface, and you should remove it with your squeegee. After that coat begins to gel, you can continue applying multiple thin coats of 105/207 to fill the weave of the fabric.
An advantage of 105/207 is that you can recoat within six hours, at 72°F (22°C), without any surface preparation between coats. At this temperature, the ideal recoat time is around three hours to avoid sanding between coats. If you can touch the surface of the epoxy with your gloved finger, and you can leave a mark on the epoxy without the epoxy transferring onto your glove, you know you can recoat. If you wait until the next day to recoat 105/207, you will need to sand the epoxy dull to get good adhesion. Make sure the epoxy sands to dust and does not clog your sandpaper. If it is too soft, you will want to wait for the epoxy to increase in hardness, ideally waiting 24 hours for the epoxy to cure.
I hope these tips are helpful, and I wish you the best of luck on your next clear coating project. If you have any questions please take advantage of our technical support line at 866-937-8797.
…


