
By Tom Pawlak — GBI Technical Advisor
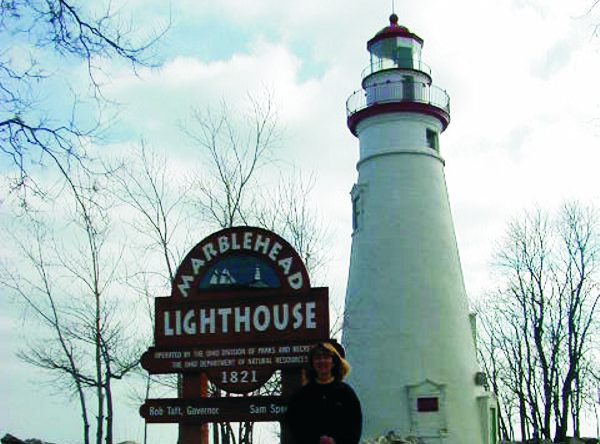
Bob, my brother-in-law, has a beautiful yard that he has set in a nautical theme. He had been looking at lighthouse plans and asked if I was interested in helping build one with WEST SYSTEM® epoxy. All the plans that he looked at were for flat paneled six or eight-sided lighthouses built with plywood. I was interested in a project that was a bit more challenging and unique, so I suggested we build a stripped plank version. That way the tower could be round and tapered like many of the popular lighthouses around the world and it would differ from the flat-sided variety often seen in people’s yards. Bob liked the idea, so he went online and found photos of lighthouses that he liked. In the end, we based our design on the Marblehead lighthouse located on the southwestern shore of Lake Erie.
As Bob became more excited about the project, he thought he might like a second lighthouse for the backyard. With that in mind, we decided to build a mold so we could easily make multiple towers if desired.
The Mold
Our mold was a series of semicircles made of ¾” particle board that defined the shape and taper of the tower at 12″ intervals. These were attached to a piece of OSB board that was supported by a flat table that served as our mold strongback. Here’s the process used to set up the mold:
Layout a centerline for the mold stations on a flat sheet of ¾” plywood or OSB. To stabilize the mold, use a flat table or an old hollow-core door supported by sawhorses.
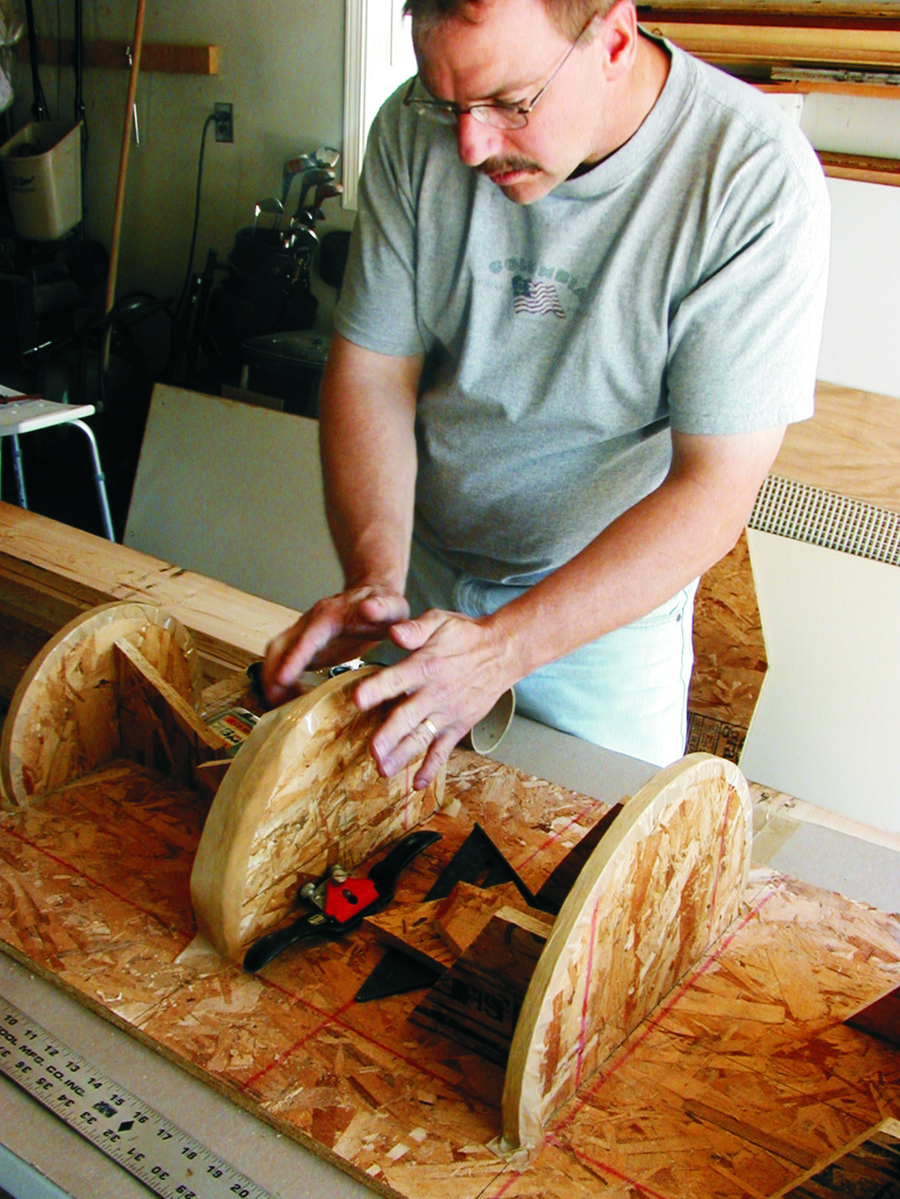
Attach 2″×2″ cleats (used later to support the semicircle mold frames) to the plywood base at 12″ to 16″ intervals along the centerline. Be sure they are mounted at 90° to the centerline. You can vary the taper of your tower by moving the mold frames closer together (more taper) or farther apart (less taper) if you wish. Attach the mold frames to the cleats with wood clamps or with drywall screws. Make sure the frames are centered on the centerline.
Check the mold frames for proper location by laying a straightedge along the length of the mold. This is best done on each side of the mold and along the centerline. If necessary, adjust individual mold frames side to side and up or down on the 2″×2″ cleats or back and forth along the centerline to achieve the best fit. Low spots on individual mold frames can be built up (faired) with strips of masking tape.
Cover the mold frames with electricians tape or duct tape so glue used to hold the wood strips together will release from the mold later.
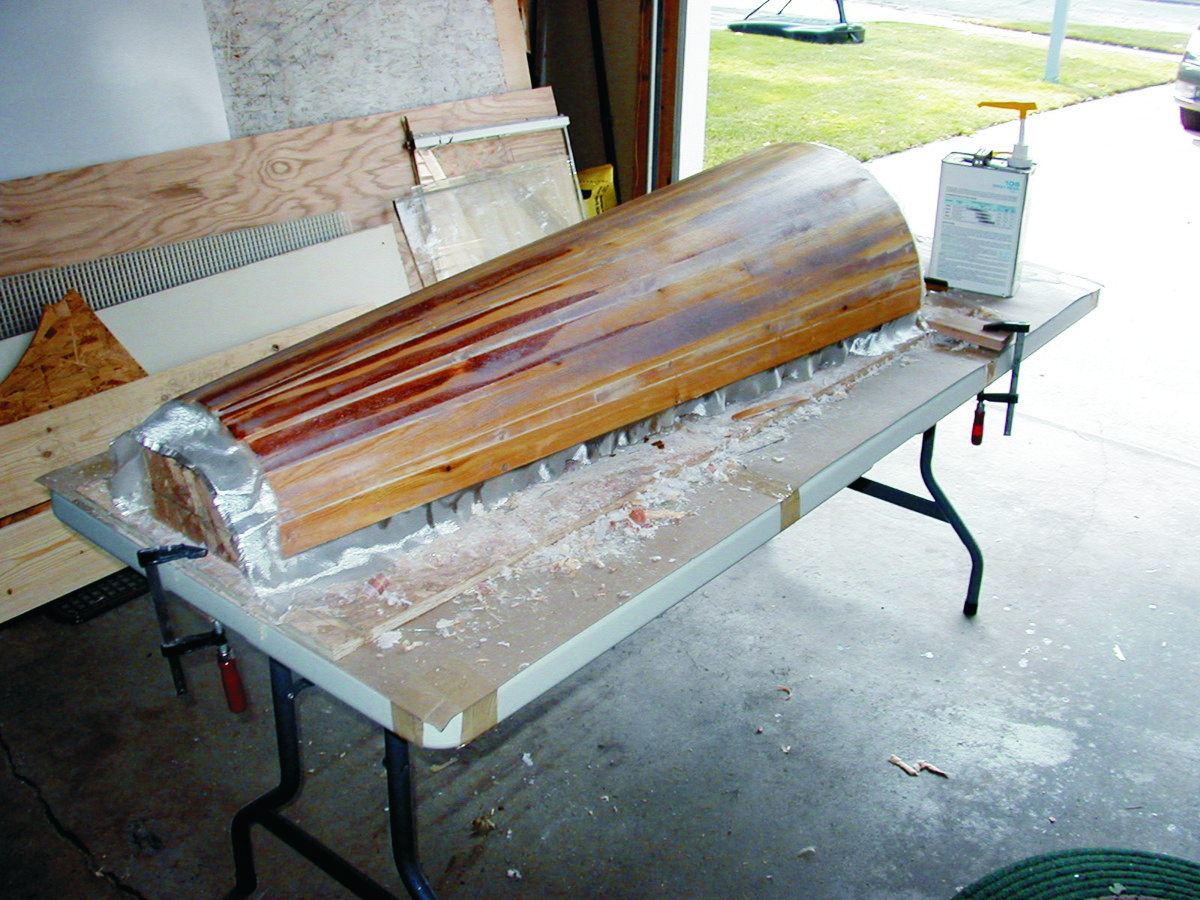
Strip Planking the Tower
Our lighthouse towers were made with wood strips resawn from 2″×10″ construction lumber, which yielded strips 3 8″ thick by 1½” wide. These were eventually tapered on the table saw so we would spend less time fitting individual planks.
The planks were temporarily attached to the mold frames with 18-gauge brads driven in with a pneumatic brad gun operating with low air pressure. This assured that the brads would remain proud of the surface for easy removal after the glue holding the planks together cured.
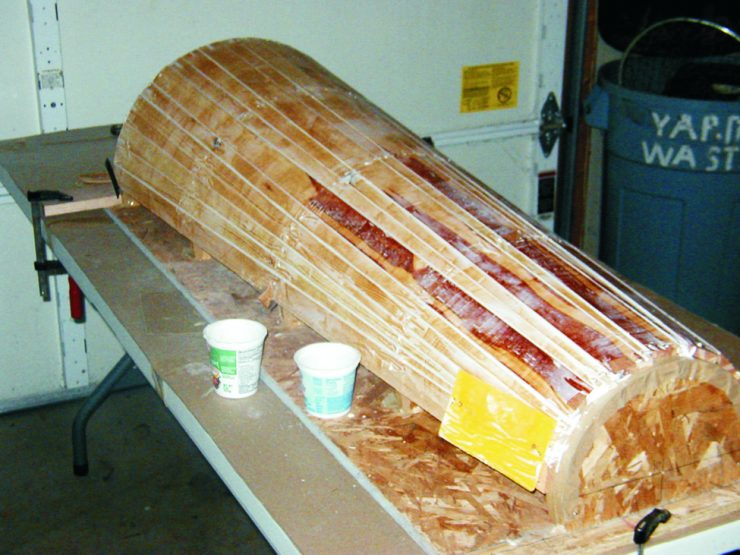
We initially attached all of our planks to the mold without glue and intentionally left small gaps between planks. This made the planking process go quickly. The gaps between planks were filled with WEST SYSTEM epoxy thickened with low-density filler. Once cured, the brad nails were removed and the planking was faired with a low angle block plane and a hard sanding block with 60-grit sandpaper. Low spots were filled in with epoxy thickened with low-density filler. I used 410 Microlight® on one lighthouse and 407 Low-Density Filler on the other. The outside of the tower was covered with one layer of 4 oz fiberglass cloth.
Once the epoxy/fiberglass cured, the tower half was removed from the mold and the inside of the planking was sealed in epoxy and reinforced with a few bands of unidirectional fiberglass tape that were applied across the width to strengthen the laminate and hold the shape until the other tower half was built.
Finishing the Lighthouse
We painted the insides of the tower halves with a latex primer, which allowed us to apply the paint while the epoxy was partially cured. White paint reflects light from a single low voltage light inside the tower. This, in turn, illuminates the etched glass windows that were attached inside the tower with a flexible silicone sealant.

Eventually, the two halves were glued together and the seams were glassed over with a layer of 4 oz fiberglass cloth and epoxy. The seams were faired with epoxy thickened with low-density filler.
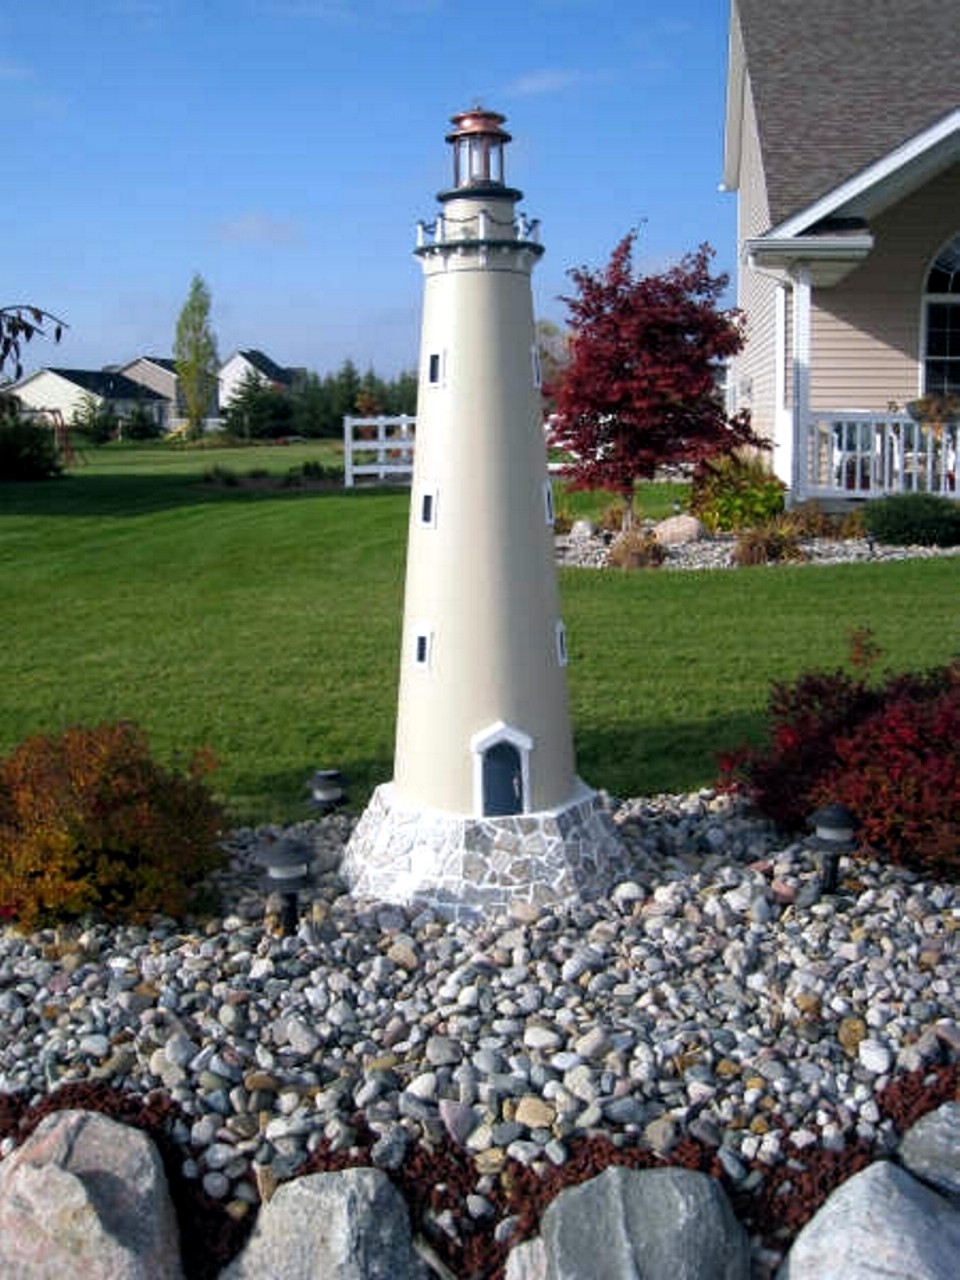
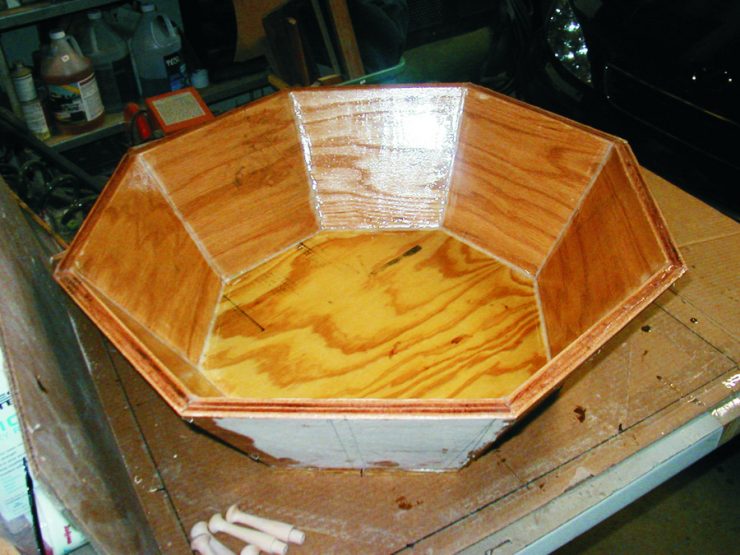
The base of the lighthouse was made of ¾” AB grade exterior plywood. Outside surfaces and glued seams were glassed over with a layer of 6 oz fiberglass and epoxy. Inside surfaces were sealed with two coats of epoxy. 879 Release Fabric was applied over the fiberglassed exterior to minimize surface prep later when I planned to glue on pieces of quartzite flagstone for a decorative effect. The flagstone was glued in place with epoxy thickened with 406 Colloidal Silica and dry thin-set mortar. We filled the seams between stone slabs with the colloidal silica/dry thin-set powder mix to eliminate maintenance on at least that part of the lighthouse. The color of the epoxy grout can be modified by choosing a dry grout mix with the color of your liking. As the last step, we sprinkled dry bright white thin-set powder over the epoxy while it was still uncured. This leaves the grout seams looking uniformly white and appealing. The excess powder was brushed away with a stiff-bristled brush after the epoxy cured. Burying the uncured epoxy grout with the thin-set powder provides UV protection that will last many years.
The window and door trim and baluster support for the catwalk at the top of the tower were made with scraps of 5 lb density foam, but they could just as well have been made with stable softwoods like cedar or redwood. The trim was glued on with G/5® Five-Minute Adhesive thickened with 403 Microfibers.
The light at the top of the tower was purchased at the local home building center. It is a solar-powered lamp intended for use as a yard accent light mounted on top of a post. We considered purchasing a light kit online that rotates the light and flashes, but we thought better of it after considering the neighbors.
The lighting inside the tower is a low voltage light that is spliced into the existing circuit for accent lighting in the yard.
The door at the base of the tower, which allows access to service the light, was cut from the original strip planked laminate. The edges were sealed with a couple of coats of epoxy. The door is held in place with industrial Velcro mounted on the back of the door and on tabs that project from the inside edges of the doorway. The door handle is made from a very small stainless steel rope cleat.
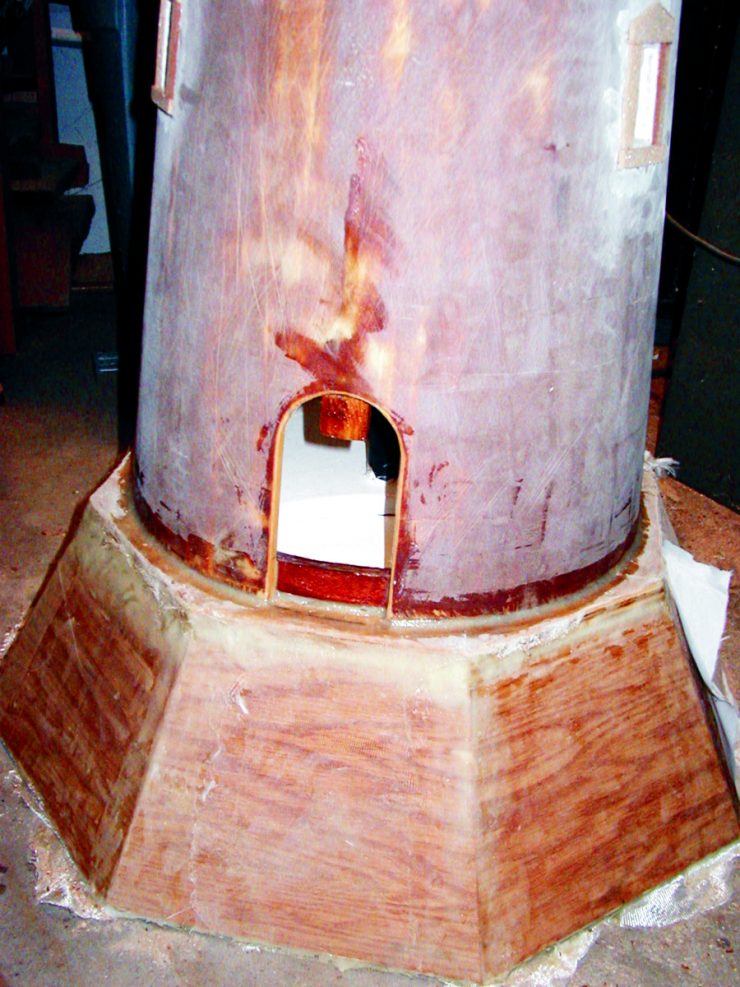
The bottom of the eight-sided tower base was covered with a piece of ½” plywood that had several drain holes incorporated around the edges. It received three coats of epoxy and special attention was paid to sealing the edges of the drain holes. After it was glued in place, the bottom was fiberglassed over with 6 oz cloth. The base was eventually filled with river gravel to provide ballast so the lighthouse would stand up to high winds and to foil half-hearted attempts by vandals to remove it from the yard. We debated anchoring the lighthouse with screw-in anchors often used to secure children’s playground equipment but opted for this easier but possibly less secure method instead.

We put a bit of detail into the catwalk support, balusters, and chain railing surrounding the base of the main light to give it some personal flair. People go to great lengths to build scale models of boats and planes, but neighbors rarely see them because they are usually stored away in a showcase. If you have a favorite lighthouse, you can make an exact scaled model of it down to the smallest detail and showcase it in your front yard.