The Joy of Six10
Spring 2019

GET STARTED
FREE PRINT & DIGITAL EDITIONS
Spring 2019
Meade Gougeon was excited in 2008. “I’m using Six10 for everything!” he said. He was working on his sailing canoe in Florida. In every phone conversation we had, he seemed to find a new use for Six10, “… even for composite layups because of its ‘shear thinning’,” a phrase new to me.
In May of 2018, a perfect application came along for Six10—the teak gunwales capping the plywood endgrain on my prototype Clam Girl.
Why teak? After sanding it as smooth as you want, it requires no finish coating. No varnish, paint, lacquer, epoxy—nothing. You’re done. You’ll have a non-slip surface that’s a tactile pleasure. It’s as dimensionally stable as Honduran Mahogany “pattern” lumber and is uniquely aromatic when worked.
But teak is heavy and costly. It’s said to quickly dull tools and has a reputation for resisting glue.
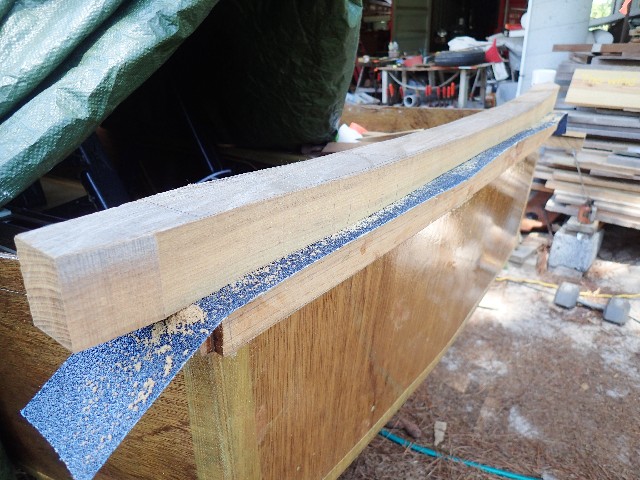
When I epoxy it, I am cognizant of its oiliness and reputation. So far, though, going back to 1980, careful preparation has done well for me. With rasps or 36-grit paper across the grain, I roughen both surfaces. I want plenty of “tooth” for the epoxy to grab. Next, I thoroughly wipe it and scrub it with a solvent, usually alcohol, before applying glue to both pieces. All the teak in the photos had this preparation.
The stern pieces came first—following tradition—overlapped by the sides, then the bow piece overlapped them. Clam Girl’s rails were to be continuous with no jogs or interruptions around her hull’s upper edge of the transom, teak gunwales, and blunt bow.
Less traditional was putting the teak gunwales on the outside of her planking. A sailor can comfortably lean back on the inside edge of the hull while gaining the most sailing stability from their weight.
The transom is complicated because it’s curved in plan and body plan views. I cut the four ¾”-thick pieces below the transom’s cap to the body plan curve on a bandsaw, and clamped them to bend around the transom’s plan form.
The first full-length parts, covering the plywood endgrain, were the inner wales, a rabbeted “L” shaped section, 5/8″ by 1½”. The rabbet covers the end grain of the plywood sides. The small side of the “L” is flush with the inside of the plywood. Epoxying these pieces was the real test.
Preparation is key. Although Six10 is simpler to use, I gather my usual gear of spreaders, putty knives, disposable brushes, 804 Reusable Mixing Sticks, rags and paper towels, vinegar, and alcohol. I find all the clamps and clamping blocks I’ll need, and check them for old epoxy on the bars.
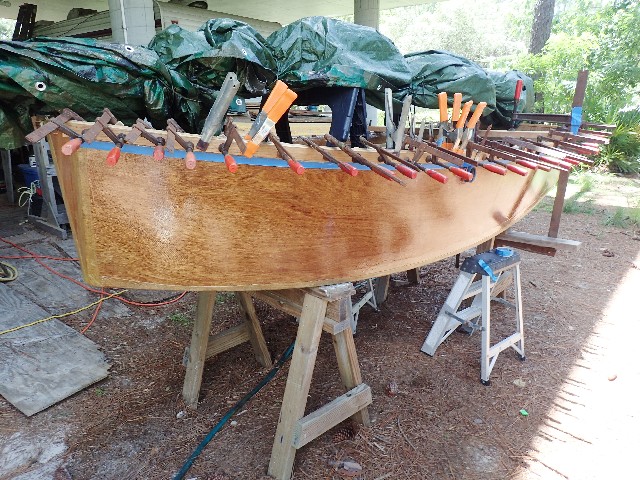
A practice dry run, clamping everything without epoxy, is wise. To ensure the sheer didn’t get whacked in plan view or lose symmetry, I clamped pieces to both sides for the dry and wet sequences, although epoxying one side at a time.
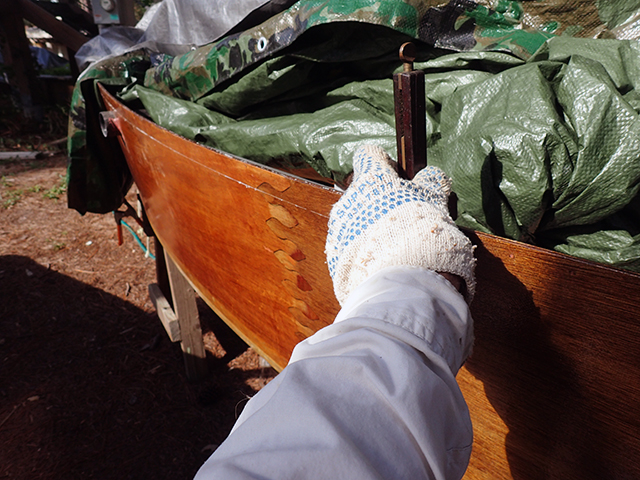
To squeeze the rabbeted, compound-bent teak down to the sheer, a 12″-reach bar clamp on each side did it, catching an athwartship clamping board for even pressure.
Yes, Six10’s 600 Static Mixer fascinated me, the swirling resin and hardener coming from the nozzle ready to use.
In spite of the heat, there was no problem with Six10 hardening too quickly. I was not rushed. After those two days, I felt like tap dancing. The joy of Six10 had struck me. The job had been done alone, relatively easily, one side per day, at 90°F with mid 70s dew points.
The only fly in the goop was that I should’ve gotten extra static mixers because it seemed there would often be part of a tube left. But, Bruce Niederer reminded me that, after a static mixer is used, Six10 still comes out of the tube correctly proportioned, so it can be easily mixed by hand.
After the long rabbeted pieces were glued to the hull, capping the plywood endgrain, the next layer was ¾”-thick. The last long pieces were the ½”-thick outer wales, epoxied after fairing the inner layer.

Only the bow piece’s mating surfaces with the hull were shaped for epoxying. Its outer form remained a block of 8/4 teak, for better clamping and eventual shaping, which is often easier after a piece is firmly on the boat. This follows the dictum, too, of trimming flush when you can, rather than attempting to glue an exact, finished shape or dimension.
With the boat upside down, I cut the bevel on the underside of the rails with a small circular saw.
Fairing and shaping is all fun. The evocative teak fragrance, the variety of hand tools, the feeling of completion.
I’d written to Tom Pawlak, “Just stuck the last tricky piece of teak on Clam Girl’s gunwale. Six10 to the rescue. I’ve begun to love that stuff.”
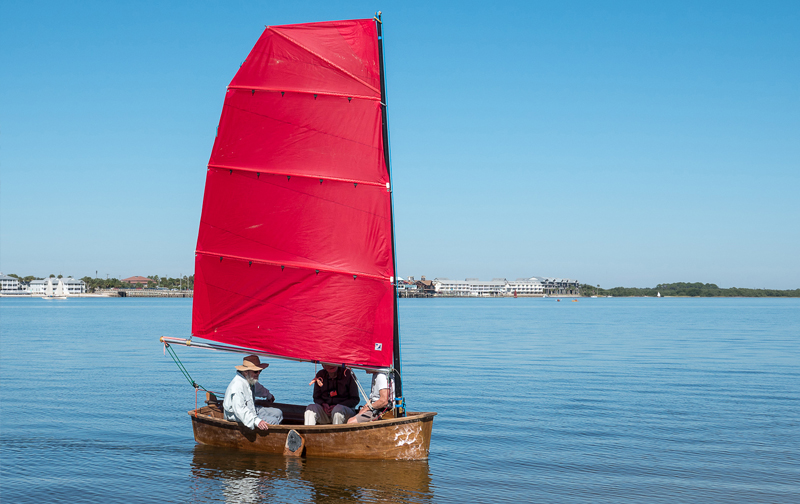
Clam Girl’s purpose is an adult’s learn-to-sail skiff. I drew and modeled her in 2013.
“Like a big Optimist Dinghy,” I’d written, “but, for one or two large adults. Easy rig, and leeboards for Cedar Keys’ shallows.”
She’s utilitarian, too, a low-impact boat for fishing, birding, and sailing with friends or family. Her old cousin is the traditional Gulf coast, “net skiff,” which was often powered by a small “kicker” engine on either end. Now, a brushless electric motor might be a good choice.
Meade Gougeon met naval architect JF Bedard in November of 2016. Meade suggested Bedard could help digitize Clam Girl’s plans. I asked mechanical engineer Simon Lewandowski to build Jan Gougeon’s cone clutch notion of leeboard mounts. Clam Girl is the result of the collaboration of Bedard, Lewandowski, and me.
Adults can learn to sail almost as quickly as children if they’re learning in boats that fit them as well as kids fit in eight-foot prams. Adults, too, need the same comfort with the effects of their mass on a boat’s trim and balance. And, like a rig for kids, an adult’s learning rig should be simple and efficient. The boat must have room for a passenger, and be stable enough to stand and reef. She should be light enough for one to pull ashore.
She is meant to be user-friendly, certainly not harder than driving a rental car from an airport. And, I’ve tried to eliminate impediments to non-sailing, older boaters.

Clam Girl’s rig is modern, powerful, and controllable with three reefs. The big sail must slide up and down easily, with the sail at nearly any angle to the wind. Thus, her mast has hoops instead of a groove or track. Except for the hoops and sailcloth, the form of her rig would not look out of place on a modern racer.
The lightweight, red sailcloth is Contender’s Stormlite. The sailcloth’s “hand,” is relatively soft, more like cotton in jeans, rather than crinkly high tech, racing sails. Stormlite is often mistaken for rip-stop nylon but it is polyester, common in cruising sails because it is relatively non-stretch.
Sailmaker: Tom Barry, Sail Technologies, 1354 20th St N., St Petersburg FL 33713 727-823-1968
Editor’s note; Hugh Horton is a brilliant boatbuilder and a long-time friend of Gougeon Brothers, Inc. He’s written several articles for Epoxyworks.


