Strip Planking SPARKS
Spring 2011

GET STARTED
FREE PRINT & DIGITAL EDITIONS
Spring 2011
In this strip planking series, we will take a look at how we have used WEST SYSTEM® Epoxy to utilize less than ideal wood and look at ways of building boats with wood that will be low maintenance and age gracefully. Since working safely with epoxy has allowed me to have a long career using it, you will hear a lot about safety.
Sparks is a science project. A professional builder working for a client has the responsibility of delivering the boat on time and within budget with no surprises so we generally stick to what worked last time. But as a science project, questioning the way things are usually done, pushing the limits of the materials, and then taking responsibility becomes the objective. Because failure is anticipated with any experiment, testing is an important part of the project and has been a whole lot of fun with few surprises, mostly pleasant.
In this series, we will take a look at some of these questions and how we have used WEST SYSTEM® Epoxy to utilize less than ideal wood and look at ways of building boats with wood that will be low maintenance and age gracefully. Since working safely with epoxy has allowed me to have a long career using it, you will hear a lot about safety.
When we look at the future of wooden boatbuilding, the major limiting factor will be the availability of suitable wood. We won’t stop building wooden boats so the challenge is to make the best of, and perhaps improve on, what we have to work with.
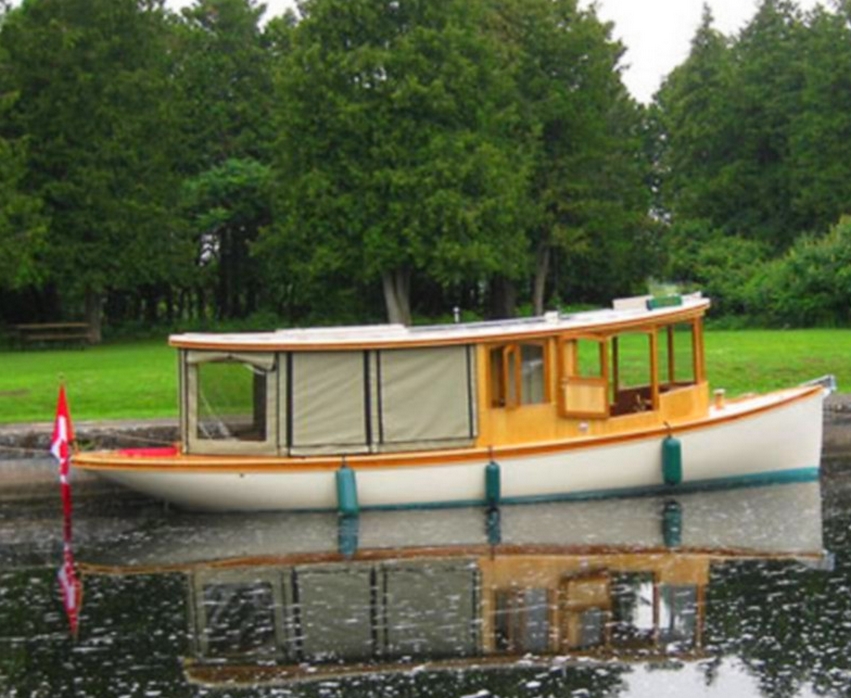
Strip-plank/epoxy is the ideal technique for planking Sparks. It adapted well to the complex fantail hull shape and could utilize local white cedar and we have been experimenting with the technique for about 35 years.
The most liberating feature of this building method is that the wood is simply a core material. The wood fibers do contribute to stiffness but the basic purpose of the core is to maintain consistent space between the two fiberglass/epoxy layers. When we look at it this way, the core can be anything as long as the glass/epoxy will bond to it and it is dense enough not to cave in under the anticipated compression load and be good in shear. Because the moisture content of the wood will not change and the air is excluded, traditional planking characteristics such as rot resistance are not an issue.
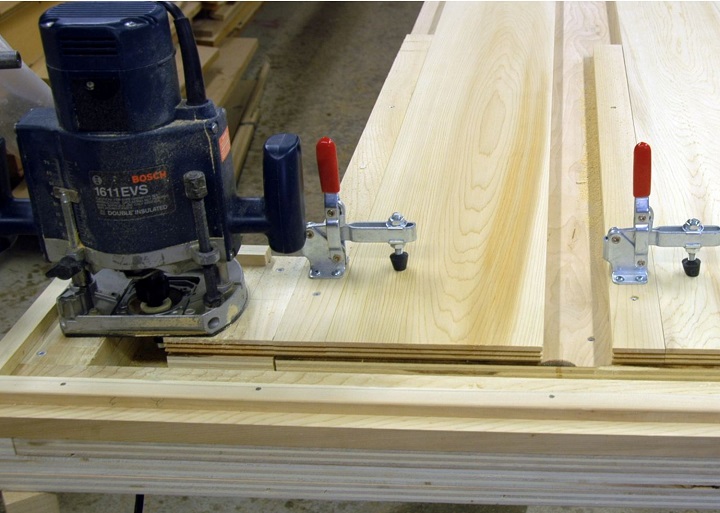
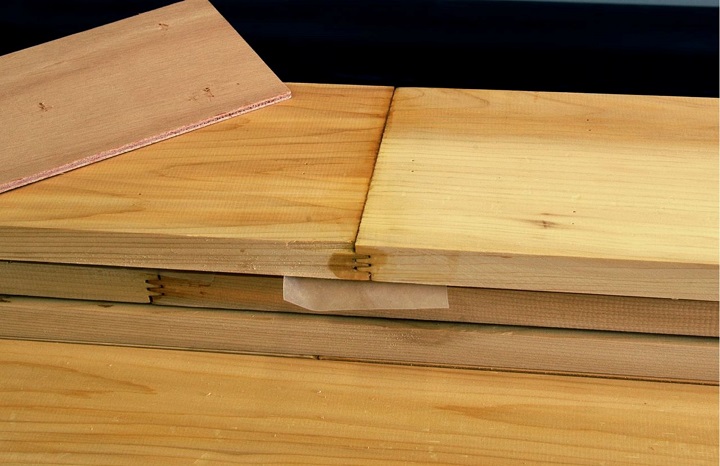
With this principle in mind, making long planks out of shortboards did not require a structural joint; this suggested easy-to-machine finger joints as an attractive option. A few simple experiments and destructive tests proved the joint to be more than satisfactory.
Traditionally, the accepted shape for strip planks has been square in section. I assume this began with edge-nailing dry joints on a hull that would be painted. This makes sense because it is easier to keep short nails centered in both planks and the narrow width minimized the amount each joint would expand and contract. Since our planks will be edge-glued and not move against each other, does it matter how wide the planks will be? Our choice was based on the maximum width that would handle the bends dry and yet be the best cut from the available raw wood.
Sparks planking is ¾” thick × 2 ¾” wide eastern white cedar dried slowly in a simple dehumidifier kiln to 6% moisture content, then allowed to stabilize in the shop at about 8%. We finger-jointed 8’–10′ long 1″ × 6″ planks together to make full-length planks 32′ to 38′ long. Then we dressed them to clean up the glue joint, split them into two planks and machined a half radii bead and cove on the edges. Planking the hull went fast using full-length planks; it was easy to stagger the joints and the lines stayed fair.

We planked the hull over a laminated Douglas fir stem, keelson, and sheer clamp. The sheer clamp, which extends around the fantail, is covered with plastic tape to keep the planks from sticking to it. After sanding and applying the glass/epoxy to the inside of the hull, we glued the sheer clamp back in over the top of the glass. This avoided all the time and complication of fitting the glass around the sheer clamp and creating a theoretical weak area in the most vulnerable part of the hull.
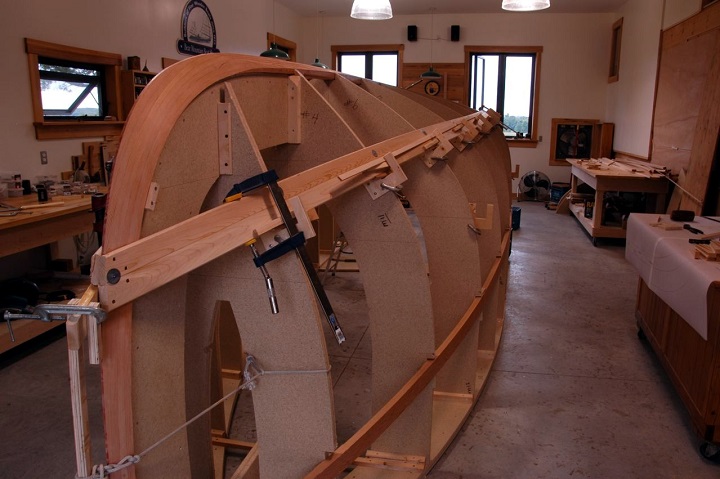
We began planking about halfway between the sheer and keel where the plank would lay in the most relaxed position at both stem and fantail. This split the difference that comes with using parallel planks on a shape that is wider in the middle. This way the edge-set, or sideways bending, in the planks was not extreme at the centerline or the sheer. Once started, we proceeded to plank in both directions at the same time.
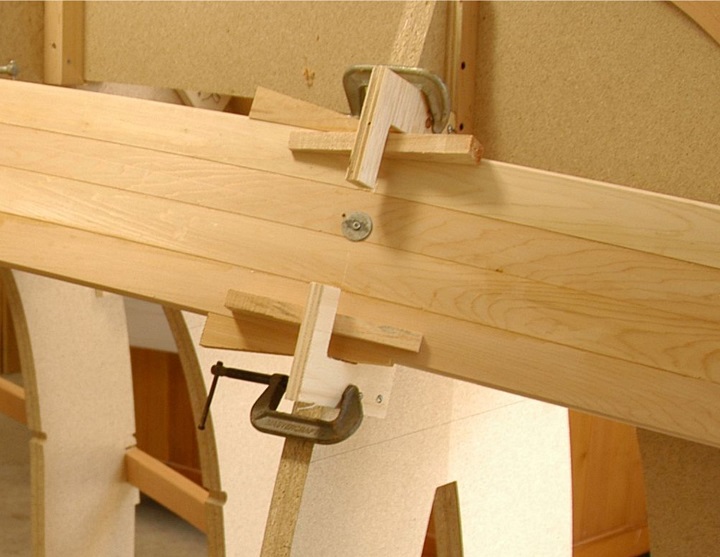
Most of the pressure holding the plank to the mold and edge to edge is controlled with simple jigs and wedges. The ‘C’ shaped plywood jig has two screws that protrude slightly through the plywood. When pressure is applied with the small clamps, the end of the screws bite into the mold to keep it from twisting when pressure is applied by the wedges. Made from scrap wood, the tooling cost is low, they apply controlled clamping pressure where it is needed and they are fast to setup and reset.
We applied mixed 105 Resin®/207 Special Clear Hardener thickened with 403 Microfibers to the cove with an acid brush. While there are more aggressive ways of getting the glue onto the plank, the acid brush puts just the right amount of glue in the right place. The cure speed of the 105/207 was ideal as it allowed sufficient working time to position clamps yet was fast enough to glue up two sets a day.
We make a habit of immediately using a dry cloth to remove any stray glue that gets on the gloves. This interruption controls the contamination at the source so it doesn’t spread and is a constant reminder to find ways of keeping your hands clean in the first place.
On softwood and end grain, it is wise to do a pre-coat with un-thickened epoxy to reduce the danger of the thirsty wood drawing all the epoxy out of the thickened mixture. To do this in one step, we anticipated how much epoxy would be absorbed by the wood and mixed the glue to a consistency that would allow for this to happen and leave the right amount of epoxy in the joint. By anticipating the amount of glue that will be absorbed by the wood plus enough to occupy to the space in the joint, there is very little clean-up time, no glue to sand off later and you won’t inadvertently sit on your bench and find yourself stuck in stray glue.
Most importantly, the time you are in potential contact with uncured epoxy is kept to a functional minimum. The bonus for me is that my helpers don’t get epoxy on their gloves so my clamps stay clean.
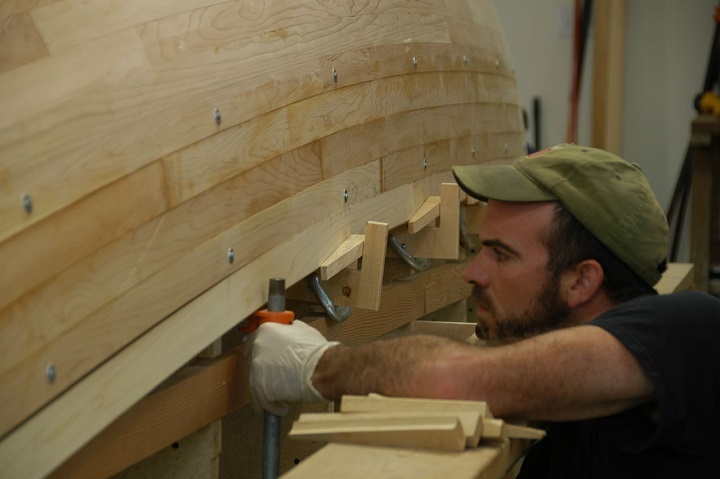
We used screws and fender washers to hold the planks only if the hull started to come away from the mold. As the edge-set increased at the sheer and centerline, considerable pressure was needed to dry bend the plank into place. Our wedge planking jigs would pull the plank into position but needed the help of bar clamps between the station molds to squeeze out the excess glue; an indication that the joint was pulled tight. In spite of the tension created, there were no glue joint failures in plank edges or finger joints which says something about the tenacity and penetrating ability of WEST SYSTEM Epoxy.
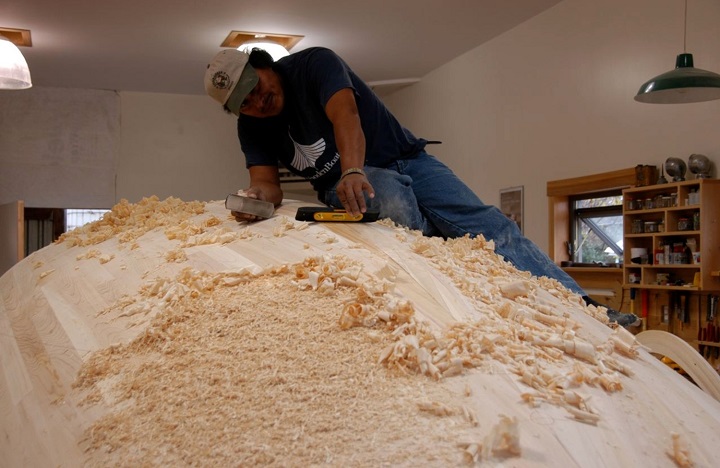
Fairing the planked hull should have been straightforward because the mold was fair the full-length planks meant no hard spots between station molds and the planks were all the same thickness. Going from a series of flat planks to fluid curves should have been a good workout with sharp hand planes except for all the changes in grain direction in the narrow flat grain planks.
The wood we had to work with was one-inch rough, plain sawn which meant that all our planks were flat-grain. We experimented with the angle on the plane irons and found that with a steeper angle, there was less tear-out but the cut was rougher and tear-out was not totally eliminated. While the resulting voids are effectively filled with 410 Microlight® fairing filler, it does mean one more job to take care of. Sanding with the long-board, a common but perhaps unloved fairing tool, was effective though tedious at the shaping stage. As the sander cuts the surface close to being fair, the soft part of the flat-grain cedar sands faster than the hard growth rings. The more you sand, the wavier it gets.
The routine we ended up using was to do about 80% of the shaping with an 80-grit disc on an 8″ low-speed polisher. Turning at low rpm, the soft one-inch foam pad allowed the paper to take the shape of the hull and find the high spots, cutting them off clean. By keeping the paper sharp, working systematically, and not over sanding, the hull was surprisingly fair at this point.
To get the remaining 20%, we used a cabinet scraper to find and take down the remaining high spots. Scrapers are not recommended for use on softwood because they do leave a little fur behind. The stiffness of the blade bending to the shape of the hull concentrates the greatest pressure on any high spot and sheers it down to the surrounding area. To remove the fuzz, we moistened the surface with water to raise the bruised grain then sanded just enough to remove it with 120-grit sandpaper on a file-board. Keeping the paper sharp helped to keep it cutting consistently. Dull paper gets into a polishing mode and eats into the soft part of the cedar, creating waves. The file board will give you a good feel for what is happening underneath and helps to identify high places to be attended to with the scraper. This routine was repeated several times before we were convinced that it was as close as we could get to perfect. When you get this close, the glue lines and changing color of the wood confuse your eye; a good way to check is to close your eyes and let the palms of your hands tell you what they feel.
In retrospect, we could have saved significant shaping time by using imported edge-grain western red cedar, but in the interest of being as green as possible, exploring the use of locally grown wood was a good decision. We do know that it is possible to use simple techniques and epoxy to adapt to the inferior wood that will be available to boat builders in the future.
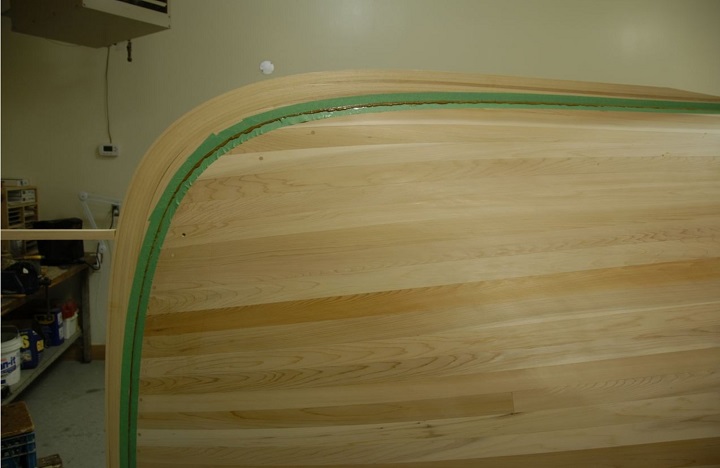
With the hull fair, the outside stem, keel, and skeg assembly were dry fit to the hull. The stem was glued on before glassing; the keel and skeg were installed after the glass in order to have the glass fibers running across the centerline and continuously from sheer to sheer.
Before applying the glue, a 105/207 mix fortified with 403 Microfibers and sanding dust, the edges were taped off. Going from a good fit to a perfect fit on a curved piece of this size is a big step.
The tape keeps the extra glue isolated. After scraping it off level, the tape is removed leaving a clean joint. The excess glue is just the thickness of the tape at the joint, leaving very little to sand. After the glue cured, the joint was shaped with 410 Microlight to make it easy for the glass to follow the change in direction. The leading edge of the stem is rounded over to allow each layer of glass to wrap around to the leading edge to be overlapped by the next layer from the other side. After glassing, this edge will be squared up with filler to fit the stainless steel stem band.
We shamelessly skipped perfect joinery by using lots of Thick glue to hide our sins. If you are filling space in a joint, it is important to over fill the joint so that glue is squeezed out. This will guarantee that the joint is full and there is no air trapped inside; it is difficult and messy to pack glue into a void without trapping air.
We are now ready to apply the fiberglass/epoxy covering to the outside of our hull. In the next article, we will look at why we chose multiple layers of glass cloth over the strip-planked hull rather than layers of veneer. Based on the testing performed by the Gougeon Test Lab, we will see how these numbers translated into our lay-up schedule and if we got it right. There are easy ways and hard ways to apply fiberglass and epoxy. We are lazy but fussy; you will see how to get excellent results with the least amount of contact with dust, chemicals, and noise.
In future issues, we will look at constructing a laminated skeg that won’t split, turning the hull in a custom jig, making the most of plywood, simple vacuum bagging techniques, no-sand penetrating epoxy sealer as well as endless ‘cheap tricks.’
See Lesson 2 of the SPARKS series—Fiberglassing a Strip-Planked Boat
See Lesson 3 of the SPARKS series—Skeg Construction
See Lesson 4 of the SPARKS series—Sealing and Priming
Related article: Ted’s Jewel Box
Visit www.bearmountainboats.com for details on the building of the Bear Mountain 30 Hybrid Electric Launch. Bear Mountain offers canoe and kayak kits, plans, books, instructions, materials and a great new DVD on stripper canoe building with TV star Nick Offerman.


