Stringer Repairs in Fiberglass Boats
Spring 1998

GET STARTED
FREE PRINT & DIGITAL EDITIONS
Spring 1998
Fixing damaged or delaminated stringers is one of the most common repairs associated with fiberglass boats. The usual causes of stringer failure are disintegration of the stringer core material, impact damage from slamming and grounding, and fatigue from normal use. Although each repair situation has its own unique problems, the following techniques are fundamental to stringer repair. These guidelines will help you repair almost any damaged stringer. Remember, stringers are structural support members. As you repair or replace damaged material, use your best workmanship.
Stringers are support members bonded into boat hulls, usually oriented parallel to the long axis of a boat hull. They are there for a variety of reasons. They stiffen unsupported flat hull sections, they support cockpit and cabin soles, and they distribute high load concentrations from engines and other mechanical systems. Often, they perform several of these functions simultaneously.
In fiberglass boats, you will find that most often, stringers are composed of a core material overlaid with a fiberglass skin. The skin usually extends a few inches on either side of the stringer. This skin extension, or tabbing, ties the stringer to the hull or bulkheads and spreads the load of the stringer over a larger area. Tabbing may be a simple piece of glass tape across the stringer/hull joint, or an integral structural part of the stringer. Some cores are structural, or active, and some are inactive, used primarily to provide a form for a structural fiberglass skin.
With active core stringers (usually solid wood or pressure-treated plywood), the core material provides the stringer with most of its structural strength. Generally, the more dense the core material (like wood or plywood), the more of the load it is expected to carry. The fiberglass skin covering an active core is primarily used to protect the wood and to attach it to the hull. It is generally thinner than the skin on inactive core. When you replace structural cores, you have to use proper scarf bevels or other proper means of piecing the new core into the old.
Occasionally, you will find a material that at first glance appears to be plywood, but on closer examination, you will find that all the veneers are oriented in the same direction. You cannot repair this unidirectional material with plywood. Plywood has half the grain running at right angles to the face veneer. It does not have the same strength as unidirectional material. A common example of unidirectional plywood material is called laminated veneer lumber (LVL).
Low-density core material is non-structural, or inactive. A low-density core depends on the fiberglass skin to carry the loads. Inactive cores are made of low-density foam, cardboard tube, or in the case of molded stringers, no core at all. Occasionally, stringers are pre-built in a mold and tabbed in after the hull is built. This type of stringer has no core material, just fairly heavy fiberglass skins to provide the structural strength.
Before you start any repair, it is a good idea to know what you are getting into. Looking at the suspected area of damage may be as easy as opening a hatch, but don’t count on it. Hull liners are common and usually fastened to the very stringers you are trying to fix. It is also difficult to see under engines, water tanks, and the like. You may have to cut access holes in the hull liner or cabin sole to see the area in question. Fortunately, you can purchase access covers to fill the hole.
Once you have resigned yourself to cutting holes in your boat, use a mirror and flashlight and look for the following:
Look for obvious fractures in the stringer. Also, look for delamination of tabbing and core away from the impact point. Inspect the tabbing where the stringer attaches to a bulkhead or transom.
Wood cores rot from water leaking around fasteners and from water collecting where the fiberglass skin has delaminated. You can often tap the suspected area of stringer with a small hammer. The impact of the hammer has a definite “dead” sound where the core is not firmly attached to the fiberglass.
For small areas of rot, dry and inject epoxy. While this is a common method of wood stringer repair, it is not nearly as effective as replacing the damaged area with wood. Without removing the skin from the wood, it is often difficult to determine the extent of the rot. Also, the degree of penetration of the injected epoxy cannot be accurately determined, so you do not know how good your repair is. If, however, you choose to use this method, we recommend the following procedure:
For more serious repairs that involve removing and replacing stringer material, try to duplicate the original construction. Unless the damage is directly attributable to an undersized stringer, assume that the stringers were structurally adequate and properly located when the boat was originally built. Making a repair that is significantly stronger than the original design can cause hard spots, which may distort or crack the hull shell. A repair that is lighter than the original may fail prematurely. When removing and replacing stringer material, observe the following guidelines:
Where the stringer is supporting a cockpit, or cabin sole, or engine, the height of the repaired or replaced stringer must be the same as the original. If not, you will have a great deal of difficulty reinstalling the equipment.
Use wood where wood was used, plywood for plywood, foam for foam, etc. Attempt to duplicate the species of wood used in the stringer as well as the dimensions of the wood. You can use a more cavalier approach to replacing low-density core materials than you can for active cores.
On stringers with an inactive core or molded stringers (with no core), watch for variations in the skin thickness. Occasionally, the top skin of the stringer is thicker than the side skins. This “cap” can significantly increase the strength and stiffness of the stringer. If the extra thickness is present, try to duplicate it.
This is especially true of engine stringers or stringers that support other equipment.
If major stringer replacement is necessary, be sure to support the hull well so the original shape is maintained. Stringers that are removed or have broken away from the hull may allow parts of the hull to sag.
Often damage to the core of a stringer is limited to a small section, or the stringer may be too difficult to remove. You may be able to replace only the damaged portion, restoring the strength of the stringer while leaving it in position in the boat.
Because the wood in wood-cored stringers is structural, any repairs you make to it have to be joined with a proper scarf. If you are replacing a section of plywood stringer, use a minimum of an 8-to-1 scarf bevel. For a ¾”-thick piece of plywood, this equates to a 6″ long bevel. When repairing hardwood or highly loaded core areas, use a longer (12-to-1) scarf angle. When cutting scarfs, keep in mind, the longer the scarf angle, the greater the joint surface area, the stronger the joint. All joints in fiberglass skins should have a 12-to-1 bevel or overlap.
Forming the scarf bevel on the new piece of wood is fairly easy. You can use typical cutting tools with the piece of wood supported on a workbench. Cutting the matching bevel on the wood that remains in the boat is not as easy. You will need to be creative. You will use chisels, disc grinders, hand planes, hand saws, and anything else you can think of to cut wood and fiberglass. The surface of the bevel does not have to be perfect. The epoxy that you use to glue the joint is an excellent gap filler.
Completely replacing a stringer is often easier than replacing a section. For example, engine stringers commonly run from the transom to a bulkhead. They may not run the entire length of the boat. Complete replacement of the damaged stringer may be much easier than attempting to replace a section of it.
After repairing or replacing core material, it is necessary to replace the fiberglass skin. To duplicate the strength of the original skin it is important to duplicate the thickness of the original skin and to properly prepare the surfaces for a good bond.
Measure the thickness of the skin on the original stringer. Keep in mind, the top skin may be thicker than the sides and the tabbing. Refer to the chart to determine the number of layers of a particular weight fabric necessary to achieve the thickness required.
Cut the necessary number of strips of fiberglass fabric to the length of the stringer. The first piece should be large enough to extend as far as the original tabbing from each side of the stringer. Cut each of the remaining pieces 1″ (½” each side) narrower than the previous one. When laying out the layers of fabric, do not allow the tabbing edges to end at the same place. For stress reduction, step the edges of the fabric to create a tapered edge. If you fail to do this, all the load the stringer is carrying will be transferred to the line on the hull surface where the tabbing ends, and the hull may crack at that point. If, however, you step the tabbing edges, the load from the stringer is gradually distributed to the hull. Where stringers end at a bulkhead or the transom, wrap the glass tabbing onto them in the same manner.
WEST SYSTEM 738 Fabric is ideal for stringer repairs. It yields about 0.040″ per layer in a hand lamination, so you will need fewer layers of cloth to achieve the necessary thickness for most stringers. Fewer layers of fabric translate into less labor to install them. There is, however, nothing wrong with using a lighter fabric. It will require more layers per unit of laminate thickness and thus more time to install it. Structurally, there is little difference between 5 layers of 24 oz. fabric or 10 layers of 12 oz. fabric.
Surface preparation for bonding is a critical part of any repair. The bilge of a boat can be very difficult to prepare for bonding, because it is likely to be contaminated (especially around engines) and many areas may be inaccessible.
Use a degreaser or detergents in areas that may be contaminated with gasoline or oil residue before wiping with solvent. Use a stiff brush on heavily textured surfaces like roving. Remove any traces of contamination by wiping the surface with solvent and drying with paper towels before the solvent evaporates.
Use a 50-grit grinding disc to prepare the surface. 50-grit cuts quickly with little heat build-up. If gelcoat is present and it is soundly attached, you do not need to remove it. Grind it to create a fresh, no-gloss surface. Brush the area free of dust or loose material. Use a wire brush to abrade heavily textured surfaces. The bonding surface should appear dull. A 12-to-1 bevel must be ground into any existing fiberglass left on a stringer. The new fiberglass will run onto this bevel, attaching the new material to the original material. A 12-to-1 bevel provides adequate surface area for the transfer of loads across the repair area. For example, if the skin on the original portion of the stringer is ¼” thick, the bevel needs to be 12 x ¼” or 3″ wide.
It is difficult to form fiberglass cloth around a sharp 90° bend. You have to create radius at the top edges of the cores and fillet at the core/hull and core/bulkhead inside corners—a 3/8 – ½” radius is a good starting place.
Note: The final two or three coats may be tinted with WEST SYSTEM 501 (white), 502 (black), or 503 (gray) pigment or with 420 Aluminum Powder (gray). If you desire a smoother cosmetic finish, the lay-up may be faired and finished.
When your repair is complete, you will have a little additional finishing work to do. Fiberglass repairs inevitably have some sharp edges or sharp “hairs” sticking out. These make cleaning the bilge difficult if not downright dangerous. It is a good idea to use some 80-grit sand paper to eliminate the imperfections that might cut you.
You have a couple of options for final finishing:
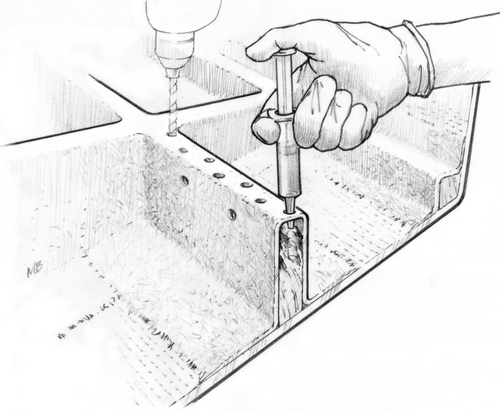
As always, when you’re installing any hardware, use epoxy to seal all holes you drill. If you neglect this step, you will likely have another repair job in a few years when the core material rots.


