Specialty Tools for Fairing
Spring 1995

GET STARTED
FREE PRINT & DIGITAL EDITIONS
Spring 1995
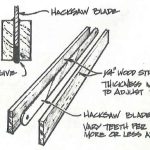
My son Matt and I recently built a small stitch-and-glue boat. While fairing the bottom we discovered that hacksaw blades can be modified and used for fairing.
The buildup of fiberglass tape along the chine and keel had caused a low spot in the hull all along the edge of the fiberglass buildup. Filling the low spot with low-density filler was easy, but sanding the cured epoxy with sanding boards was slow work. Experimenting with a new hacksaw blade, we found it easily cut through the low-density filler and occasional high spots in the fiberglass.
The only problem was the blade was somewhat flexible and difficult to hang on to. To eliminate this shortcoming, we clamped the hacksaw blade between two ¼”-thick wooden strips. The result was a fairing tool that exceeded our expectations. The wooden strips added the required stiffness, yet were flexible enough to let the blade bend slightly with the hull. We rounded the corners of the wooden strips with sandpaper, making the tool comfortable to hang on to.
The first tools were held together with small wood screws. More recent versions have been held together with our G/5 Five Minute Adhesive. The key is to keep the glue out of the saw teeth while bonding the wooden strips to the saw blade. For fairing surfaces with lots of curve, a more flexible version can be made by adding thinner strips of wood to each side of the hacksaw blade. If it’s still too stiff, a few strokes of a hand plane on each side will fine tune flexibility.
It may be possible to use industrial hacksaw blades without adding wood. For example, power hacksaw blades are made with a thicker saw stock and may be stiff enough for fairing many projects. When doing a lot of fairing, it is helpful to have a variety of these tools, to allow a change of handholds to reduce fatigue.
Just like sandpaper, hacksaw blades offer differing abrasive qualities. A 6 to 10 TPI (teeth per inch) blade will offer good coarse fairing capability. A 16 to 20 TPI blade offers medium fairing capability and the 28 to 32 TPI offers fine fairing capability. Using one of each will reduce sandpaper usage and fairing time. Using quality bi-metal blades will dramatically extend the work life of the tool. Metal cutting band saw blades can also be used to build longer fairing files that will last and last.
To work this modified tool effectively, hold it so the saw teeth are against the surface to be faired. Lean the tool over slightly at a 10° to 20° angle and push the tool across the surface in a direction that is diagonal to the length of the tool. Avoid pushing in a direction parallel to the tool length, because the saw blade will cut a slot in the surface. Think of the modified saw as a file that is used in a diagonal direction to maximize the cut. To determine what works best, experiment with the angle at which you push or pull the tool across the surface.
These tools take a little getting used to, but once you discover the technique, it is easy to duplicate the effective motion. As with sandpaper, it is best to fair the surface in opposing directions on a diagonal. To do this, turn the saw around so the teeth are facing the other direction and repeat the fairing process working in the opposite direction. Fairing in opposing directions will quickly establish a fair surface and help to better maintain fairness.
Long, stiff sanding boards are often used for fairing large hulls and decks. These sanding tools are typically made from resawn lumber or plywood because these materials are stiff, reasonably light, and inexpensive. Ideally, the sanding boards are flexible enough along their length to curve with the hull, yet stiff enough to resist dipping into the low spots in the area being faired.
This kind of sanding board works well on gently curving structures. However, where surfaces become more tightly curved, very little of the sanding board will actually touch the surface. An example of this is near the bow of a boat hull, where the shape changes from gently rounded to tightly curved. Very little of the sandpaper along the length of the board touches in these areas, because the sanding board cannot flex across its width. If the surface is concave, only the edges of the sand paper touch the surface. If the surface is convex, the sanding board touches only in the middle across its width.
Believing that there must be a better sanding tool for fairing this kind of area, we searched through tool catalogs and visited several hardware stores. But no such tool existed. What we needed was a sanding board that was flat and stiff along its length, yet flexible across its width so more of it could contact the surface.
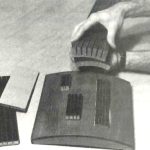
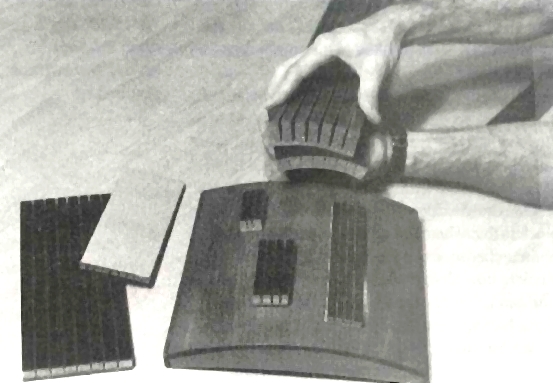
One creative employee decided to make such a tool. His sanding block was made by gluing 3/8″ thick redwood to conveyor belt material. He chose conveyor belt material because it was tough and flexible. He scuffed it up so it would bond well with our epoxy. After the glue cured, saw cuts were made parallel to the length of the redwood on ½” centers. The cuts were just deep enough to pass through the wood but not into the conveyor belt. This resulted in the appropriate sanding board.
This design worked so well that we made many versions of it. By varying the thickness of the wood and the distance between saw cuts, you can adjust the stiffness and edgewise flexibility of the tool.
One drawback to using this kind of sanding block is that when wet-sanding for long periods of time, the wood can swell causing the sanding block to bow along its length. An improved version can be made of two skins of flexible conveyor belting separated by a layer of low-density closed-cell foam core. The 1/16″ thick conveyor belting is held with epoxy to both sides of the foam core, creating a stiff laminate. Like the earlier wooden version, one of the sanding board surfaces has several deep saw cuts parallel to the length of the sanding board, going through the first skin but not into the second. These slits allow the sanding board to conform to concave or convex surfaces across the width of the sanding board while remaining stiff along the length.
We have experimented with various belting materials and core thicknesses to achieve different results for specific jobs. Fairing boards built here range in size from 1″ thick by 6″ wide by 36″ long, to much smaller versions ¼” thick by 1″ wide by 2″ long. A thickness that seems to work well for 1/3 to ½ sheet of sandpaper is ½” thick. It is made up of 3/8″ thick foam core separated by 2 layers of belting. These sanding blocks work particularly well with adhesive-backed sandpaper.
If you don’t have a source for closed-cell foam and conveyor belting, you can build a similar sanding board with more commonly available materials. Cloth-backed vinyl can be substituted for the belting. Open-cell seat cushion foam that has been wet out with epoxy will replace the closed-cell foam core. To make a sanding block like this you will need:
Cover the flat working surface with plastic sheathing. Cut one piece of foam and two pieces of vinyl into 4″ x 12″ shapes. Mix a small batch of 105 Resin and 206 Slow Hardener. Dip the seat cushion foam into the epoxy and wring it out like a sponge. Dip it again to be sure the epoxy is uniformly dispersed within the foam. Lightly squeeze the excess epoxy from the foam and set it aside for a moment.
Apply epoxy to the cloth side of both pieces of vinyl. Place one piece of vinyl, cloth side up, over the flat covered surface. On top of this, place the epoxy covered foam. Place the other vinyl piece, cloth side down, over the wet foam. Place ½” thick spacers just outside the four corners of the foam and vinyl stack. Cover the whole thing with plastic or wax paper. Place the piece of ¾” plywood on the stack, centering it over the ½” spacers. Place weights on the plywood to compress the foam, allowing the plywood to touch the ½” spacers. The spacers will determine the sanding block thickness and allow a uniformly thick sanding board.
Once the glue cures, trim the sanding block to size, then use your table saw to make cuts parallel to the length. Remember, the cuts should be just deep enough to pass through the foam/epoxy core but not into the vinyl fabric on the other side. Saw cuts can be spaced from ¼” to ½” apart. You can also use a hand saw to make cuts, as long as you use a guide to hold the saw straight while cutting into the sanding block.