
By Tom Pawlak — GBI Technical Advisor
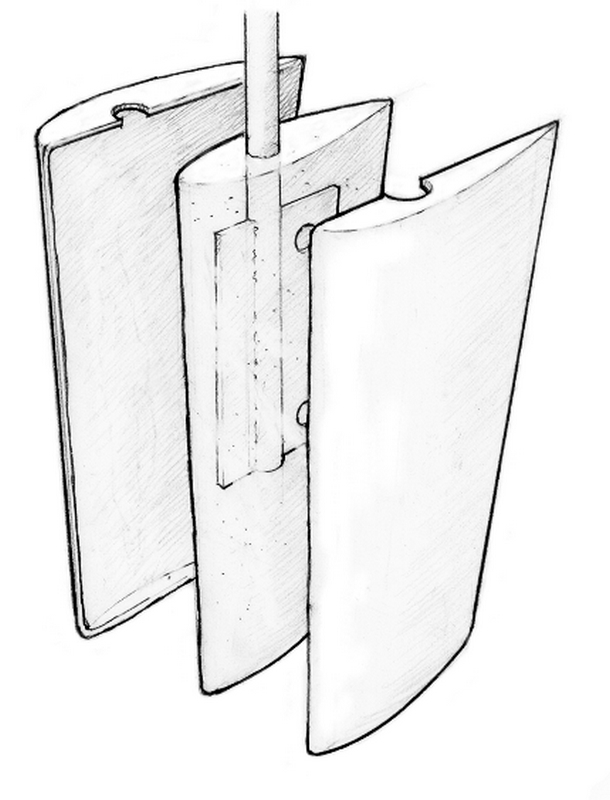
A typical spade rudder for sailboats is made up of two fiberglass skins that define the shape of the rudder, a metal mandrel that is an extension of the rudder post, and foam core which bridges the space between the skins and mandrel. In order for a rudder like this to work properly, its fiberglass skins must be attached to the core and the core must be attached to the metal mandrel. Side loads on a rudder exert compression loads on the core which transfer into the mandrel. If the components become detached, the rudder can deflect excessively and eventually develop cracks in the fiberglass skins.
Causes of rudder failure
Through normal use, rudders go through a lot of stress. With every turn, the skin on each side is subject to a cycle of compression and tension. Years of sailing can accumulate a lot of these fatigue cycles. Shock loads, groundings, competitive sailing and a rudder that may have been under-engineered all contribute to rudder failure.
Additional damage, at least in northern climates, can be caused by freezing water. A slight leak at the top of a fiberglass rudder will allow moisture to enter. A drop or two of water per day adds up over time. Once inside, the water will freeze during the winter. When it freezes, it expands and can crush the foam core and, in some cases, cause the rudder to delaminate and even split apart. It may take several seasons for a problem like this to reveal itself. Our tech staff gets many calls about this kind of damage from boat owners in northern climates.
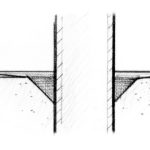
A common place to find damage is at the top of the rudder where the skin meets the rudder post. The core and fiberglass skin surrounding the post are repeatedly compressed against the post. The result can be a gap along side of the post, allowing excessive movement and permitting water to enter along the post.
Reinforcing/repairing the top of the rudder
A small gap around the rudder post or tube is not considered serious and can be sealed with a flexible sealant to keep water out. Left unsealed, the gap may allow water into the rudder, leading to extensive damage later.
As a rudder ages and additional fatigue cycles accumulate, stress cracks may develop in the fiberglass laminate around the rudder post at the top of the rudder. These cracks usually radiate from the post into the surrounding fiberglass, often beginning at the glue joint where the two fiberglass halves of the rudder meet. If the cracks are limited to this glue joint, they can be cleaned out with a broken hack saw blade or rotary grinder and glued back together with epoxy thickened with a high density filler.
If the cracks at the top of the rudder radiate into fiberglass beyond the glue joint, the cracks need to be properly repaired. This is accomplished by grinding out all of the damaged fiberglass and replacing the removed material with fiberglass cloth and WEST SYSTEM® Epoxy. At the same time, reinforce the joint between the rudder post and the fiberglass rudder top by cutting away a band of fiberglass and core around the post and filling the gap with epoxy thickened with high density filler.
- Grind away the damaged fiberglass skin around the cracks with a rotary tool like a die grinder or DremmelTM tool. Avoid grinding into the rudder post, this will weaken it. Cut the opening to a smooth circular or oval shape, and grind a 12:1 bevel around the edge of the fiberglass.
- Grind back the fiberglass skin at least 1/2″ from the rudder post on all sides. Grind or cut the core around the post at a 45 degree angle back to the post.
- Dry the area with heat lamps or heat guns if necessary. Sand the metal surfaces to be bonded with 80 grit to roughen the surface.
- Apply a coat of unthickened epoxy to the metal, fiberglass laminate and core.
- Fill the excavated area around the tube with epoxy thickened with 404 High-Density filler.
- Apply layers of wet out fiberglass fabric across the repair to restore the skin. Use enough layers to equal the original skin thickness. Step the edge of each layer of fabric back to match the 12:1 bevel. Sand and fair the surface when cured. Apply several epoxy barrier coats after fairing is completed, before applying bottom paint.
It’s not a bad idea to reinforce the top of the rudder in this way as a precaution, when the rudder is out of the boat and you are making other rudder repairs.
Repairing delamination
Accumulated stresses can lead to cracks in other locations on the rudder. A common skin failure on an aging rudder occurs in the area where the metal mandrel inside the rudder ends. These stress cracks show up on the sides of the rudder about two thirds of the length down from the top. The damage may be isolated to the cracks in the fiberglass skin or problems may go deeper.
Delamination can occur anywhere in the rudder but will most likely show up in this same area where the metal mandrel inside the rudder ends. The stress cracks and delamination can go unnoticed for a season or two and the problem may not be identified until water begins weeping from the rudder after the boat is pulled from the water.
When delamination is discovered, drill a few small holes to drain any water that may have accumulated inside the void. Tap on the outside of the rudder to identify the extent of damage. Debonded areas will have a distinct dull sound compared to undamaged sections. Use a pencil or permanent marker to identify the boundaries of damage.
There are two approaches one can take to restore strength to the delaminated area. The first and easiest option is the drill and fill approach. The second option involves removing the fiberglass skin in the debonded area, repairing the core, gluing the skin back in place and structurally repairing the original cracks in the skin if any and the cuts made in the fiberglass skin to gain access to the core.
Drilling and filling
The drill and fill method is the easiest of the two repairs. It involves fewer steps but takes more time to complete the repair because of the longer time required to dry out the wet core before the repair can be attempted. The repair may not be as reliable as the second method because there is no opportunity to inspect or prepare the delaminated areas inside the rudder for optimum bonding. Even so, this method has worked well when the damage is not too extensive.
- Drill a series of 1/8″ to 3/16″ holes on a one inch grid pattern over the debonded area. Drill deep enough to get to the center of the core. You may hit the metal mandrel.
- Dry the core. Wet cores can take weeks or months to dry even if a multitude of holes have been drilled. Force drying with heaters or heat lamps is recommended for speeding the process. A small fan blowing over the surface will help. Locate any heat source carefully to minimize the risks of fire. I have been surprised to find how hot a surface can get after leaving a heat lamp unattended for several hours.
- Verify that the core is dry by drilling a few more holes when you think the rudder has dried out. Squeeze the core drillings to see if they are dry.
- Inject a slow curing epoxy such as 105 Resin and 206 Hardener or 105 Resin with 209 Extra Slow Hardener. Use syringes to force the epoxy into the delaminated areas. Lay the rudder on its side with the drilled side facing up, so gravity works in your favor.
- Refill the holes as necessary with unthickened epoxy until the holes are filled flush with the surface. A light layer of fiberglass cloth can be applied over the area to strengthen the area if desired.
Removing the skin and repairing the core
Most repair facilities use the second option and cut off the fiberglass skin in the debonded area. They remove and repair the voided core before gluing the rudder skin back in place. This method allows the rudder to be repaired over the period of days rather than weeks. It is also a more reliable repair because you get to see what you are bonding to. Surfaces can be dried quickly and thoroughly, and damaged core can be removed and replaced with new core.
- Cut through the fiberglass skin using the marked boundary of the delaminated area as a guide. Use a rotary tool or a circular saw with the blade set to cut just below the surface of the fiberglass.
- Carefully pry off the fiberglass skin to expose the delaminated core. Removing the skin may be difficult if the delamination is within the core rather than between the skin and core. Hack saw blades or dry wall saws may be needed to cut the core that has delaminated from the mandrel but is still attached to the surrounding areas. Remove the skin and attached core together.
- Remove all loose and crumbled core.
- Dry the area with heat lamps or heat guns. Caution! Don’t let the surface get too hot.
- Bond any intact pieces of core back in place (like a three dimensional puzzle), using thickened epoxy. Gaps of 1/4″ can be bridged using 105 Resin with 206 Hardener thickened with 407 Low-Density Filler. Wider gaps are possible if you are working in cool temperatures or if you use 209 Extra Slow Hardener.Caution! epoxy generates heat (exotherms) when it cures and may melt the foam core if too much epoxy is used at one time to fill wide gaps in the core.If the core is too broken up, replace larger voids with a foam core of similar density, glued in place with epoxy and low-density filler.
- Prepare the bonding surfaces of the core and the inner surface of the removed skin (or the core attached to the skin). Dry fit the fiberglass skin over the repaired core. Remove any small pieces of core or epoxy that may keep the skin from fitting flush. Vacuum off any dust and loose material.\plain \par
- Wet out the bonding surfaces of the fiberglass skin or attached core with unthickened epoxy. Apply epoxy thickened with 406 Colloidal Silica to the core with a notched trowel.
- Press the fiberglass skin into the thickened epoxy and hold it in position (flush with the surrounding skin), with weights, duct tape or bungee cord.
- Prepare the cuts in the fiberglass skin for repair by grinding a 12:1 bevel in both directions from the cut. An 1/8″ thick fiberglass skin will require a 1/2″ wide bevel on either side of the cut.
- Apply several layers of fiberglass tape over the joint. Use enough layers to equal the thickness of the skin. (Several layers of 731 or 732, 9 oz. fiberglass tape equals about 1/8″
- Prepare the surface of the cured epoxy by washing with water and an abrasive pad, and sanding thoroughly (or wet sanding). Fair the fiberglass buildup with 407 Low-Density filled epoxy. Apply three barrier coats of epoxy over faired areas, allow to cure, then wet sand, before applying bottom paint.
For general information on fiberglass boat repairs, download our Fiberglass Boat Repair & Maintenance (free download) manual (free).