Repairing Fiberglass Powerboat Transoms
Spring 1998

GET STARTED
FREE PRINT & DIGITAL EDITIONS
Spring 1998
Transoms are major structural parts of fiberglass powerboats, especially outboards. Transoms not only support the weight of the motor, they maintain the shape of the boat, they are a mounting point for holdowns, towing eyes and other accessories. And, they must be able to let water out of the hull, without letting it back in.
Outboard motors apply a considerable load to the transom. The effects of the motor’s weight are magnified when the boat is accelerated under normal operating conditions, and when the boat is bouncing along on a trailer. These loads are concentrated on the fiberglass skin and core where the mount is located. Over time cracks develop. Moisture penetrates the plywood core, leading to delamination and eventual rot. Moisture can also penetrate the transom skin at hardware fasteners, around drain holes and I/O cutouts. These factors have a cumulative effect on structural failure.
When the transom loses its stiffness, so does the outboard motor. Excessive motor movement may be your first sign of trouble. Tap around the suspected area lightly with a small, hard object to help reveal any areas of delamination. A void under the skin will sound flat or dull, compared to a more resonant sound of a solid laminate.
Damage can be confirmed by drilling 3/16″—7/32″ (5mm) -diameter inspection holes into the core at the suspected delamination. Examine the core material removed by the drill for signs of decay. Squeeze the core material tightly between your thumb and finger to determine whether the material is wet or dry. Wet is bad.
Once you have determined that there is damage, there are a couple approaches you can use to repair the transom. Access to the damaged core is required and is normally attained by removing the fiberglass skin from either the outside or, if possible, the inside of the transom. Which method is best depends a lot on the design of the boat. In this article, we’ll assume that our only access to the core is from the outside. With either method, the delaminated and soft wet plywood core is removed and replaced. If the fiberglass skin is in good condition, it is usually reused and glued back in place over the new core. The cuts made in the fiberglass skin to gain access are repaired with multiple layers of fiberglass cloth and epoxy.
Restoring boat exteriors to their original condition is expensive. Refinishing costs, after the structural repairs are complete, can be a large part of the repair bill. Because skin repair requires a 12-to-1 scarf angle, the repair area can extend several inches beyond the edges of the transom. On a powerboat, this normally requires some repair and refinishing of the exterior skin beyond the transom corners, onto the sides and bottom of the boat.
If the total area of fiberglass repair can be confined to the transom and not allowed to extend around the corners, the cost of cosmetic repairs will be significantly less. Any finish painter will tell you it is much easier to paint to a body line or corner of an object than it is to cosmetically blend into a surrounding area. Isolating the structural and eventual cosmetic repair to the transom alone will allow you to better disguise the fact that a repair ever took place. Matching color and texture at a corner is less critical because the transom corner acts as a visual break.
The following transom repair method allows the fiberglass skin repair to be limited to the transom without having to wrap around the corners. The method leaves enough fiberglass around the perimeter of the transom for a proper bevel, yet allows enough access so the damaged core can be removed and replaced.
After removing the motor and all hardware and trim, measure the fiberglass skin thickness at one of the holes through the transom. The fiberglass thickness determines the bevel length which is also the distance from the corner to the location of the cuts for removing the fiberglass skin. As mentioned, the cut line will be located to allow the outer edge of the bevel to end before the corner of the transom. The distance of the cut line (and the bevel) back from the corner is 12 times the fiberglass thickness.
A 12-to-1 bevel allows room for multiple layers of fiberglass fabric and epoxy across the cut line to restore strength to the fiberglass skin. If the fiberglass skin is 1/8″-thick, the width of the bevel will be at least 1 ½” long. If the fiberglass is ¼” thick, the cut line will need to be at least 3″ in from the edge of the perimeter to allow for a 3″ bevel. If the original fiberglass skin is reused, the same bevel will eventually be required on each side of the cut after the skin is rebonded to the new core. (More on this later.)
Layout the cut line the required distance from the edge of the transom. Remember to measure from the end of the rounded corners where they blend into the flat transom surface.
Cut through the fiberglass with a router, circular saw or grinder. Preset the depth of cut carefully if you are not replacing the entire core. If you know you will be replacing all of the core, the depth can be set deeper.
The skin may be stuck on areas of sound wood core. Use a heat gun as necessary to assist in removing the skin without damaging it. Long skinny wedges or long thin metal flat stock ground to a chisel end may assist in removal also. Reusing the skin can save you time and money. It is worth the effort of getting it off in one piece.
Even if the core damage is isolated to some portion of the transom, you may want to consider replacing all of the plywood core rather than repairing it. Damaged cores are typically delaminated and very moist. Unless you have plenty of time to allow for drying, you are better off replacing all the core.
If you have time for drying and the damage is isolated to a specific area, you can repair the damaged area by scarffing in new plywood or stepping the edges of the damaged area in layers with a router. Complete directions for replacing damaged plywood sections can be found in section 6.3.2 of the WEST SYSTEM manual, Wooden Boat Restoration & Repair (free download).
If you will be removing the entire plywood core, use whatever combination of tools you need to get the job done. Circular saws, pry bars and chisels can be used to remove core. The plywood core near the corners of the transom will be the biggest challenge. Here you can carefully use large drill bits to weaken and remove stubborn areas. Rotary rasps can also be effective. Home made tools similar to a grub hoe or an adz can be used to remove the stubborn perimeter areas. When you’ve removed as much of the wood as you can, sand the surfaces of the exposed fiberglass skin to expose fresh fiberglass laminate.
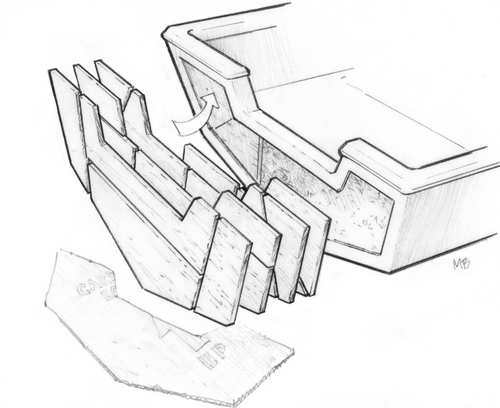
Because the opening in the transom is smaller than the plywood core required for the repair, you will need to replace the core in pieces involving 3 or 4 layers. Multiple layers are required so the butt joint or joints in any given layer can be staggered and isolated from joints in an adjacent layer. This staggering of the butt joints in the plywood layers helps to maintain core strength as though it was a continuous solid piece of plywood. This method also requires that the plywood core be laminated in place rather than installed as a full-size piece. This does not present a significant problem because most transom replacements require multiple layers of plywood to achieve the required thickness.
A 1½”-thick core can be replaced with three layers of ½” or four layers of 3/8″ plywood. We recommend marine grade plywood for this repair. If marine grade plywood is not available, use multiple layers of AB grade exterior plywood. Exterior grade plywood may have more voids in the inner layers of veneer than true marine grade. Because of this it is important to use more layers of thin plywood to build up the required thickness. In other words, use four layers of 3/8″ or 6 layers of ¼” plywood to build up a 1½”-thick transom instead of three layers of ½”. Be sure to fill any voids in the plywood edges with thickened epoxy after the panels are cut into shape.
Make a template of the transom and use it to layout the plywood layers. Plan the cuts in each layer so the pieces are small enough to fit through the opening in the transom.
Make certain that the joints between each layer are staggered by at least eight times the plywood layer thickness. For example, a 3″ stagger will be required between joints when using 3/8″ plywood. Ideally these joints are staggered widely. Joints out near the sides of the transom will affect strength less than if they are all staggered near the middle. Remember, the cantilevered load of an outboard motor puts significant loads on the middle of the transom. If the splices are kept out of the middle, the transom repair will be stronger. If the joints in any layer are scarffed with an 8:1 bevel rather than butted, joint location is not an issue. Joints can also be made on a diagonal to stagger them even more.
Come up with a plan for assembling all of the pieces and holding them in place while the epoxy cures. Label the pieces and dry fit them in the transom to eliminate potential problems during actual assembly. The fit need not be perfect. Thickened epoxy will bridge gaps and bond layers in place without a problem.
The layers can be glued in place all at once or one or two layers at a time. Use clamps, screws, wedges or prop sticks to force the laminates together. Bolts with nuts and oversized washers can be used in places where holes will eventually be required. These would include motor mount holes and drain holes. Be sure all parts, tools and clamps are within easy reach. Be sure you and any parts of the boat you do not want to get epoxy on are protected.
Plan to use 209 Extra Slow Hardener if you will be working at temperatures above 65°F. It will allow the extra working time for assembling the core. Remember to use multiple small batches of epoxy rather than large batches. Epoxy in mass generates heat and becomes unusable if not spread out quickly into thin films.
Plan A
All the layers can be installed and clamped in place at the same time if you like. Professional repair yards generally try to complete the plywood installation in one big assembly operation to keep costs down. Dry fit and label all of the parts. Apply unthickened epoxy to all of the plywood segments, especially the end grain around the perimeter of each piece, before applying thickened epoxy. Be sure to apply unthickened epoxy to the abraded fiberglass surface that you will be bonding against.
Thicken the epoxy with a high density filler to prevent glue sag and to bridge gaps between layers. I prefer 403 Microfibers filler for large projects because it is strong, stirs in quickly and requires less filler to achieve the same viscosity.
Apply the thickened epoxy with squeegees and notched trowels or spreaders. The 809 Notched Spreader is ideal for applying thickened epoxy. It offers three different notch sizes to fit your needs.
Apply enough thickened epoxy to each plywood section to allow for squeeze out at the perimeter. Squeeze out will bridge gaps between the edges of the plywood and the inside corners of the transom. Press the first piece in place to verify adequate squeeze out. Adjust the amount of thickened epoxy applied based on the results of the previous section. Be careful to avoid over thickening. The epoxy needs to move under minimum pressure. Adjust viscosity by adding more or less filler to achieve consistency between that of ketchup and mayonnaise.
Plan B
Here is an approach that has merit if you will be working alone and wish to accomplish the repair in bite-size pieces.
Install only the first layer or two of plywood using the methods described in Plan A. Use whatever clamping schemes that are available to you to hold the plywood in place while the epoxy cures. Clean up excess epoxy before it cures. Once cured, you have a rigid base against which you can glue or laminate the remaining plywood one layer at a time. Now you can use screws or nails instead of clamps to hold each additional layer in place while the epoxy cures. If you plan to leave the fasteners in place, be sure to use screws or nails that are stainless, galvanized or bronze. Recheck the fit of the final pieces and be sure to sand cured epoxy coated surfaces prior to laminating additional plywood layers.
After the core replacement is complete, the original fiberglass skin can be laminated over the new core or if necessary a new skin can be laminated over the core. Remember to aggressively sand epoxy coated surfaces and the back side of the fiberglass skin in preparation for gluing.
Plan A
Glue the skin in place using the same laminating techniques previously described. I normally use temporary drywall screws driven through oversized washers or a small plywood block to spread the holding power of the screw over a larger area. This prevents dimpling in the fiberglass skin which would require considerable filling and fairing later. Apply auto paste wax or cooking spray to the washers or plywood ahead of time to allow for removal later, or apply a layer of plastic sheet over the fiberglass skin before applying the plywood cauls.
After the epoxy has cured, remove the screws and fill the holes with slightly thickened epoxy, injected with a plastic syringe.
If you were able to reuse the fiberglass skin and glue it in place over the new plywood core, there is one last step to complete the structural part of the repair. The fiberglass skin damage created when we cut the fiberglass away to gain access to the damaged core needs to be repaired.
Prepare the cuts in the skin by grinding a minimum 12:1 bevel. If the fiberglass skin is 1/8″ thick, the bevel on each side of the cut line needs to be at least 1½” long. Because the repair involves two bevels, one on either side of the original cut, the dished out repair will be at least 3″ wide.
Laminate the repair patch with multiple layers of fiberglass and epoxy until the dished out cavity is full. Remember to apply the largest fiberglass layers first and apply progressively smaller layers until the repair is flush with the surrounding fiberglass skins. Detailed instructions for laminating fiberglass repairs can be found in our Fiberglass Boat Repair & Maintenance (free download) manual.
Plan B
If your fiberglass skin is unusable, plan to laminate a new fiberglass skin over the core with multiple layers of fiberglass and epoxy. Apply them one layer at a time until the same skin thickness is achieved. Subsequent layers can be applied immediately or while the previous layer is still tacky. If the epoxy is allowed to cure beyond being tacky, allow it to cure overnight, then wash the surface with water and sand the surface to prepare it for more layers. Laminate the new skin so it extends to the edge of the 12:1 bevel that was machined earlier on the outer edges of the transom. Install the biggest patch first with each layer being progressively smaller to fill the 12:1 bevel. For additional information on laminating a large new fiberglass skin see Section 4.3 of Fiberglass Boat Repair & Maintenance (free download).
Once cured, wash the repair with water to remove amine blush and grind or sand the fiberglass smooth. Fill low spots with thickened epoxy and recoat as necessary to seal exposed fiberglass and sanded low-density fillers.
Be sure to coat and seal all holes drilled through the transom with multiple coats of epoxy. This is not a waste of time. If the holes are not properly sealed, plan on replacing the core again in the future. If all sources of water are eliminated by sealing the wood in epoxy, the repair should be better than new and last indefinitely. Remember to coat screw holes with epoxy just prior to installing screws for motor mounts and transom hardware. Apply Pam cooking spray to the fasteners prior to gluing them in place if you plan to remove them at some point in the future.
Now the transom is ready for paint or gelcoat. I strongly recommend paint, not gelcoat, for amateur repairers. It is much easier to achieve satisfactory results. To prepare for paint, tape off the transom along the edge of the corners to keep paint off of the sides of the boat. Find a paint that matches the original finish reasonably well and apply it using techniques that you are comfortable with. I personally like using a paint roller and tipping brush approach to apply a quality two-part linear polyurethane paint. AWLGRIP® and STERLING®brand paints offer excellent two-part polyurethanes with thinning reducers that allow flow time for roller marks and brush strokes to level nicely. People have also reported having good success using the new automotive base coat/clear coat type paints.
If the boat will be left in the water, be sure to stop the paint short of the true waterline. There may be some exceptions but generally top side paints will soften and peel if used below the waterline for extended periods. For boats that are trailered, topside paints typically work well for bottoms of boats if they are cured well and are not left in the water more than 2 or 3 days at a time. Contact your paint manufacturer for their specific recommendations.
SAFETY NOTE: Spraying two-part polyurethanes is extremely hazardous to your health. These paints contain isocyanates. While spraying, the paint becomes atomized and is extremely dangerous if allowed into the lungs. Even respirators with organic vapor cartridges are not approved for removing isocyanates. As I understand it, the isocyanates are less hazardous when these paints are applied with paint rollers or brushes because isocyanates are not atomized and emissions are lower. Even so, use a respirator to protect against solvent fumes.


