Repairing Cracks in Concrete
Spring 1995

GET STARTED
FREE PRINT & DIGITAL EDITIONS
Spring 1995
Cracks in poured concrete floors and foundation walls allow water to leak into basements and cause damage. With WEST SYSTEM® epoxy, you can, in many instances, fill the cracks from the inside and stop the water penetration without digging up your yard. WEST SYSTEM epoxy’s adhesion to concrete is excellent. It is very resistant to moisture penetration, and the tensile and compressive strength of the epoxy (about 8500 psi and 10,000 psi respectively) easily exceeds that of concrete. The following process is one method of epoxy injection that effectively seals cracks without requiring excavation outside the walls. The actual filling process takes some time, so use a slow hardener if the temperature is above 60°F.
The process involves cleaning the loose concrete and dirt from the crack and installing some tubes through which you can inject the epoxy deep into the crack. You also need to fill over the top of the crack to keep the epoxy from flowing out of the crack during the injections.
Although WEST SYSTEM epoxy will bond to damp concrete, the best adhesion is obtained when the concrete is dry. Under no circumstances should water be flowing through the crack. If water is flowing, either wait for the dry season (if there is one in your location) or use a different method to seal the crack.
Clean the loose rubble and dirt out of the crack. Use compressed air, vacuum cleaner, hacksaw blade, wire brush or even power wash if you don’t mind more water in the basement. The cleaner and drier the surface, the better the adhesion. If the crack is narrow, you may want to use a hammer drill to drill a series of small diameter holes in the crack to open it up a little. This may make it easier to clean the litter from the crack and also encourage drying.
To fill the crack, you will need to install filling tubes (which also serve as vents) every couple of feet. Use a hammer drill to drill holes, centered in the crack, and the same size as the outside diameter of a piece of copper tubing. Many times the crack is not perpendicular to the surface, so you may have to drill at an angle to follow the crack. Use a 3/8″ drill for narrow cracks. This will accept a 3/8″ outside diameter (o.d.) copper tube. If the crack is wider, use a 5/8″ drill and 5/8″ o.d. copper tube. Drill into the crack 1½” to 2″ deep so the epoxy will be able to fill the crack more easily. Push the tubing into the crack until it bottoms in the drill hole. Allow at least an inch to extend beyond the wall surface. When the job is complete, you will grind off the excess tubing.
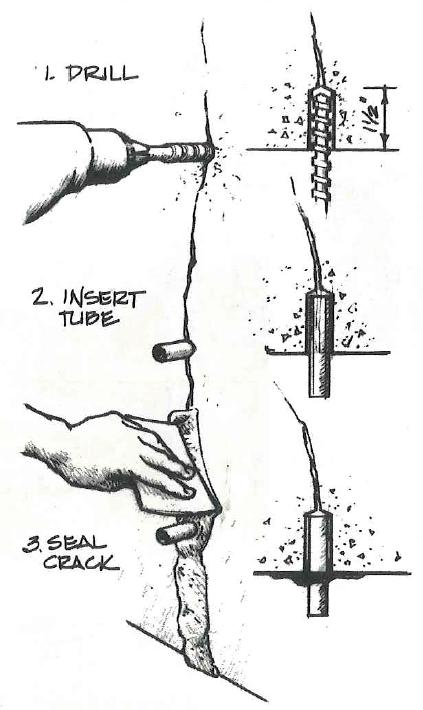
If you are working on a vertical surface, you need to prevent the epoxy from flowing out the crack as you inject it. Do this by sealing over the top of the crack with a putty made of WEST SYSTEM Epoxy thickened with 406 Colloidal Silica or 403 Microfibers. First coat an area a couple of inches wide along each side of and into the crack with the resin and hardener mixture, then trowel the thickened epoxy putty over the top. Force the thickened epoxy into the joint with a putty knife so it gets a good mechanical bond. The idea here is not to fill the crack—just seal the top so it won’t leak when the epoxy is injected. Thoroughly seal around the copper pipes and allow the epoxy to cure overnight before beginning the injecting operation.
To inject the epoxy, measure and mix a cup of epoxy—about 6 strokes each from the 301 BC Mini Pumps. Pour the epoxy into a WEST SYSTEM 810 Fillable Caulking Tube. If you are working on a horizontal crack, start at one end and work towards the other end. If the crack is vertical, start injecting at the lowest fill tube and work toward the top. Insert the nozzle of the tube into the first copper tube and inject. Push the caulking tube nozzle into the copper tube with enough force to make a seal. Keep several corks of the appropriate size handy to stick in the copper tubes to keep the epoxy from running back out when you remove the caulking tube to refill it.
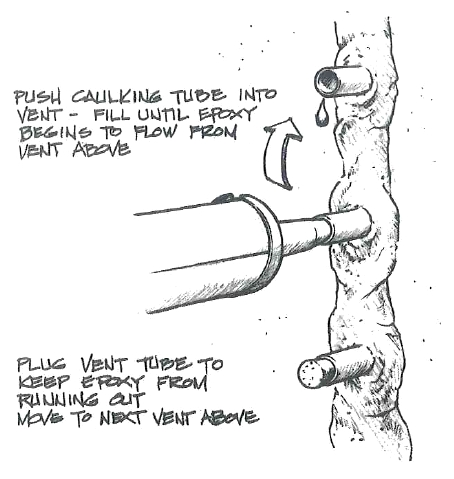
When epoxy flows from the vent tube, you can assume the crack is full of epoxy to that point. Plug the original copper fill tube with a cork or crimp the pipe and move to the next vent tube. Inject more epoxy into that tube until it comes out the next vent tube. Continue in this manner until you have injected epoxy into every tube in the crack.
Allow the epoxy to cure overnight, remove the plugs from the tubes and saw or grind the protruding portion of the tube flush with the wall. Touch up the ground area with an epoxy patch to match the rest of the crack, allow it to cure, and finish the repair area to match the rest of the wall.
Featured photo by Andrew Buchanan on Unsplash


