Repairing a Runabout Floor or Pontoon Deck
Spring 1998

GET STARTED
FREE PRINT & DIGITAL EDITIONS
Spring 1998
By Joe Parker
A common source of problems on open runabouts and pontoon boats is the cockpit floor or deck. This part of the boat is usually just a layer of plywood screwed down to the top of stringers and frames. Many have a layer of carpet or vinyl flooring material glued onto the plywood.
On runabouts, the floor is usually “tabbed” or joined to the hull sides with fiberglass tape at the edges of the plywood and up the side of the hull a few inches. Some runabouts will also have a layer or two of fiberglass fabric over the top of the plywood, with a non-skid pattern molded in.
Poorly installed floors and decks are prone to delamination and rot. Moisture enters the plywood endgrain alongside of the screws holding the floor down to the framing as well as the fasteners holding the seats, coolers, and other items to the floor. (Moisture also penetrates and damages the stringers supporting the floor—see Stringer Repairs in Fiberglass Boats.) In addition, there is seldom any fiberglass or resin coating to seal the back side of the plywood, so moisture also enters the plywood from below the floor where the air is often damp and stagnant.
Once the plywood begins to delaminate, the deck will feel spongy underfoot. This is discomforting and unsafe to walk on, and also reduces the athwartship (side to side) hull stiffness the floor would normally provide. If not repaired, the plywood will rot. I have repaired boats that were less than five years old that had this problem. This situation can be avoided if the builder takes care to seal any penetrations into the plywood.
But once the moisture damage occurs, the only repair is to replace the affected plywood. Here is a description of a procedure to do that. I will describe floor replacement in a runabout, but a pontoon deck would be repaired in much the same way. The primary difference is that the pontoon deck will be mechanically fastened around the perimeter framing because there is no hull side to bond to.
1. Remove any equipment or hardware screwed down to the floor. This may include things like seat bases, cooler brackets, and step or ladder brackets.
2. Pull up any carpeting or floor covering to expose the fasteners or tabs used to hold the plywood down on top of the frame and stringer system. If there are cutouts in the floor for access to storage compartments below, carefully remove any trim around the cutout. You will probably want to reuse that once the new floor is in place.
Before cutting tabs or removing any of the fasteners, make sure the hull is supported so that its sides do not move once the floor is no longer supporting them. In many boats, this will not be a problem, but there are some hulls that will be very floppy when the floor is out. If the new floor is installed while the hull is out of shape, it will stay that way.
3. Cut through the fiberglass at the floor/hull joint if the plywood is tabbed to the hull with fiberglass tape or if the floor is covered with a layer of glass. Remember that this is not a 90° joint—the hull is angling toward the centerline. Make sure you are not going to cut into the hull side as you are cutting the tab. (Don’t laugh, it has happened).
Or, in the case of pontoon deck— Remove all of the fasteners. The floor may be fastened to cleats between plywood sections, cleats attached to the hull at the perimeter, and stringers near the center of the floor.
4. Remove the pieces of plywood. If you remove them carefully, you can use them as patterns for the new floor. If only a portion of the floor is damaged, you can cut out a section of the floor. If there is no structural member below it to make a good place for a joint, use cleats bonded under the edge of the remaining original deck to set the new plywood on.
The floor may be bonded to the stringers and cleats supporting it. If necessary, cut the floor out in sections then chisel and grind away any material bonded to the tops of the stringers.
Installing the new floor
The moisture that damaged the floor could have also damaged the stringers supporting the floor. It’s a good idea to inspect and repair all damage to the structure below the floor, before reinstalling the floor. If the structure is in good shape, reinstall the floor as follows:
1. Cut out new pieces of plywood using careful measurements or the patterns from the old floor. Make sure the new plywood is at least the same thickness as the original material.
2. Dry fit the sections and drill any fastener holes, and then remove the section.
3. Coat the back side with two or three coats of epoxy before reinstalling, to prevent moisture from penetrating the bottom of the new floor. It is also very important to completely seal the edges of the plywood and the fastener holes. Sealing the edges of the plywood is especially important at the edges of a deck on a pontoon boat. If using Douglas fir plywood, you should use a light layer of woven fiberglass fabric on both sides to prevent the checking—6 oz. glass is usually sufficient.
4. Bond the new plywood floor to the hull, to the stringers and cleats installed to support the edges of the plywood between stringers. Use a mixture of WEST SYSTEM 105 Resin® and 206 Slow Hardener® and a high strength filler to make a putty to bed the plywood into. For partial replacement of the plywood or multiple sheets of plywood, dish out the joint between pieces with a grinder and join the pieces together with fiberglass tape to make a single panel.
Or, in the case of a pontoon deck—Install the new floor by screwing the plywood down to the stringers. Coat the fastener holes with epoxy before inserting the screws. This will prevent moisture from getting into the plywood endgrain at the fastener holes. We usually coat or fiberglass the top side after the floor is installed.
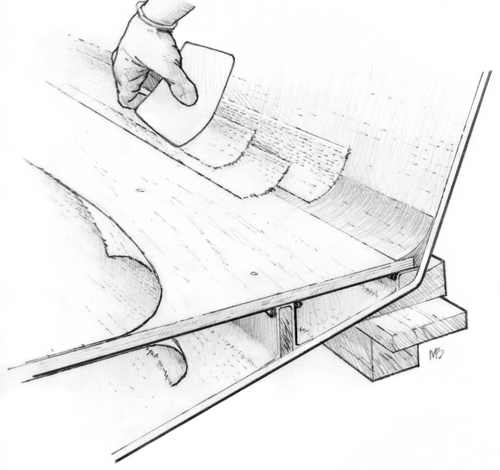
Tabbing the floor to the hull
5. Prepare the hull surface for bonding by sanding a 4″—6″wide strip on the hull above the floor with 80-grit paper.
6. Mix WEST SYSTEM epoxy and add either 406 Colloidal Silica or 407 Low Density filler to create a mixture with a peanut butter consistency.
7. Apply a fillet of thickened epoxy all along the hull-to-floor joint. This will make a radius which will allow the fiberglass tabbing to lay easily across the joint without seriously distorting.
8. Apply 4-inch wide 727 Biaxial fiberglass tape over the fillet. Wet out the tape with either a 105 Resin/205 Hardener or 105 Resin/206 Slow Hardener epoxy mixture. If necessary apply multiple layers of tape to build up to the same thickness as the original tabbing. Stagger the edges of the tabbing when using multiple layers so they do not end in the same place on the hull side or floor. A good trick is to apply the first layer up the side 3″ or so, the second layer 3″ out on the floor, and the third layer centered over the corner. This creates an aggregate build up three layers thick on the corner without causing a hard spot at the edges of the tabbing.
9. Reinstall the carpeting or floor covering after the epoxy is cured. If painting the floor, make sure wet sand the surface to remove all gloss before priming and painting. When reinstalling seats and deck hardware, be sure to seal the fastener holes with epoxy. This will prevent the same type of damage from recurring.


