Planer Chip Diverter Built with G/flex
Spring 2024

GET STARTED
FREE PRINT & DIGITAL EDITIONS
Spring 2024
By Stephen Clark
Back in the ’70’s I bought a 10″ INCA jointer/planer. It came with a molded plastic chip diverter for use when set up as a planer. Back then, there were no thoughts on the designer’s part of attaching a dust collector to the diverter. The diverter simply spewed chips out the front, right onto the work piece being fed through for thicknessing.
A few years later, I got a new dust collector. I cobbled on a section of 3″ galvanized duct pipe connecting the diverter to the suction end of my new dust collector. It worked fine until the plastic diverter finally died a couple of months ago.
These INCA tools haven’t been available here for decades, yet there are a few remaining sources for parts like the original chip deflector. Unfortunately, they’re EXPENSIVE as well as old, and the original plastic doesn’t seem to age well. I’d have to find a way to fabricate a new diverter.
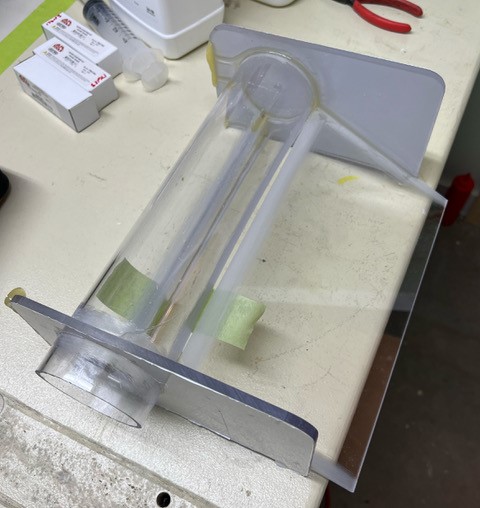
I knew I wanted to use clear polycarbonate to build the diverter. I had also recently became aware of G/flex® 655 Thickened Epoxy Adhesive’s durability and its great reputation for bonding to many types of plastics. I set about building myself a new chip diverter using those materials.
I started my build with the two side panels. I routed shallow, circular grooves in each piece to hold the collector tube in place. I also routed two slots to hold each of the two flat guard pieces. The guards direct the chip stream into the round collection tube and also serve to provide some added rigidity to the assembly. I then routed a rectangular aperture in the collector tube to allow the chips to enter.
For my initial assembly, I used G/flex to create fillets for joining the polycarbonate pieces. Gougeon’s technical articles on G/flex explained the simple preparation needed for dealing with polycarbonate. I merely sanded the surfaces to be epoxied with 80-grit sandpaper before assembling them.
Once assembled, it was apparent the aperture in the collection tube wanted to ‘close up’ from residual stresses in the plastic material. This left a gap between the tube and the guards.
I had recently built a Chesapeake Light Craft Waterlust expedition canoe. Through the process, I became proficient in using the stitch’n’glue building technique. I used the 18-gauge copper wire left over from the stitch’n’glue kit to hold that aperture open, bringing the tube flush with the guard pieces. Then I tacked it with G/flex.
Once the G/flex had cured solid, I removed the copper wire and did another fillet over top to fill in any remaining gaps. From here, all that remained was to salvage the two small, steel spring clips that served to hold the previous chip diverter onto the planer’s outfeed table to use in the installation of the new diverter.
As you can see, the result speaks for itself!


