Nose for Speed
Spring 2000

GET STARTED
FREE PRINT & DIGITAL EDITIONS
Spring 2000
Some people just have a knack for things. We commonly say that someone may have an “eye” for beauty, an “ear” for music, or a “taste” for art, and now you can have a…“nose” for speed. Nose cones on outboard and sterndrive lower units are common in the world of boat racing. Whether it be outboard hydroplane racing, outboard performance craft (tunnel hulls), offshore powerboats, or customized recreational boats, all have factory-built “speedo” lower units, which are very fast, but expensive. However, adding a nose cone to your existing lower unit is affordable, quick, and fun to do. Twelve to sixteen hours of working time should help you gain a couple of ticks on your top-end speed and may even increase fuel economy.
You’ll need the following materials: WEST SYSTEM® Epoxy (105 Resin, 206 Slow Hardener), 406 Colloidal Silica, 407 Low-Density Filler, an aluminum nose cone, a rubber hose, miscellaneous application tools, and paint for final finishing.
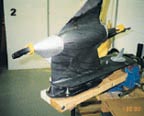
It is much easier to add a nose cone with the lower unit off the boat. You will want to clamp it (upside down or nose side up) in a jig or another fixture so that you can easily work on it (photo 1). Here are the steps that may be taken:
Rough fit the cast aluminum nose cone to the lower unit
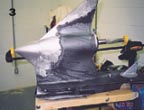
Set the nose cone on the lower unit and note where it hits the lower unit. Make a mark on each side of the lower unit and nose cone at the widest points; this will help to center the nose cone on the middle of the lower unit. To help find where it is hitting, you can dust the nose of the lower unit with chalk or cover it with carbon copy paper and then set the nose cone on it. The chalk or carbon paper residue will transfer the high spots on the lower unit to the inside of the nose cone. With a file, drum sander chucked in a drill, or a rotary grinding tool, carve out the inside of the cone. Make sure you use proper safety equipment, especially safety glasses or goggles—flying aluminum and eyes don’t mix! Keep shaping the inside of the cone (fitting, grinding, fitting, grinding) until you achieve a fairly decent fit (photo 2). This may take about 4–6 hours. The fit doesn’t have to be perfect because the thickened epoxy will fill gaps between the two surfaces.
Clean the nose of the lower unit
Remove any grease or oil from the surface. Then sand the paint off until you see shiny aluminum. Sand about 6″–8″ back from the nose (photo 3). A Random Orbiting (RO) sander makes quick work of this.
Prepare the lower unit for bonding
Usually there is more than one hole in the lower unit. Look very carefully for all of them and check a maintenance manual if you are unsure. These holes are necessary to allow the lower unit to operate properly. One is the oil drain plug; other holes might include the water intake, gear case cooling holes, pitot tube for speedometer, etc. These need to be protected so that they are not permanently plugged by epoxy. I was able to take a small piece of rubber hose that fit snugly into the hole of the oil plug drain. Apply a little paste car wax to the hose before inserting it to allow it to release later. Use the end of a small plastic artist’s paintbrush for small holes such as the pitot tube hole or gear case cooling hole. Creativity prevails here; the key is to temporarily plug the holes with something that can later be removed easily. Waxing the temporary plugs will help when you’re ready to remove them later. Once all of the holes are temporarily plugged, the rest of the lower unit is ready to prepare for bonding.
Wet sand the lower unit and nose cone
Wet sanding should be completed less than two hours before you are ready to mix the epoxy. This gets the surface ready for bonding.
Bond the nose cone to the lower unit
Coat the two mating surfaces with one coat of “neat” mixed WEST SYSTEM epoxy. We recommend using the 206 Hardener because the gap has the potential of being rather thick and creating some heat. Then mix another larger batch of epoxy and thicken with the 406 Colloidal Silica to a mayonnaise consistency. Apply a thick layer (1/8″– 3/16″ thick) on the lower unit and the mating surface of the nose cone. If there is a large space between the two, you may want to add liberal amounts to minimize air. Set the nose cone on the lower unit and press it down. Excess thickened epoxy should ooze out between the two surfaces. Once the nose cone is sitting on the lower unit, step back and check for alignment. Take a look from directly above. The leading edge of the nose cone should be aligned with the rest of the lower unit. A 24″ Quick Grip™ clamp is a great tool to hold the aligned nose cone in place until the epoxy cures. Once satisfied with the alignment, you can use some of the thickened epoxy that oozed out to build up deeper indents at the trailing edge of the nose cone. Allow this to gel and tack up. It may take 1–2 hours, so the 105/206/406 combination would be a good choice.
Fair the nose cone to the rest of the lower unit
Use mixed epoxy thickened with 407 Low- Density Filler to a peanut butter consistency for a fairing compound. Apply this to the lower unit and fair the nose cone into the rest of the lower unit body. A thin stick, like a paint stir stick, may be modified with a slight arch and used as a forming tool to make the smooth transition from the nose cone to the lower unit. The fairing will allow the water to flow smoothly over the lower unit, create less drag and increase efficiency. When applying the fairing filler, it is actually better to have a high spot in the fairing that may be easily removed by sanding than to have a low spot that needs to be filled in again. Low spots in the fairing could cause cavitation, which is not good for the lower unit’s internal components and may lose system efficiency. Once the fairing is fully cured, sand to remove any high spots. You may need to repeat fairing and filling 3 to 4 times to get it looking right. Wet sand any exposed aluminum each time the epoxy coating is sanded through. At this point you should be able to remove the temporary plugs from their holes. Sand the surface to be as symmetrical and true as possible.
Final finish the new sleek lower unit
Cover the faired surface with a coat of “neat” epoxy. One or two coats should suffice. When these coats have cured, wash with water and a 3M Scotch Brite™ pad and lightly sand with 180–220 grit sandpaper. Paint the lower unit with the proper marine outboard & I/O paint. Most marine stores will carry paints to match the factory engine colors.
If there is still exposed aluminum, you may want to prime it with Zinc Phosphate primer. The primer will also highlight any flaws that may need to be addressed prior to final painting. Some marine stores sell an anti-fouling clear coat to apply over the paint.
Do other lower unit maintenance
While the lower unit is removed, it is a great time to check the water pump impeller (typically located at the top of the lower unit where the drive shaft meets it). This rubber impeller typically will last 3 to 5 years under normal conditions and is the key to keeping your engine adequately cooled. If you have the ability to install a nose cone on the lower unit, you can easily check and replace this key component of your boat’s water cooling system. Rebuild kits run from $30 to $60. It is well worth the investment and would cost you 3 to 5 times that at a local marina.
Install the lower unit
You are now ready to install the newly modified, sleek lower unit back on the outboard or sterndrive. Then go hit the water and see how the boat performs. I was able to pick up about three miles an hour with my modified lower unit. However, the results will differ from boat to boat. Even if the performance is minimal, the extended nose cone surely makes the boat look faster than the standard, blunt lower unit. Good luck with your newly perfected…Nose for speed.