

Final Details
by Captain James R. Watson
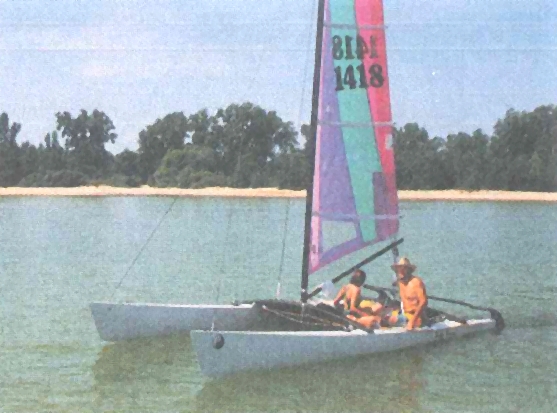
(In Epoxyworks #5 I wrote New Beach Cat (Part I)—The Hull Story about constructing the hulls of my new beach cat.)
There is a little aftershock related to this event, with all the anticipation and abstracting of what she’ll finally be like—now we find out. One finds it is also time to evaluate whether or not this project fulfills the criteria that drove its initiation.
Easy to Launch
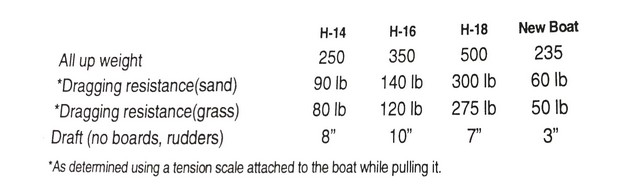
To launch this boat, I drag it over a very soft sand beach—too soft a beach for Cat Trax™ or similar dolly-type beach launch devices. Where I launch, the grade is slight and the water is usually shallow for several hundred feet, so transporting the boat to water deep enough to float it can be a strenuous task. As I age, my strength may lessen, therefore my first design criteria was to produce a craft that would be easier to drag onto and off the beach. Since more weight translates into more friction, I built a lighter structure. I also made the hulls U-shaped to reduce resistance. U-shaped hulls have the same advantage on sand as fat tires do, they don’t sink in. These hulls also draw less water, shortening the distance to water deep enough to float it. This boat weighs less and has less wetted area than the one it replaces, thus it sails better. The following chart compares drag characteristics of the new boat’s hull to three Hobie Cat hulls.
Centerboards
All boats need lateral resistance in order to move efficiently through water. Boats with U-shaped hulls require centerboards or daggerboards to provide lateral resistance, but boards are a hassle when sailing in shallow water and are easily damaged by groundings. Hobie Cats and similar catamarans have V-shaped hulls to provide lateral resistance. And, although V-shaped hulls eliminate the need for the vulnerable boards, they have greater wetted area and more drag, causing the boat to move more slowly in water. V-shaped hulls also dig into the ground, making launching more difficult. A board’s aspect ratio is more efficient than that of a V-shaped hull’s, permitting a boat with boards to point higher when sailing to windward.
I wanted my boat to have the speed and handling advantages of U-shaped hulls with boards, but I didn’t want the problems and hassles associated with daggerboards or centerboards. So I designed special centerboards to minimize board-related hassles. They are fitted with a heavy spring, set in a pocket in the centerboard case. The spring pushes the centerboard down. Since there isn’t a lanyard holding it down, the centerboard comes up automatically when it hits the bottom, and goes back down when the water gets deeper. The only adjustment is a line to hold it in the up position as desired for shoal water operation.
Centerboard case construction
Building the case was fairly straightforward, but the spring housing posed some interesting challenges. When the centerboard is retracted (nearly all the time except when sailing), the load on the spring is about 30 pounds. The housing had to be just wide enough to house the spring, or the spring would flop over on its side. The housing had to be shallow enough to allow the spring’s force to fully extend the centerboard, yet deep enough to house the compressed spring and the centerboard.
The configuration would be tough to fabricate of wood, so I formed the housing out of fiberglass and attached it onto the forward end of the centerboard case. I bonded some blue home-insulation foam to the forward end of the case and shaped it with 50 grit sandpaper. I figured 3/16“ thick biaxial fiberglass would be strong enough to accept the spring loading. The glass also had to, while extending onto the case sides for attachment, fasten the stainless steel axle in place. To get a 3/16”-thickness of biaxial fabric it takes 4 layers of 15-ounce E-glass fabric. I wet each pre-cut layer of glass and placed it over the foam and onto the plywood of the centerboard case. I covered the wet lay-up with release fabric and heavy polyethylene, then smoothed the laminate. After it was cured, I removed the plastic and release fabric and trimmed the edges. The soft foam was easily dug out of the spring cavity. Where it was difficult to get at, I sloshed a little solvent to dissolve the foam.
With the hulls upside down, I created the centerboard slots by first cutting undersized slots in the hull bottoms. Then I stuck the narrow end of the boards up into the slots. After lining the board centerlines with the hull centerlines, I scribed an oversized line around the boards and trimmed the slots to the lines. I repeated the process several times until the slots were just slightly larger than the foil section of the fully extended boards.
Rigged for simplicity
I wanted her simple and easy to sail, yet exciting. Around here we’ve always called that the grief-to-fun ratio. It simply means a reduction of the tasks required to go sailing. This boat is rigged and underway in 5 minutes.
Excitement means speed and efficiency. This boat achieves simplicity via a uni rig (one sail) and no vangs, barber haulers, running backstays, spinnakers, struts, poles, turtles or hydrofoils. It’s efficient with its long, narrow hulls, and low all-up weight, and is easily driven under a modest sail plan. (Actually 168 square feet for a lightweight 18’ catamaran is not all that modest. An A- class catamaran carries 150 square feet and an 18 square meter carries 194 square feet. In 15 knots of wind the A-boat is a bit of a pussy cat where the 18 square meter is a vicious tiger). I had a sailmaker place a reef point so the area could be reduced by 20%. This reduction, plus the subsequently lowered center of effort, tames the boat so I can work against a fresh wind. The boat gives a good turn of speed no matter the direction headed or the amount of wind blowing. The goal is not ultimate high speed on a broad reach in high winds, but rather a good speed given the prevailing wind conditions. There is a great thrill in going 8 knots in a 6 knot breeze and that’s exactly what we found ourselves doing on launch day, the digital speedometer responding to the catamaran’s acceleration in the faint breeze.
The speedometer is the one accessory I chose to install on the boat, and is to me a marvel of modern technology. It’s called Speedwatch™ Wireless Knotmeter. A tiny impeller (0.5″ diameter) hangs from a stainless steel fin taped outside the hull. Inside the hull, a sensor fastened with Velcro™ picks up the impeller’s signal and sends it to a small liquid crystal display mounted near the mast on the front beam. The speedometer weighs just five ounces and is powered by the sun. I reckoned its simplicity matches that of this boat.
The mast
A rotating rig (a mast that is allowed to turn on its step for aerodynamic advantage) must have a fair amount of inherent slop in the shroud and stay configuration. Hence, the leeward shroud becomes quite loose when sailing. Because of the slop, the rig bangs around when on a mooring, and can be especially aggravating when sailing in light air with waves. To keep this shroud from getting into mischief, and to absorb shock from bouncing around in light air or on a mooring, I attached shock chord to the upper hole of the shroud adjuster, led it forward under tension and attached it to an eye. Thus the unloaded shroud is pulled forward and kept under slight tension. The shock chord dampens the snapping that results with sudden loading, and extends the life of the standing rigging. We’ve used this approach on larger boats by attaching a pendant further up the shroud and a tackle of shock chord at the end of the pendant.
Another temporary rig-tightening device is a line led from the forestay bridle to a cleat on the main beam. (We used to call this it an anti-motorboat-wave line.) It can be used separately or in conjunction with the shroud tensioners described above. When moored or sailing down wind, this line can be tightened to remove excess slop from the rig and eliminate jarring loads to the rig. I fasten the bitter end of my halyard to this line and tighten it. This leads the halyard away from the mast so it cannot slap it. The working end is shackled to the boom to serve as a topping-lift. The mainsheet tackle is snugged and thus all the components of the rig are tensioned.
A fair hull
The primary difference between a work boat and a pleasure boat is the degree of finish. Fairness is defined as a straight or curved surface without dips or bumps. Fair topsides look the best, while a fair bottom improves speed. A fair hull is achieved with long-boards (sanding blocks about two sheets of sandpaper long) and a lot of time sanding. (See Specialty Tools for Fairing) A long board leaves low areas alone and eventually removes high areas until the entire surface becomes even.
I first coated my hulls with WEST SYSTEM 105 Resin® and 206 Slow Hardener® mixed with 501 White Pigment. The white coating highlights irregularities and pin holes, protects it from temporary exposure to direct sunlight and gives the hull shape continuity. Low areas are filled with epoxy and 410 Microlight blended to a non-sag consistency. I used a 3’-long batten to apply the filler in a scraping manner, and the hulls came out exceptionally fair. Significant sanding was required only at the bows, where there were some wrinkles, and at the scarf joints, where some puckering occurred during the joining.
When fair to the eye, all surfaces were coated again with clear epoxy then wet sanded to a 120-grit finish. The topsides were painted with a one-part polyurethane. I wet sanded the thoroughly cured epoxy and washed with water just prior to applying the paint. I rolled the 10% reduced paint with urethane roller cover, and it flowed out to a glass-like surface.
One subtle design modification I made was increased freeboard forward of the main beam, to make her a drier boat. My fear was the added windage might result in a lee helm condition or, worse, that the bows might blow off when beating in high winds. It turned out that on my first cruise to the Katakay Islands in the Saginaw Bay, the wind came on to make it a dead beat home. After lunch, I reefed the sail in the lee of Defoe Island and began that long beat back. Thus snugged down, any potential problem would soon be apparent. But, she handled well and we clawed our way to windward all day with just a tad of weather helm. The pencil-thin hulls barely left a mark as they cut across the bay.


