By Captain J.R. Watson
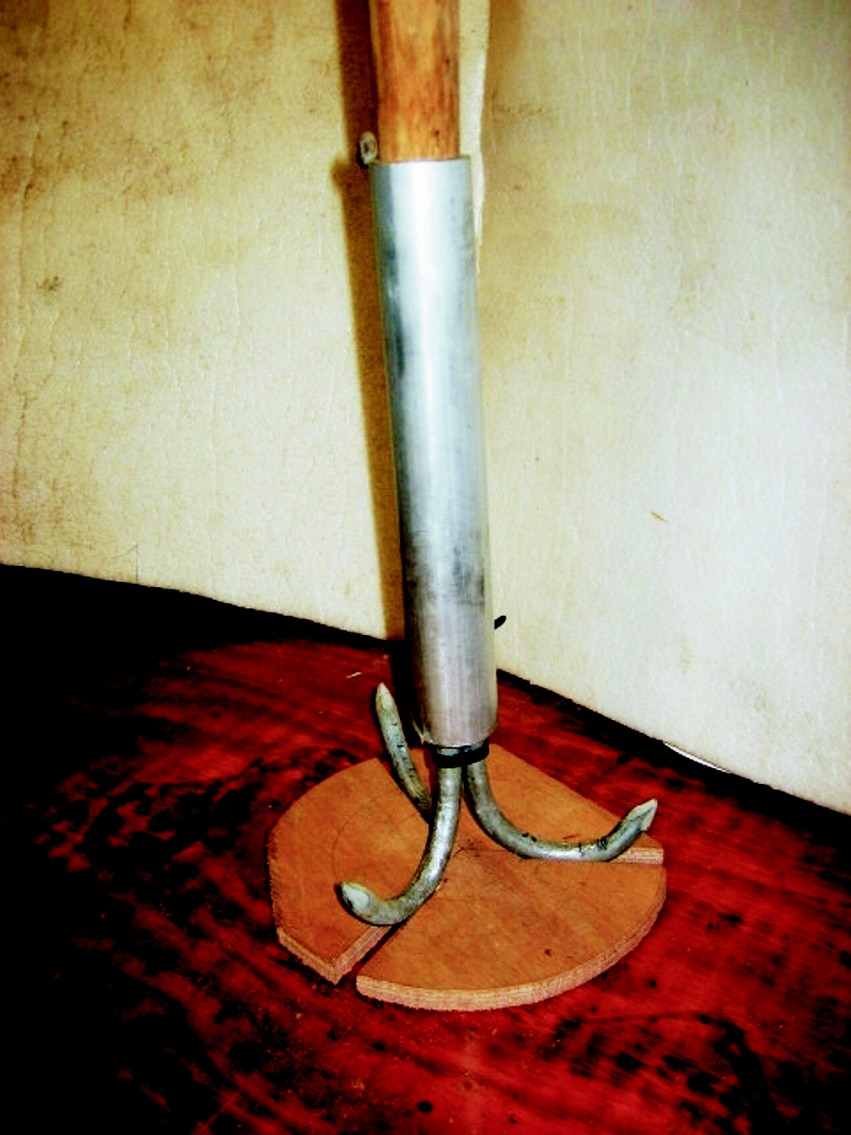
A grapnel or grappling hook is a device with curved tines or “flukes” attached to a rope used for retrieving overboard objects. For pleasure boaters, a grapnel should be small, lightweight, and made of non-rusting materials. I think every cruising boat should have one. The only ones I could find were too large or were a folding grapnel anchor, not a retrieving hook.
To get what I wanted I had to make my own. I settled on a treble configuration and chose galvanized steel. Although plenty strong, this grapnel is intended for light service, up to about 40 lb, which is about as much as the average person can lift with a line anyway.
Grapnel specifications
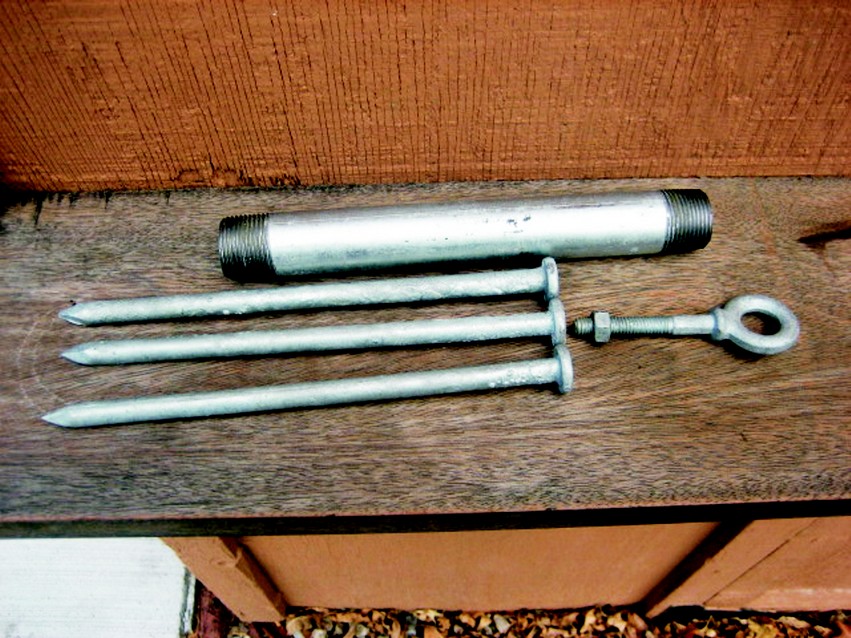
Constructing a grapnel like mine calls for a few common, inexpensive components:
- 3–8″ × 3/8″ dia. galvanized spikes
- 1–8″ × 3/4″ galvanized pipe
- 1–5/16″ × 2″ galvanized forged eyebolt
- WEST SYSTEM® Epoxy (105 Resin and 206 Slow Hardener)
- 1–807 Syringe
- Plumber’s putty
Tools required
- Vice
- Propane Torch
- Channel locks
- 3″ dia. × about 12″ pipe
- Plywood scrap
- String
Step 1. Cut the pipe to 6 1/4″ long removing any threads. This pipe is now your grapnel’s shank. File the ends flat and smooth.
Step 2. Cut the heads off the spikes to make the flukes. Place one spike in a vice, heat with a propane torch and bend to shape in steps using channel locks and a 3″ pipe as a lever. They bend easily. When the fluke is at the desired shape, quench it in water to toughen the steel a little. Repeat until all three are completed. They should all be about the same shape.

Step 4. Using a 3/8″ or 1/2″ scrap of plywood, fashion three 3/8″ wide slots cut as shown so the three flukes rest in the slots 120° apart in the end view. In a side view, you want the curves of the flukes even, so the straight ends of the flukes stand vertical and level. This is the crown of your grapnel.
Step 5. Slide the shank over the three flukes until it stops where the bends begin. At the crown end of the grapnel, seal the shank’s end with plumber’s putty so the epoxy won’t run out of the end. Use a bit of string to suspend the eye bolt (with the nut on, just past the bolt’s end) from something in your shop and adjust until its shoulder is even with the shank’s cut end. Eyeball and adjust until you’re satisfied that it’s straight.
Step 6. Mix three pumps strokes of 105 Resin with three pump strokes of 206 Slow Hardener. This isn’t essential, but if you have 404 High-Density filler on hand you can add a heaping tablespoon to the epoxy. Stir the epoxy mixture thoroughly. Pour into an 807 syringe and inject in the opening alongside of the bolt. Reload the syringe and keep filling the shank until full. Allow to stand 15 minutes, then top it off. The surface tension of the epoxy will create a slight dome on the end, covering the cut end of the shank. Allow it to cure overnight.
Step 7. The next day, remove the plumber’s putty and scratch the cavity with an awl. Place the grapnel in your vice, crown up, and fill this cavity the same way you did in Step 6. It should only take a little epoxy. You can paint the grapnel a bright color to help you see it better underwater but I left mine galvanized. I tie the bitter end of a 1/4″ line about 50′ long to a cleat, toss the grapnel in the direction of the overboard item, then drag it to me. (Never use a grapnel where there could be submerged cables or electric wire.)


