

How I made a composite fender for my bike
By Tom Pawlak — GBI Technical Advisor
Last Father’s Day I received a new light and sleek bicycle from my family. It is by far the nicest bike I’ve ever owned. I enjoy riding it to work in the spring, summer, and fall. Because it is so nice, I decided I didn’t want to bolt on the aluminum bracket used previously over the back wheel on my old bike. The bracket had served multiple purposes. It supported my travel bag and it acted as a fender to keep road water off my back while riding. I decided I would ride with a backpack instead to reduce bulkiness and thought it would be nice to make a lightweight composite fender that I could snap on for those rainy days. That would allow me to remove it for longer trips and on nice weather days.
If you are interested in making your own lightweight composite fender, here’s how it is done:
Make the fender
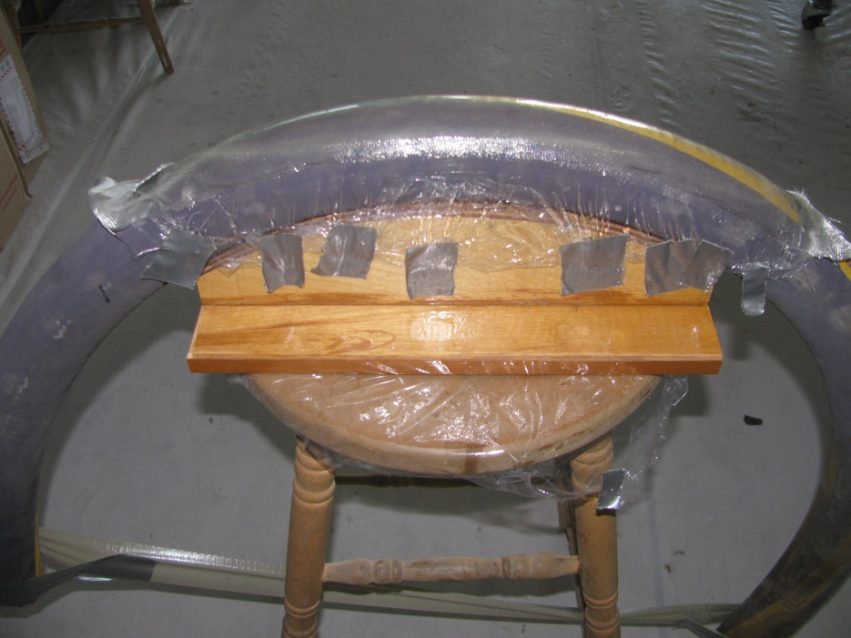
Locate a flexible hose or foam Fun Noodle or another object that has a curve and diameter that looks good. This will be your mold for making the fender.
Flex the hose or Fun Noodle so it matches the diameter of the tire diameter plus a couple of inches for wheel clearance.
Drape the hose over a stool and secure it into position with duct tape. Wrap it with a stretch plastic film like Saran Wrap. This will act as a mold release for the composite fender after it cures.
Cut 4-oz or 6-oz plain weave fiberglass cloth to the length and width needed (I used three layers of cloth). Two layers were oriented with the strands running +-45 degrees to the length of the fender and one layer with the fibers running 0/90 degrees). Be sure to cut more than enough length so the fiberglass composite fender is a bit longer than needed. That way you can always cut it shorter later.
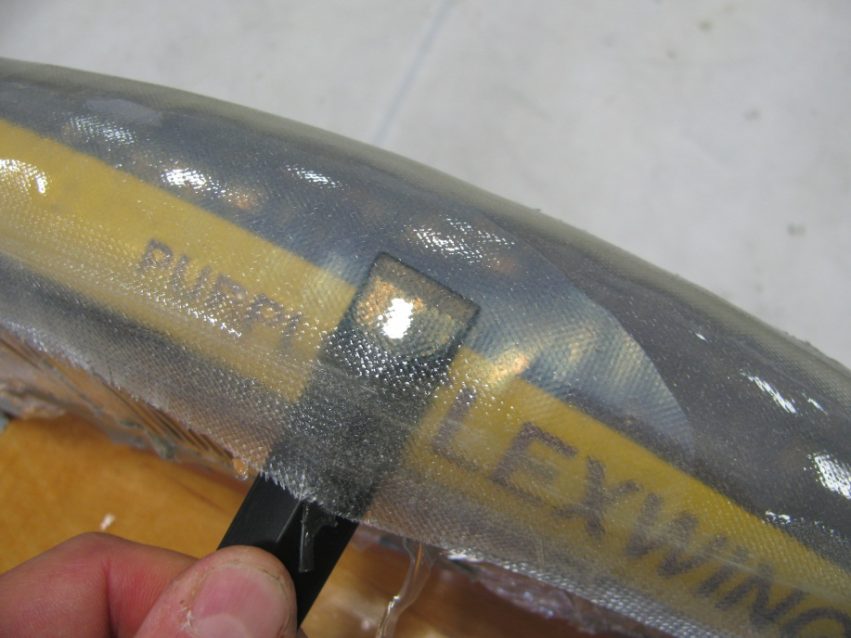
Brush a coat of 105 Resin mixed with 207 Special Clear Hardener onto the stretch plastic.
Place a layer of fiberglass into the wet epoxy and wet out the fiberglass with 105/207 until the white fiberglass strands turn clear.
Apply the remaining layers one at a time with the previous layer still uncured and brushing on more epoxy as needed.
Allow the epoxy to cure for 3-4 hours then apply one additional coat of 105/207 to fill the weave of the fiberglass. If you wish, you can add a bit of black powder toner from a copy machine to the epoxy for the desired effect if you like. That way the fender would look like smoked glass. See Bruce Niederer’s article in Epoxyworks #21 Adding Pigments to Epoxy for more ways to color the epoxy.
Allow the epoxy to cure overnight, then work an 804 Plastic Stir Stick under the edges of the composite fender to lift the fender off of the mold.
Cut the fender to shape with tin snips or with heavy scissors and set aside
Create snap sleeve to connect composite fender to seat support tube
Prepare the bike frame/seat support tube by covering it with clear shiny Cellophane packaging tape. (This will act as mold release so the epoxy does not stick.)
Cut 3-4 strips of 4 to 6 oz. fiberglass cloth that are 1.5” wide and just long enough to make it 3/4 of the way around the circumference of the tube. I used Kevlar for the first layer on mine so it would not scratch the paint on my bike, and followed that with a couple of layers of fiberglass cloth.
Brush a coat of 105/207 epoxy onto the Cellophane tape, then apply the layers of 4-6 oz. fiberglass one at a time using the technique described for making the fender. Be sure you start the pieces at the same point on the tube with the goal of wrapping the tube ¾ of the way around with each piece.
Allow it to cure overnight before removing the composite sleeve from the tape-covered tube. It should pull away like a fiberglass spring.
Trim it to the final size with snips, files, or sandpaper.
Try snapping it in place. If it goes on and off the round support tube with difficulty, shorten the snap by removing 1/16” to 1/8” of circumference until it snaps onto and comes off of the tube without too much effort. Remember, this snap will keep the front end of the fender attached to the bike so you don’t want it too loose. If you trim away too much and it is a bit loose, don’t worry because it will tighten up a bit when the spacer strut (info on this will follow) is glued to it.
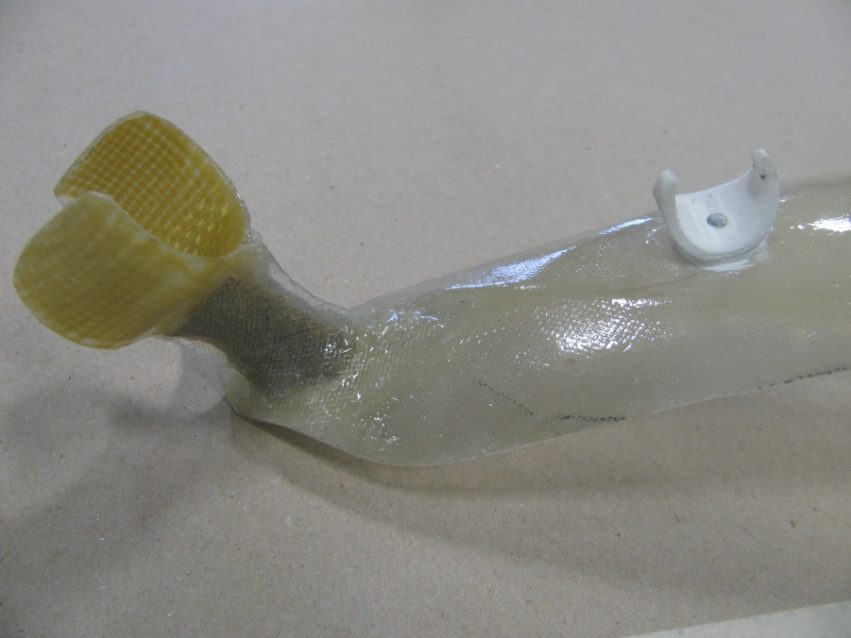
PVC pipe snap connector
There is a place on my bike frame just above the rear wheel where an aftermarket fender can be bolted in place. I used the holes intended for the thru-bolt as indents for a plastic snap made from ½” white PVC plastic pipe cut to shape.
Create spacer strut for the composite fender
Mockup the fender, PVC fender snap, fender, and seat support tube snap sleeve (align opening in the sleeve to face the front of the bike) with a combination of wire and cellophane tape. In other words, get all the components in place and secure them temporarily. Be sure the fender is centered over the wheel and centered behind the seat support tube (at the lower front end of the fender). Adjust as needed to get it all aligned. When the fender is temporarily supported in its intended position, look at the gap between the front end of the fender and the back edge of the support tube snap sleeve. Adjust the fiberglass snap sleeve up or down the tube until the bottom edge is level with the front bottom edge of the fender.
Begin measuring and drawing the shape of the gap so you can sculpt it from a piece of expanded polystyrene foam or pink or blue Dow Styrofoam.
Use whatever tools you have for carving/shaping the foam spacer. Band saws, keyhole saws and coarse sandpaper wrapped around wooden dowels are all helpful. Don’t look to make it perfect now because it can be further shaped after it is glued in place.
Dry fit the spacer to make sure it fits then glue it in place with epoxy thickened to a non-sagging consistency. Six10 Thickened Epoxy Adhesive, G/5 Five-minute epoxy or 105 Resin/with 200 series hardeners epoxy thickened with 403 Microfibers would work for this. Try to avoid smearing excess epoxy onto the foam face because epoxy smudges will be much hardener to sand than the expanded foam when final shaping later.
Allow the epoxy to cure then carefully remove the fender and fiberglass snap from the seat support tube.
Final fair the strut with sandpaper wrapped around wooden dowels or various shaped course metal files with the goal of creating something sleek and aerodynamic.
Cut two strips of 4-oz or 6-oz fiberglass cloth (one for each side of the foam strut) with the fiberglass strands oriented on the bias (at +-45 degree orientation). This will enable the fiberglass to better conform to the spacer strut, fiberglass snap sleeve, and fender. Leave the fiberglass long enough and wide enough to tab onto the sides of the fiberglass snap sleeve, cover the foam spacer and extend onto the fiberglass fender by about 3/8”.
Apply a coat of epoxy to the strut and 3/8” beyond the foam onto the fender and onto the fiberglass snap sleeve.
Lay the fiberglass piece oriented on the bias over one side of the strut and press it in place with a small acid brush or with your gloved fingertips.
Apply additional epoxy to the fiberglass until the fiberglass strands go clear. Wipe away any excess.

Repeat the process on the opposite side of the strut. Where the fiberglass meets at the front and back of the strut, you can either let it overlap by ¼” or you can let the two fiberglass pieces contact one another to form a ¼” wide flange.
If you wish to fair the strut and tabbing that connects everything together you can brush on a coat of epoxy thickened with 410 MicrolightTM or 407 Low-Density filler (to a stiff ketchup consistency) to fill irregularities while the previously applied epoxy is still sticky or tacky.
Install the PVC Snap on the composite fender
Press the PVC snap into place in the fender mounting holes located over the rear wheel.
Feed the rear end of the fiberglass fender between the seat support post and the rear wheel. Continue feeding it over the back wheel and adjust fore and aft until the fiberglass snap sleeve can be pressed in place on the seat support tube.
Center the fender side-to-side over the rear wheel, lifting it until it touches the PVC snap fitting. Secure it temporarily with tape.
Put a couple of witness marks on the PVC snap and fender so you can relocate it later.
Remove composite fender from the bike.
Align the marks on the PVC snap and the fender and drill a hole thru the underside of the fender and into the PVC snap connector. Be sure to select an appropriate size pilot hole for the self-tapping stainless steel screw.
Screw through the underside of the fender and into the PVC snap connector. When it is snug and secure, trim off the excess screw length so it is flush with the inside edge of the PVC snap.
Take it apart and sand the mating surfaces on the fender and on the PVC snap with 80-grit sandpaper.
Apply a bit of thickened epoxy, (I used G/5 Five-Minute Epoxy thickened with 403 Microfibers for this) insert the screw, snug it up slightly and clean up excess epoxy after sculpting the “squeeze out” into a clean radius fillet.
Install the fender on the bike, feeding it once again through the gap between the tire and the seat support tube while the epoxy is still soft so you can rotate the snap slightly, if needed, to align with the holes in the bike frame.
If you want to make it really nice, you can sand everything smooth and fair then paint it or clear coat it with an automotive clear coat. I left my fender unprotected all summer long and it still looks good, although it did yellow slightly from UV exposure.
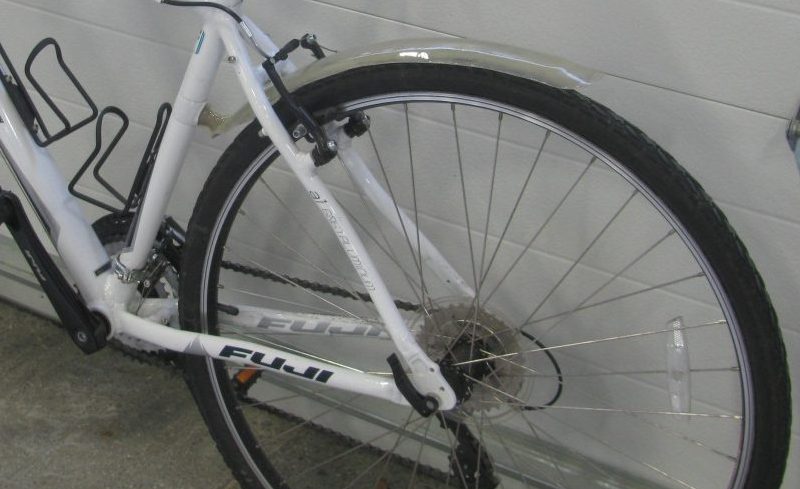
Well, there you have it. It may be that your bike is set up a bit differently than mine and you may have to improvise to connect & disconnect the composite ender from your bike frame. That’s part of the fun in a project like this. In the spring, I’m thinking of shedding a few grams by making my next composite fender out of carbon fiber—just kidding. This one only weighs 1.75 ounces (50 grams) so I don’t think I could do much better, although it would be fun to give it a try. We’ll see.


