By Bruce Niederer — GBI Technical Advisor
Bruce’s law: The amount of time and effort required to complete an unexpected boat repair is exponentially proportional to how soon you planned on launching.
I am sure I am not alone in this observation. Such was the case this spring as my father and I prepared Triple Threat, our 30′ Pearson Flyer, for another season of racing. I knew the bow floor boards, made of marine plywood and falling apart, would need to go. I had started to build replacements over the winter using foam core, fiberglass and epoxy. But when I climbed aboard and removed the old ones, Bruce’s law kicked in big time.
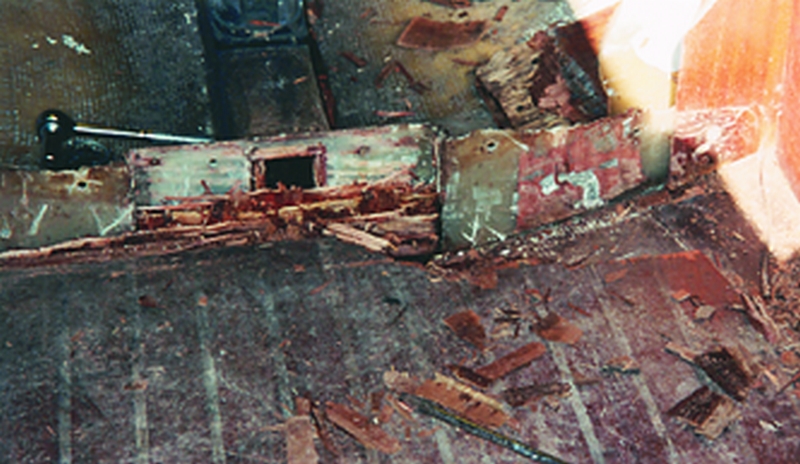
With the bow floor boards removed, the mast support stringer is exposed. The mast is stepped on this support. It also serves as a center support, to which both floor board sections are fastened. This support stringer runs from the forward bulkhead about nine feet back to the middle bulkhead, which is where the chainplates are secured. Actually it ran 8′ 11 1/4″, leaving a 1/4″ gap. The gap was bridged with a piece of 3/4″ tabbing was run up the forward side of the bulkhead from the hull bottom, covering all but the edge of the plywood that faced up. The exposed end grain served quite nicely as a sponge.
Over the years, as this board became wet, there was no way for the water and moisture to escape except into the wood surrounding it. That is, the wood of the bulkhead and the main salon floor. Any hope of a quick fix to replace this soaked piece of plywood soon vanished. In addition to the anticipated simple job to replace the bow floor, we now had to repair the bulkhead, and replace the main salon floor, in addition to the usual bottom and freeboard work. With the tune-up race just ten days away, Bruce’s law was in full effect.
Our first job was to carefully remove the main salon floor intact so that we could use it as a template. The large companionway on a Flyer allowed the old floor to be removed in one piece, and allowed the new floor to be built in the shop and installed later in one completed piece. The original floor was made of 3/4″ plywood with a teak and holly veneer. We decided to replace it with two layers of 3/8″ okoume plywood. We already had the okuome stored for another project, and the cost to replace teak and holly veneer is quite high.
The main salon floor is about 10′ long, while our okoume was in standard 4′ x 8′ sheets. Using two layers of 3/8″ material proved to be a handy way to get the length we needed to make the one-piece floor unit. We did it by overlapping butt joints at different points in the top and bottom layers. The visible butt joint in the top surface was placed towards the back and is under the companionway ladder, making it pretty unnoticeable. Also, the two layer plan made it easy to make the bilge access cover by simply cutting a larger opening in the top layer than in the bottom layer. The piece cut out of the top then becomes the cover, which sits on the ledge formed by the smaller opening in the bottom layer.
To bond in the pieces and fill the gaps between layers, we used WEST SYSTEM® 105 Resin and 206 Slow Hardener, filled with 406 Colloidal Silica to a consistency slightly thicker than catsup.
We stained the top surface with a water-based mahogany stain, then encapsulated the entire floor with four coats of 105 Resin and 207 Coating Hardener. To finish the surface and provide UV protection, we applied a couple of coats of one-part polyurethane varnish to the top.
The next step was to repair the bulkhead. Before removing anything, we made a template from a piece of cardboard. This allowed us to cut a replacement from the okoume we had left over from the floor. With all the floors out, it was fairly easy to remove the bad wood in the bulkhead. We cut a scarfed edge well into the good wood on both sides of the repair area, and used a one-inch chisel to scrape out the rotten wood, including the offending piece of plywood.
When the replacement wood was ready to be bonded in, we sanded the remaining FRP surfaces with 80-grit paper to prepare for secondary bonding. As the photo reveals, the mast support stringer is an FRP laminate over a plywood form. We made sure the plywood form was well dried before bonding in the repair pieces. We cut the bulkhead replacement with scarfed ends to match the cuts in the bulkhead.
We replaced the plywood spacer (that was the cause of our problems) with a 3/4″ board. This reduced the amount of end grain, even though the entire repair would be encapsulated in epoxy.
The replacement pieces were coated with two layers of WEST SYSTEM 105 Resin/206 Slow Hardener on all surfaces, bonded into place and held with clamps. We filled the gaps with 105/206 thickened with 403 Microfibers. We waterproofed the offending board by completely covering the top surface with a 1/4″ layer of thickened epoxy. Then we allowed the repair to cure. After washing and sanding the cured surfaces, we covered the scarf with two layers of Episize® 12 oz. woven glass for added strength. We applied one more coat of 105/206, and after it cured we sanded the repair smooth and painted it. With these repairs done, the main salon area was ready for the new floor to be installed. As the photo above shows, the finished floor looks very good.
The repairs I’ve described so far make use of the standard techniques, or variations thereof, discussed in previous issues of Epoxyworks or found in our manuals. But the bow floor boards, which we built in the shop over the winter and spring, are unique. The bow of a Pearson flyer seems to get wet more than any other area. It is not a V-berth. Rather, it has sail bins and a portable head, so sails are often dumped wet through the forward hatch. The mast is also stepped there and is notorious for leaking around the mast collar. Consequently, plywood used for floor boards has a short life span. Plywood also gets heavy when it is water logged. For all these reasons I decided to try something a bit different.
I started by using the old floor boards as templates to cut some Divinycell® foam into shape and use it as a core material. Divinycell is a closed-cell PVC core material.
(Instead of Divinycell, I could have used blue Styrofoam® insulation board. It works well for sailboards and should work well in this kind of application too. (See Foam Things in Disguise.) Once cut to shape, I laminated three layers of Episize 12 oz. woven glass to each half, top and bottom, using 105/206. When the epoxy was fully cured, I rounded all of the edges with an orbital sander to make it easier to wrap fiberglass tape around the edges.
Laminating Episize 4″ biaxial tape around the edges turned out to be harder than I’d anticipated. After grinding off a couple of failed attempts, I finally got smart and brought up the problem at our morning tech staff meeting. Ace technical advisor Tom Pawlak suggested the perfect solution.
I bought a large, restaurant-size roll of Saran® cling wrap from the local restaurant supply warehouse. Then I cut a length of biaxial tape to fit one edge at a time. With 105/205, I wet out the tape on a piece of visqueen plastic laid over a table. I used a small brush to wet out the rounded edge with epoxy. I put the tape around the edge of my board, using my gloved hands as squeegees to get it mostly in place.
I was then able to wrap the piece with cling wrap, pulling it tight just as one would do to cover a bowl of leftovers. The edge-to-edge pressure created by the stretched cling wrap creates a tight, uniform clamp to hold the tape in place around the tight radius on the edges of the floor boards. Since the epoxy does not bond to the cling wrap, it will come right off once the epoxy has cured. Where the cling wrap wrinkled, some of it did get caught in the epoxy, but it came off easily with a sander.
By doing one edge a day on each piece, I covered all four edges of both boards within a week. A variation of the complete wrap technique is to tape one edge of the cling wrap below the edge being bonded, pulling the cling wrap tightly around the edge, and taping the stretched cling wrap on the opposite side. This process works very well if, during the wet out process, you can keep the surfaces where the tape is applied free of wet epoxy.
To finish, I sanded the edges fair, then filled the visible top surfaces with a fairing compound of 105/206 filled to a non-sag consistency with 407 Low-Density filler. Then I did more and more sanding until the edges and walking surfaces were smooth and fair.
I used a reciprocal saw to cut holes for the thru-hull access ports. I bonded these parts in, without hardware, using 105/206 thickened to a non-sag consistency with 406 Colloidal Silica filler. I made sure that any exposed foam core was well coated. Then I drilled oversized holes for mounting the floor boards to the mast support beam, taped off the bottom and filled them with slightly thickened 105/206. Later, I drilled the proper diameter holes through the center of the cured epoxy plug, which is our recommended hardware bonding technique. The final step was applying three coats of white urethane cement floor and deck paint.
As the photo shows, the finished job turned out looking quite nice. My father and I are pleased with the changes and so far everything is working well. Because of Bruce’s law, we didn’t make the tune-up race, or the first race the next weekend, but next year we are going in.


