By Tom Pawlak — GBI Technical Advisor
Building with epoxy fillets is especially beneficial when attaching bulkheads to hull sides, attaching hull sides to hull bottoms where the faces of the plywood are coming together at ever-changing angles. Gluing plywood structures together with epoxy fillets saves considerable time constructing the joints and reduces the overall weight of the structure compared to more traditional methods using wooden cleats and screws. The strength and gap-filling qualities of epoxy eliminate the need for precisely fitted wood cleats that otherwise require time and skill to create. When gluing with conventional adhesives, that are non-gap filling such as resorcinol glue, wood cleats need to be well fitted, need to be wide enough to provide sufficient glued surface area, and provide enough thickness for screws to be driven into.
Because epoxy can be thickened with high-density fillers into a non-slumping consistency it can bridge large gaps in wood joints, without loss of strength, thus saving a great deal of time labor otherwise needed to create a strong joint.
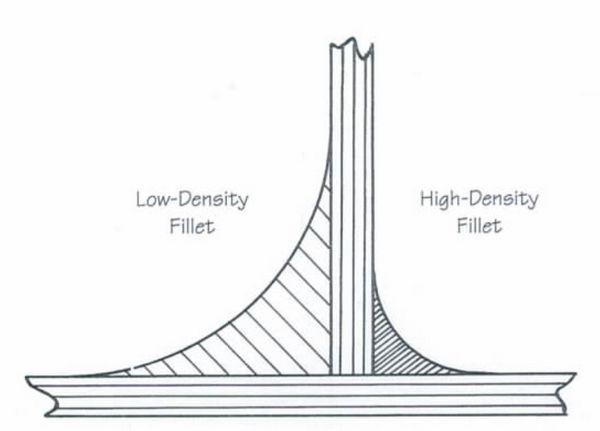
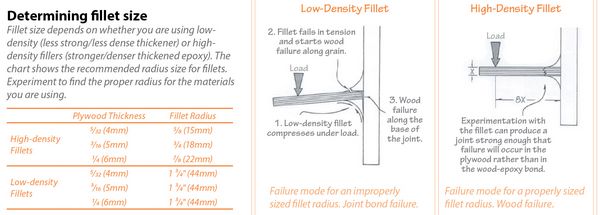
A fillet is a continuous bead of thickened epoxy mixture applied to the angle created between two parts. It increases the surface area of the bond and serves as a structural adhesive and brace.
Filleting creates an effective glue joint that requires no fasteners of any kind and can result in a joint that is as strong as the parts being joined together.
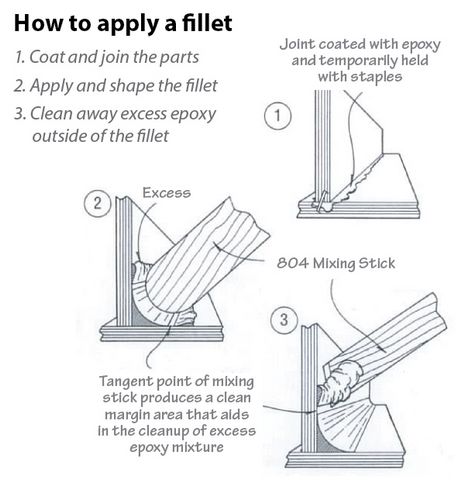
If wood components have not previously been sealed in epoxy, it is good practice to apply a thin coat of epoxy to saturate the surface prior to applying the thickened epoxy fillet so the edges of the fillet don’t soak into the dry wood and cause a dry edge.
You can let the initial coat of epoxy cure, then sand it in preparation for applying the fillet; or you can allow the initial coat of epoxy to tack up a bit before applying the thick epoxy fillet; or you can wipe off uncured epoxy remaining on the surface with a paper towel so the uncured epoxy does not cause the thickened epoxy to slide or slump. In this last scenario, by wiping off the remaining liquid uncured epoxy from the surface you can now apply the thickened epoxy fillet without it sliding off of the wet and uncured liquid epoxy.
An epoxy fillet can be especially effective when joining parts that meet at difficult angles like where bulkheads meet the hull sides near the bow. Other instances would be where plywood hull sides meet the hull bottom or chine, where hull sides meet at the bow and where hull sides join the deck at the sheer. Historically these joints required well-fitted pieces of wood that the plywood could be glued and screwed into.
Applications where fillets are common and helpful:
Stitch and glue boatbuilding
Gluing plywood structures with epoxy fillets has become extremely popular because it allows extremely thin plywood panels to be bent into compound curves and temporarily stitched together at varying angles with plastic wire ties or copper wire that are then permanently joined together with epoxy fillets.
More often than not, these fillets along the chine and at the bow and stern are fiberglassed to provide fiber reinforcement over what would otherwise be a butt-glued joint. Once the fiberglass is applied and cured, the joints are amazingly resilient and strong.
Gluing stringers and frames into hulls
Fillets are also used when gluing stringers and frames into hulls. In these applications, fiberglass fabric (called tabbing) is often applied over the fillet that extends and onto the hull and stringer 2-3” to reinforce the joint. Smooth rounded fillets bridge the hard corner and give the fiberglass reinforcement something to be attached to. Without the fillet, fiberglass fabric won’t go into a square corner well, and the strength would be decreased.

Color-Matched Fillets
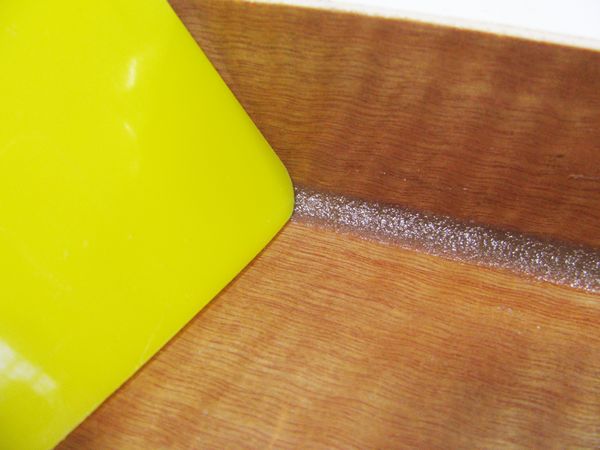
When hull interiors are to be finished natural, epoxy fillets are often colored with a blend of thickeners to achieve colors that match the natural color of wood.
One way to achieve a natural brown fillet would be to use our 405 Filleting Blend filler. It is a blend of dry powder fillers designed to produce medium brown thickened epoxy.
You can also make your own color-matched fillets. Some people use sanding dust, taken from their palm sander dust pickup bag after sanding the wood that they are trying to match. If you use sanding dust exclusively however to thicken the epoxy, it will be grainy to work with and it will be significantly darker than the original wood that it was created from.
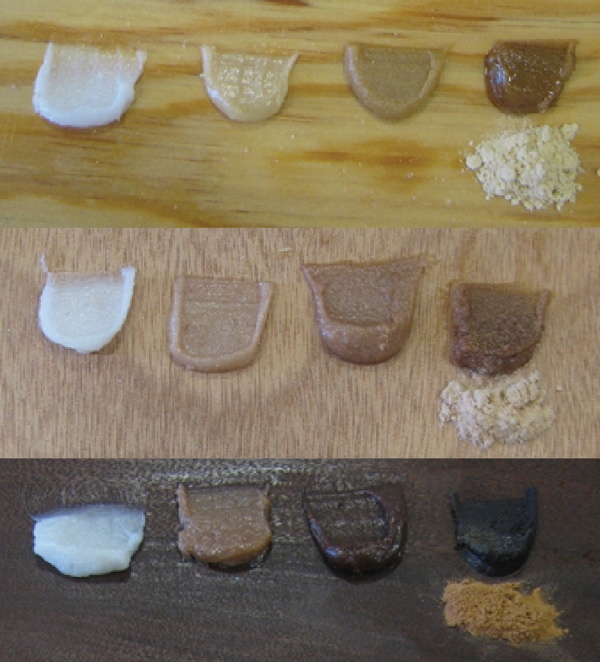
A better approach is to initially thicken a batch of epoxy with 406 Colloidal Silica filler to a mayonnaise consistency (this will create a translucent white/smooth and creamy epoxy) then add wood sanding dust until you arrive at a color you are happy with. The translucent white color of the 406 filler is easily overcome by the wood sanding dust. Add a little wood sanding dust and you’ll get a colored epoxy that is lighter than the wood. Add a lot of the wood sanding dust to the 406 filler thickened epoxy mix and it will become dark. See the photos of three different wood types with four dollops of thickened epoxy on each.
You will discover that if the 406 filler is used to thicken the epoxy alone it gives the mix a translucent white look that will nicely offset the darkening effect of wet wood flour (sanding dust) allowing you to arrive at a color that perfectly matches the wood tone. To do this well though, you will need to have a varnished wood surface or an epoxy-coated surface to see what the wood looks like as you try to color match the thickened epoxy for making fillets. What the epoxy looks like while uncured is what it will look like after it cures.
So, if a natural wood finish is desired, you can add to the overall beauty and elegance of a glued plywood structure by using color-matched epoxy fillets.
The illustrations in this article are taken from The Gougeon Brothers on Boat Construction pages 102 and 103.

