A Magnesium Crankcase Repair
Spring 2011

GET STARTED
FREE PRINT & DIGITAL EDITIONS
Spring 2011
I accidentally punched a hole in my motorcycle’s magnesium crankcase or ignition housing cover. A lot of the guys I work with also ride motorcycles, and in talking with them, I found out that it is not uncommon to punch a hole in the crankcase. I work here at Gougeon Brothers, Inc. as Operations Supervisor in the Epoxy Department where we do production mixing, assembly, packaging, and quality control of WEST SYSTEM® Epoxy.
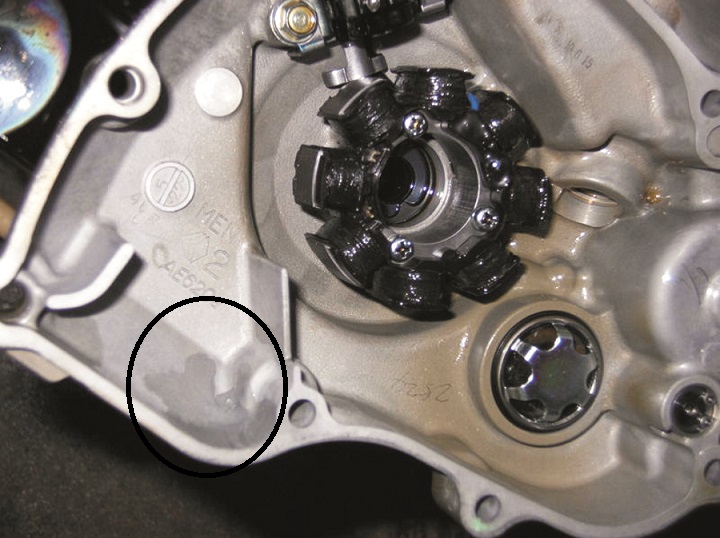
The magnesium crankcase casting is not heavily stressed but does have to hold the hot (about 140°F) oil that lubricates the engine. When I realized it cost $160 to replace the cover, I started thinking of the alternatives like, “How about using this epoxy we make for the repair and save some cash?”
After asking around a little, I came up with an approach. Now, after completing the task and finding that the crankcase repair is working fine, I thought I’d share my process of how to fix a punctured metal casting.
There were too many wire and cable connections so, rather than disconnect these, I chose to repair the cover in place. After draining the oil, I cleaned all surfaces with acetone. Then I abraded the magnesium surfaces with a Dremel™ rotary tool to knock off the burs. Crankcases are made of other materials like aluminum and steel, and I think the same strategies I used on my magnesium crankcase would work as well. I figured a rivet-like casting of epoxy would hold best. I wanted the epoxy thick enough so it wouldn’t run out.
I chose Six10® Thickened Epoxy Adhesive mixed with a little 420 Aluminum Powder. Six10 will not sag and also is toughened a little so it will tolerate the vibrations that the whole motorcycle is exposed to. I didn’t need a large enough quantity to require using the static mixer, so I simply dispensed some into a small plastic container and stirred it before adding the Aluminum Powder. Six10 has a property called shear thinning, which means it is thin when moving but thickens, or gels, when at rest. So it was easy to work into the void and flow around the inside to form my vision of a rivet. I smoothed over the outside and allowed it to cure for 24 hours before I filled the case with oil.
When I’m done riding the bike I put it in the garage with a paper towel under the repair so I can easily note if there are any leaks. Since the repair, I’ve ridden about 16 hours and have had no leaks.


