How to Build a Set of Planer Boards
Spring 2008

GET STARTED
FREE PRINT & DIGITAL EDITIONS
Spring 2008
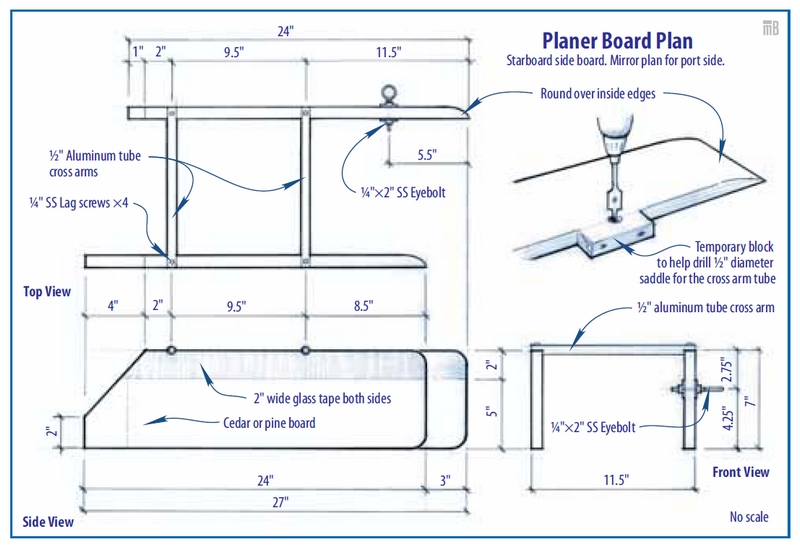
Above: A schematic showing how to build a set of planer boards.
Planer boards allow for more fishing lines to be trolled simultaneously and are used to spread lures and harnesses away from the boat when trolling at low speeds (below 2 knots). They are commonly used when fishing for walleye. You can achieve a greater dimensional spread with planer boards than with outriggers.
A good planer board should advance away from each side of the fishing boat with little effort, not present excessive drag or splashing, track well, resist capsizing in a seaway, be durable, and be painted so as to be very visible. The following is a successful design that is easy to build and requires no ballast. The planer boards are asymmetrical catamarans that are made in pairs; each is a mirror copy of the other.
Select a light wood of sufficient size. Common 1″×8″ is sufficient (3/4″×7½” nominal). Cedar or pine works well (plywood is too heavy). Cut the boards to size and shape the bows as shown. Drill a hole for the eyebolt in the location shown.
Tubes should be lightweight aluminum. I use discarded (kinked) ½” diameter ski poles (most are made of T6061 thin-wall alloy). Clamp a temporary wooden piece as shown and drill (using a spade cutter) to create tube saddle that matches the aluminum tube diameter.
Coat the planer board surface with a thin coat of WEST SYSTEM® 105/205 epoxy to seal the wood. Be sure to swab the inside of the drilled eyebolt hole to protect the exposed end grain. A second coat may be required on the ends where the end grain soaks up the epoxy. Apply a strip of 2″ fiberglass tape as shown in the area of the tube attachment. The fiberglass tape will help prevent board warping and splitting from side forces. Blend tape with a fairing mixture thickened with 410 Microlight™. Allow everything to cure. Then sand all raised grain smooth and blend everything fair. Ream the eyebolt hole as necessary for the eyebolt to pass through without force.
Cut tubes to length. Fill ¾” of the tube ends with a fairing mixture and allow it to cure.
Align the two components of the planer board as illustrated, being sure to maintain a vertical and parallel alignment. Place tubes in saddles and drill through tubes and into planer boards as shown. The hole should be larger than the diameter of the lag screws so the lag screw can be pushed through the aluminum tube and into wood without having to turn the screw. Remove screws and tubes. Apply WEST SYSTEM 105/205 epoxy (neat) to saddle surface and hole interior. Then thicken epoxy with 406 Colloidal Silica to mayonnaise-like consistency and swab a sufficient amount into hole, screws, and saddle surfaces. Place tubes into their location and press all lag screws through the tubes and into the boards. Clean away excess epoxy and then allow everything to cure in the proper position overnight. The structure will be strong and rigid.
Sand all surfaces smooth with 80-grit sandpaper. File the aluminum tube ends so they are smooth and flush with the planer board edge. Paint all surfaces with several coats of sprayable sanding primer, touching up flaws for the desired finish. Follow with sign painter’s “One Shot” (it covers very well, has vivid colors, and dries fast). Install the eyebolt. The eyebolt length allows some adjustment that will affect tracking; start with a middle setting.
Last step: go fishing.


