

By Mike Barnard
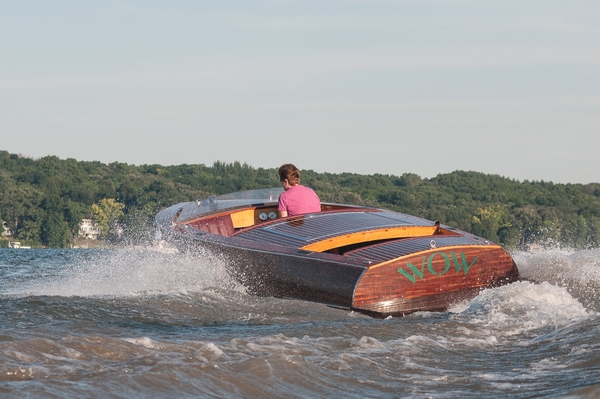
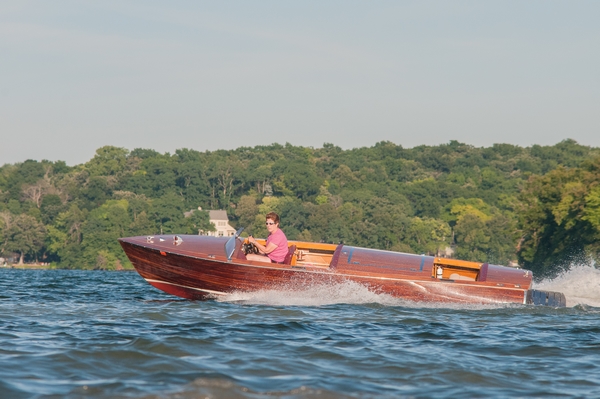
In June of 2000, Mark Bronkalla launched his homebuilt Glen-L Riviera. The20′ runabout was nearly complete but not yet named. The boat turned heads wherever Mark took it and the reaction from bystanders was a universal “WOW.” That’s how his beautiful Glen-L Riviera got its name.
Mark had never built a boat before and found lackluster information from first-time boat builders like himself. Websites or blogs with good information tended to end once the structure was built. Mark used his background in woodworking, marketing, and computer science to share his first-time boat-building experience to encourage and help other first-time boat builders. In this article, I’ll give a brief overview of this build where WEST SYSTEM® Epoxy was used. Anyone considering a build similar to this should consult Mark’s website, bronkalla.com, for more detailed descriptions of each step.
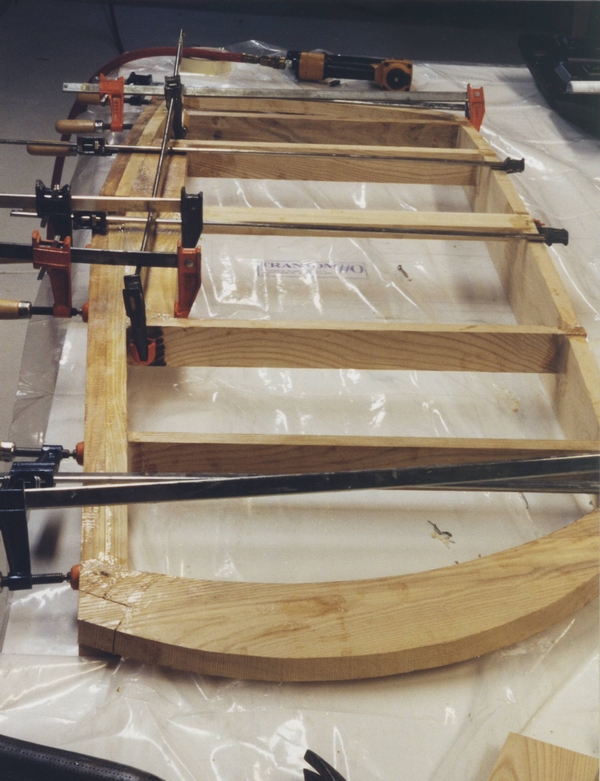
Mark began by building sawn frames using white ash on a sturdy table covered with plastic sheeting. To bond the frames and transom together, Mark used WEST SYSTEM 105 Epoxy Resin with 206 Slow Hardener and wax-coated padded clamps to reduce slippage. The construction of the hull was done in his basement and when completed had to be carried out a double door at a 45° angle. Friends offered to lend him chainsaws to extend the doorway, but that wasn’t needed thanks to his attention to detail.
Mark pre-coated the frames and stringers in epoxy before the assemblies were glued. This prevents water that might be sitting in the bilge from penetrating into the wood.
The battens were then fitted and installed into notches in the frames. Some battens were too short and needed to be glued together. Butt-glued battens would not be flexible enough for the installation, so a scarf joint was required. For cutting these scarfs, Mark set up a jig to match the ideal 8:1 bevel. Once the battens and sheers were glued on, the boat took its general shape and the “real fun” could start: fairing.
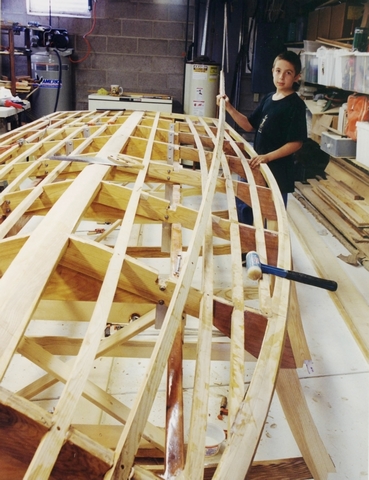
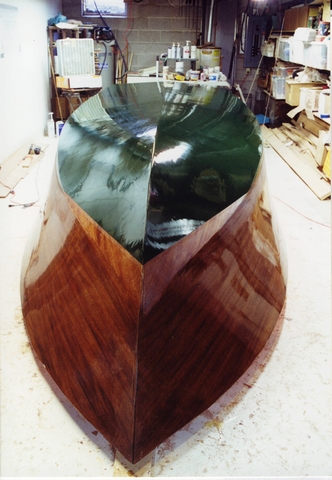
When we mention fairing or the process of making a surface smooth, we’re generally referring to the final step of sanding before coating with epoxy or paint. However, when cold molding a boat, waiting until the last possible moment to sand would make for a lot more sanding. Mark decided to deprive himself of the extra “fun” of sanding at the end and fair the hull before the first laminate was applied and between each successive layer. Sanding between layers helps the next layer to lie down nicely and will prevent distortions caused by uneven thicknesses of wood or epoxy drips that have cured. Since a majority of the hull was empty space at this point, the only way to get a fair surface was to sand multiple battens and frames at a time using a longboard.
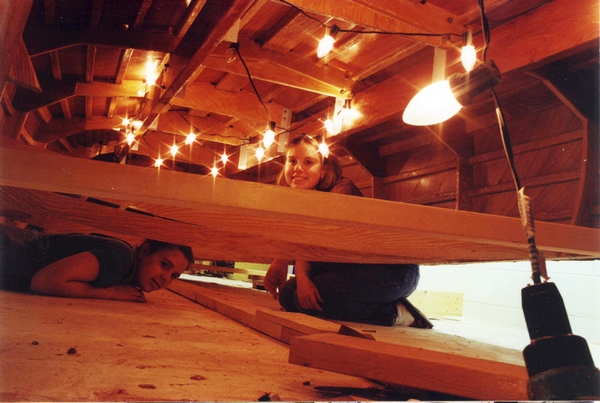
Mark dry fit 6″-wide Okuome plywood strips at a 45° angle by loosely stapling them, then removed them and glued them into place. With two helpers during this process, he was able to finish it in good time. One helper followed him to catch any squeeze-out or drips, while the other was inside the hull doing the same thing. Since this was a family build, his helpers were his kids. His son David was the most involved and put in about half as many hours as Mark. As the process neared completion, they learned that a string of incandescent white Christmas lights under the hull allowed them to see excess epoxy that they could wipe away or use to create fillets.
After the first layer of planks were glued down, it was time to fair once again. An air file was invaluable, but filing was still difficult. Mark recommends taking multiple short breaks not only because of the difficulty, but also to refresh the eyes, making it easier to see the contours of the hull.
Being efficient with his wood usage, Mark was able to save about 1.5 sheets of plywood by scarfing sheets together. His website describes a moderately dangerous but overall good technique to use for scarfing. Alternatively, if there is a lot of scarfing to be done, a WEST SYSTEM 875 Scarffer® can come in handy.
Mark glued on the second layer of planks, then circled the low spots with a pencil. He was smart about not wasting excess epoxy from the gluing process. He added 407 Low-Density filler to the collected squeeze-out to fill the low areas he’d marked.
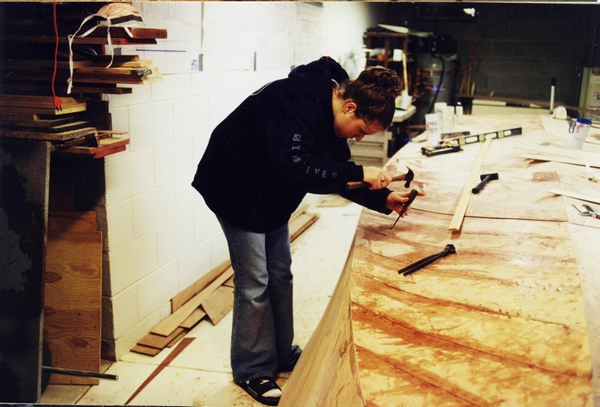
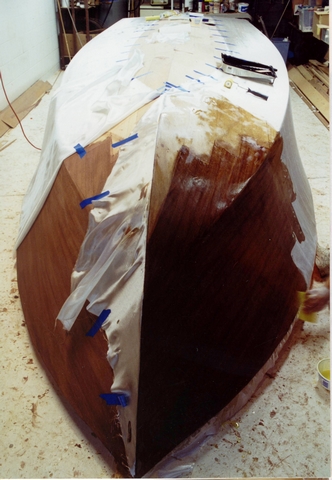
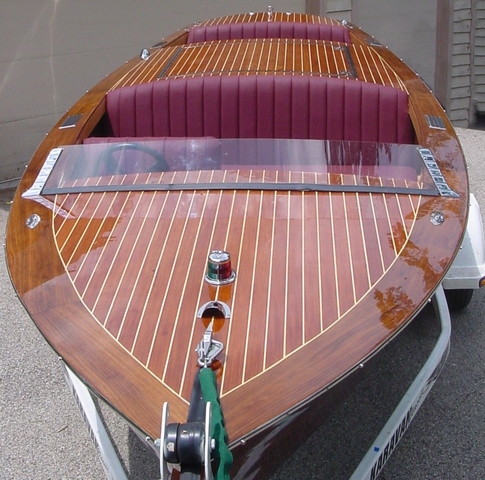
Once the second layer was fair and sanded, it was time for the final layer of planking. On the bottom, these were 6″ wide strips of mahogany plywood that ran longitudinally. The hull sides and small portion of the hull bottom were made from 2″ wide mahogany planks. Since this was the final layer, Mark chose to staple through strips of sacrificial wood to hold the mahogany planks in place while the epoxy cured. This kept him from digging into the final wood surface when removing the staples. The sacrificial strip came off once the staples were removed.
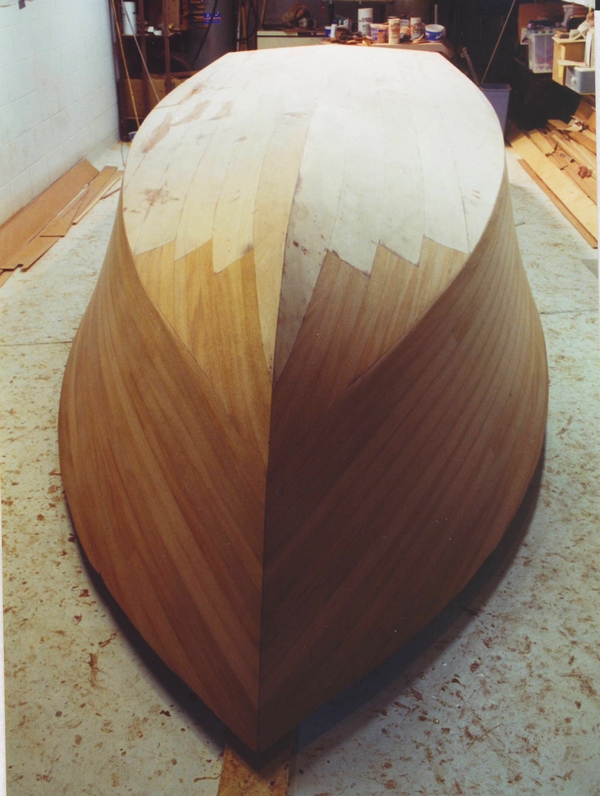
The hull was sanded and then stained using Minwax oil-based stain. This stain was tested by Gougeon Brothers in 2003 (three years after WOW was completed) and failed after both 24 hours, and four days, of drying. Using our recommendations at the time on how to test adhesion to the surface of stained wood, Mark tested several methods and was satisfied with a drying time of one week followed by a 220-grit sand.
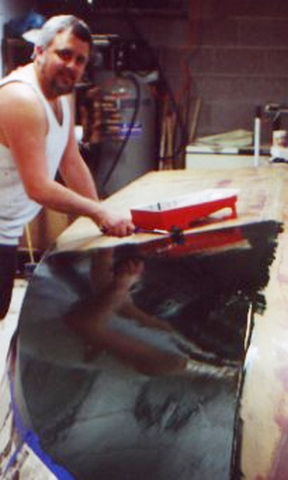
6 oz. fiberglass was then applied to the hull using the dry method. That is where the fabric is laid directly on the dry hull and epoxy is applied on top of it. For optimal clarity, Mark chose to use the 105 Epoxy Resin with the 207 Special Clear Hardener. Laminating was a three-person job—one person to mix, the second to spread, and the third was a “go-fer.”
The fiberglass was applied to the entire hull and overlapped 1″ at the stem. The fiberglass on the transom was tabbed onto the hull side and applied over the already cured fiberglass on the hull. Because this overlap created too much fiberglass thickness to cure clear, it was instead hidden behind a stainless steel trim piece. When the time came to install the trim, Mark noticed the fiberglass started to lift slightly which indicates the epoxy did not bond well enough to the stained wood to resist a peel force. The lifted fiberglass was trimmed back to where there was a good bond and ended up being covered by the stainless steel trim piece.
The rudder, struts, water pick-up, motor mounts, prop shaft, and stuffing box were installed and the engine was hoisted in place and hooked up. Once that was done, the electrical, exhaust, steering, and fuel systems were installed. If you’d like to learn more, visit bronkalla.com where Mark has gone into great detail on each of these topics.
With the majority of the systems installed, it was time to focus on the deck frames and ski tow blocking. Using the Glen-L Riviera plans, this process was pretty straightforward.
Since one of the purposes of the boat was to pull wakeboarders and water skiers, a ski pylon and ski tow were added. To prevent the deck from deforming too much from the force of pulling up a wakeboarder, two pieces of wood were added to make it into a very stiff and strong box beam. The ski tow was mounted at the transom and bolted down through the horizontal brace there.
Eager to complete the engine hatch but still without a transmission shaft flange, Mark eyeballed the fit and decided it looked close enough to continue. He jumped the gun and installed the engine before all of the parts were in, and ended up having to uninstall and reinstall it because it didn’t fit right. He cautions would-be boat builders not to make this mistake.
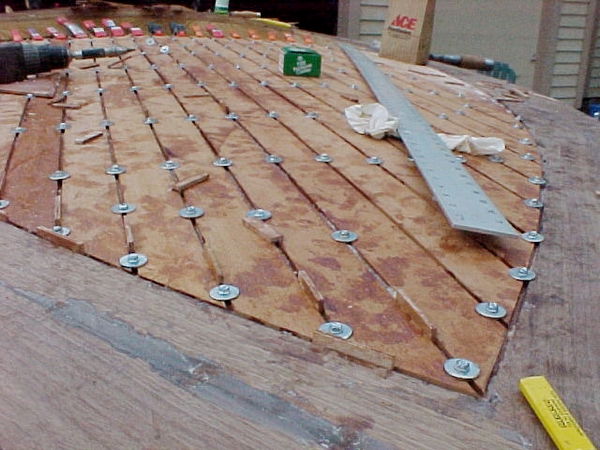
Once the engine was mounted correctly, plastic was draped over it and the plywood decking layer was glued on. Gluing most of a 4′ x 8′ plywood sheet down at a time, Mark used drywall screws to temporarily fasten the plywood down while the epoxy cured. As soon as it was fastened he crawled under the deck and formed fillets with the squeeze-out. Once the epoxy had fully cured, the screws were removed.
After the walnut covering board was epoxied on and trimmed, the mahogany planks were epoxied onto the deck. To get the spacing between each plank, 4 mm plywood scraps were cut into 2/3″ wide strips about 1.5″ long for temporary spacers.
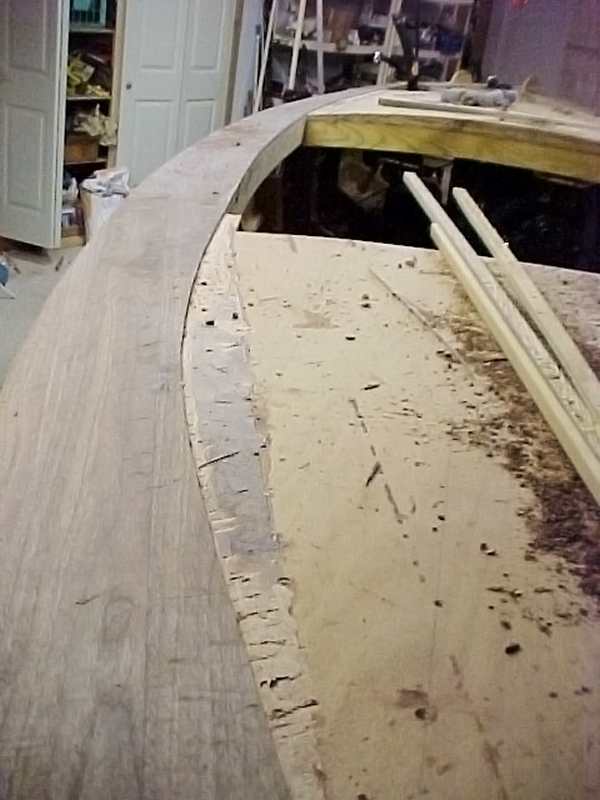
The screws temporarily holding the planks in place were spaced 12″ to 16″ apart, but once a section was fastened, more screws were added so the final distance between each was 6″ to 8″. At this point, the 4 mm plywood spacers were removed. After epoxy cures, it is difficult to remove the screws, so Mark removed them while the epoxy was still rubbery. Another option would have been to coat the screws in wax before driving them through the uncured epoxy. The wax prevents the epoxy from bonding to the screws and they can be removed even when the epoxy is cured.
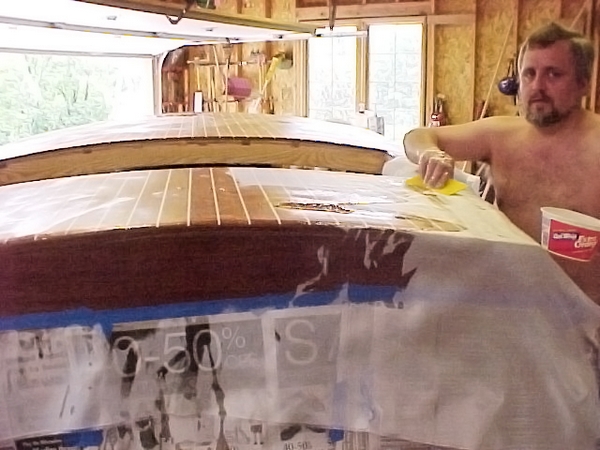
The top of the deck was coated with WEST SYSTEM 105 Epoxy Resin and 207 Special Clear Hardener. Mark squeegeed a mixture of 105 Epoxy Resin, 206 Slow Hardener, 403 Microfibers, 406 Colloidal Silica and 501 White Pigment between the mahogany planks and allowed it to cure. Then the deck was sanded flat so 4-oz. fiberglass could be used with the 105/207. He filled the fiberglass weave with four coats of epoxy and allowed it to cure, sanded it, then applied several layers of Z-Spar Flagship varnish. After perfecting each of the three decks, it was time to cut a hole for the engine hatch.
The final touches of adding trim, hardware, and modifying the seats were technically not completed by the time the boat hit the water, but it still looked good enough to turn heads and earn its name from admirers.
In addition to allowing me to summarize the building of WOW, Mark has been kind enough to provide an update on the boat after 16 years of use. In our next issue, his retrospective article will cover how the boat was used, how well it has stood the test of time and the modifications he’s made to the boat over the years.


