- Boat Building & Repair
- Boat Construction
- Coating
- Canoe & Kayak Construction
- Fiberglassing
- Techniques & Tips


GET STARTED
FREE PRINT & DIGITAL EDITIONS
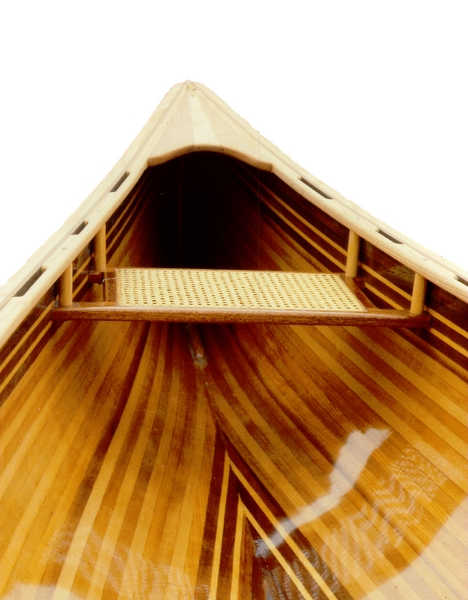
If you are using the strip planking method to build a canoe, kayak or even a telescope, you already appreciate the beauty of wood. The following tips will help you achieve the clearest possible fiberglass coating to protect and reinforce the wood and show off your handiwork.
Because your work will be on permanent display under glass, you must make the wood surface as fair and flawless as possible before you apply fiberglass cloth. Once you’ve glassed and coated the surface, the flaws will stand out and they will be very difficult to repair.
First check the surface for fairness. This is where you want to be a perfectionist. Be sure to sand out any scratches running across the grain. To prevent small hollows, use a long sanding board, with the grain. Remove the dust by vacuuming and wiping the surface with paper towels dampened with lacquer thinner. (Rags can sometimes contaminate the surface, preventing a strong epoxy bond—paper towels are safer.) This also helps to reveal any scratches or marks across the wood grain and gives you an ideal of how the surface will look when coated with epoxy.
WEST SYSTEM 207 Special Clear Hardener is specifically designed for clear finishes. Mixed with 105 Resin, it is unaffected by high humidity and has a low viscosity. It wets out fabric well and flows out smoothly when coating.
Woven fiberglass is best for general sheathing because it finishes to an even surface. For maximum clarity, use a lightweight fiberglass cloth, 4 oz. or 6 oz. per square yard. Heavier fabric won’t wet out as clear, and will hide wood grain details. Buy your fiberglass cloth on a roll. It is less likely to wrinkle than folded fiberglass fabrics.
Fiberglass becomes clear during wet out as epoxy surrounds and displaces the air between the many fine filaments that make up its strands. Choose a fabric with an epoxy-compatible coupling agent, because it permits epoxy to more easily replace the air around the filaments than incompatible fabric.
On clear finished wood, we recommend applying a seal coat of epoxy to the wood before fiberglassing. This will assure the wood won’t absorb epoxy out of the cloth, leaving dry spots. The coating also highlights any flaws you’ve missed, giving you a last chance to perfect the surface before you apply the fiberglass. Sealing the wood also helps prevent outgassing.
When temperatures rise or when high barometric pressure gives way to low barometric pressure, air within the cells of the wood expands and is forced out. This occurrence is called outgassing. If the surface is coated with fresh epoxy, the outgoing air can leave bubbles or pinholes in the coating. Not only do the bubbles show in the cured coating, they can lift the fiberglass from the surface, creating unsightly voids.
You can get the best results coating indoors where you have control over the temperature. Raise your shop temperature for a few hours, then reduce it before you begin coating. As the wood temperature drops to equal the room temperature, it tends to draw air, or epoxy, into its pores (the opposite of outgassing). If you must coat outdoors, wait until after the air temperature and wood temperature have peaked, and will be cooling as air temperature drops through the afternoon or evening.
Mix only as much epoxy as you’ll use in about 10 minutes. Freshly mixed epoxy is best for wetting fiberglass. Epoxy thickens slightly toward the end of its pot life. Although still workable, it won’t wet the wood surface or fiberglass cloth quite as readily.
For a uniform fiberglass wet out and the clearest finish, Ted Moores of the Bear Mountain Boat Shop, suggests applying the epoxy with a paintbrush. You’ll aerate the epoxy if you use a roller or pour a puddle of epoxy on the fabric and spread it around with a squeegee. While the initial results will look uniform, the aerated epoxy will lighten after exposure to sunlight, obscuring the beauty of the wood grain.
If you need to apply more than one layer of glass (such as in the bottom of a canoe), apply the layers individually. When you apply multiple layers at once, the lower layers act as a cushion, making it harder to squeegee out all of the air. You can’t exert as much pressure with the squeegee as you could with a single layer of cloth.
The object of squeegeeing is to force the epoxy into the fiberglass while forcing trapped air out. Hold the squeegee at a low angle, and with enough pressure, so there is about an inch of contact against the surface.
If you don’t squeegee away excess epoxy after wetting out the cloth, it may float off of the surface at the epoxy puddle. The result will be a wavy surface and a heavier canoe. After squeegeeing, the cloth weave should project above the epoxy. If you drag the squeegee at too high of an angle, it may remove excess resin but won’t force the air bubbles out. If you leave air bubbles in the interstices (the small hollow at the cross weave of the fiber strands), the sun may heat it enough to create blisters. If you notice little white specs where the fabric is not completely wet, you can work epoxy into these spots by dabbing at them with a short bristle brush and gently warming the area.
For best chemical bonding between build up coats, and to avoid sanding between coats, apply the fiberglass and all of the necessary build up coats on the same day. Apply the first build up coat when the wet-out fiberglass begins to gel (about 3 hours at room temperature with 207 Hardener). Apply each remaining coat at the same interval. The epoxy build-up coats should be thick enough to provide a good moisture barrier and allow sanding to prepare for varnishing, without sanding through to the fiberglass. For best results apply the build up in thin, even coats.


