

by Bill Bertelsen, GBI Test Engineer
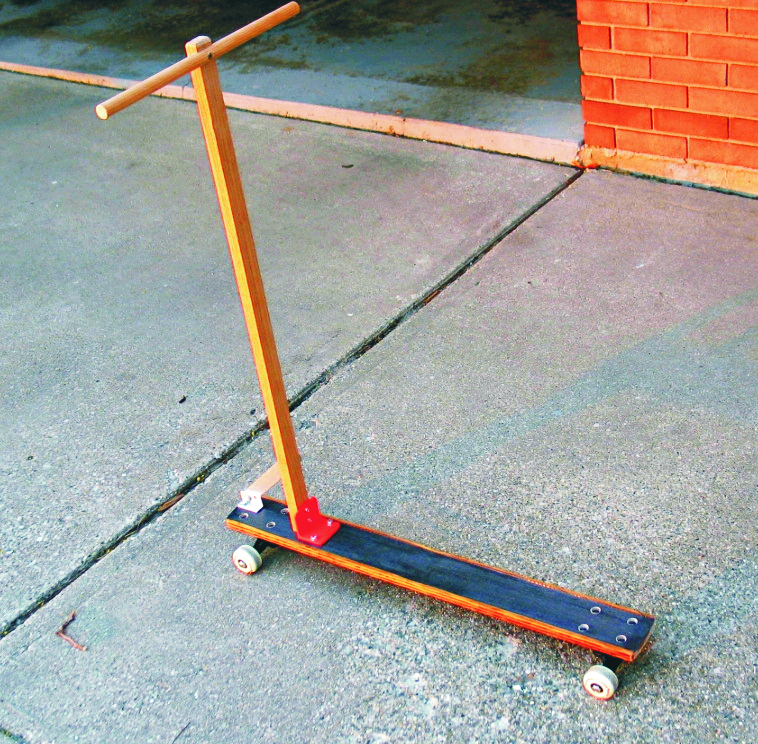
Above: A properly engineered scootboard chassis. Even without the resources of a well-equipped test lab, Bill Bertelsen, GBI’s test engineer, was able to gather useful composites data using the equipment at hand—in this case, a spring clamp, a ruler, a digital camera, and an 8-year-old girl. ,
“Daddy, can we build a scooter from these old pieces of wood?”
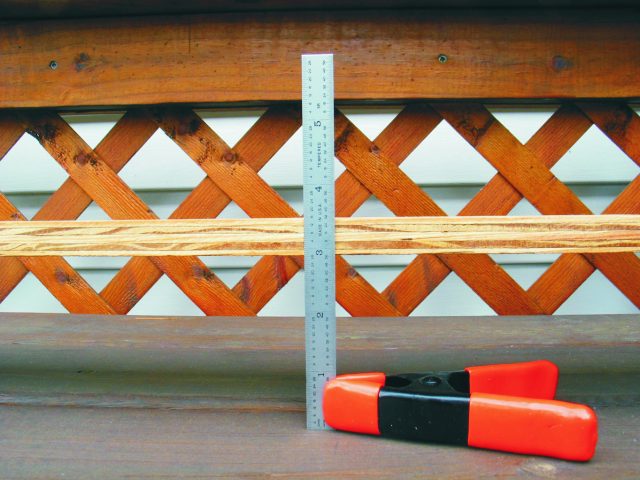
Thus began a father-daughter project with my 8-year-old that provided a learning opportunity for both of us. That weekend Mikayla had been scrounging in our spare lumber barrel and found two items that immediately suggested themselves as “scooter parts.” After examining her selections, I had to agree. One piece was a 32″-long strip of A/C grade Southern yellow pine plywood, about 5 8″ thick and 3½” wide. It was the perfect size for the “chassis.” The other piece was a stick of solid oak, ¾”×1¼”×33½”, ideal for anchoring a handlebar.
I said, “OK, if we can borrow the wheels from your skateboard.”
Inwardly, I questioned whether the skinny plywood strip could handle the chassis job. The wheelbase would be at least a foot longer than the old skateboard (making it the sidewalk equivalent of a stretch limo). And sooner or later, the new “Scootboard” would have to stand up to the big boys in her school.
But I knew that building the scootboard would be a simple matter to reinforce the plywood chassis using WEST SYSTEM® products. It occurred to me that this was the perfect project to teach Mikayla the effectiveness of composite reinforcement in stiffening our marginal structure. The WEST SYSTEM User Manual & Product Guide is filled with exactly the right goodies to start anyone on the road to becoming an experienced composites expert. There is not only easy-to-use 105/205 epoxy, but also versatile 703-12 Unidirectional Carbon Tape, 3″ wide. The 703 carbon was exactly the right width for the chassis of our scootboard. WEST SYSTEM also offers 808 Flexible Plastic Spreaders for applying the epoxy to the carbon fabric.
I proposed a three-stage experiment. Stage 1: We would first bolt the skateboard wheels to the ends of the plywood, then measure how far it sagged when Mikayla stepped on the middle with her full 55-lb weight. I set up our digital camera to document the extent of the flexure. Stage 2: Next we would remove the wheels, apply the carbon tape to the underside (tension side) of the plywood with the WEST SYSTEM 105/205 epoxy, and allow it to cure overnight. After reinstalling the wheels, we could repeat the flexure test in front of the camera to determine the reduction in bending. Stage 3: Finally, we would once again remove the wheels, apply a length of carbon tape to the upper (compression) side, and allow to cure overnight. After reinstalling the wheels we could make a final deflection measurement to determine how much additional stiffness could be obtained from the application of carbon tape to both faces of the plywood strip.
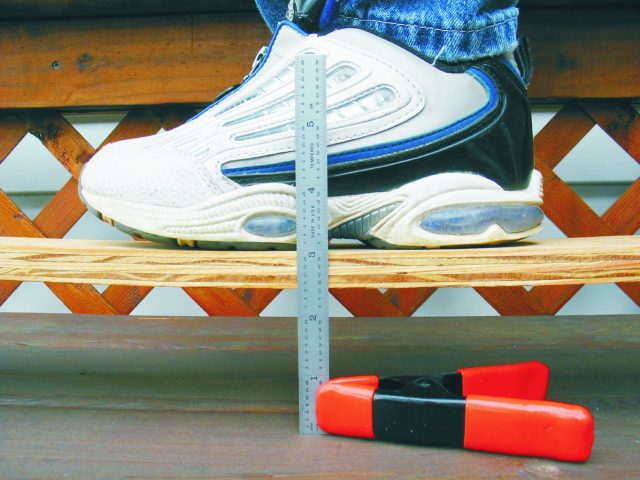
It didn’t take long to install the wheels on the naked plywood strip. First, I created a recess for the bolt heads by boring from the top (partway) with a ½” spade drill. Then I drilled the rest of the way through with a regular 3 16″ (bolt-size) drill. The resulting wheelbase was 27″, as measured from the center of the front wheels to the center of the rear wheels. When Mikayla stepped in the middle, putting all her weight on it, the untreated plywood sagged exactly one half inch. We then removed the wheels and prepared to apply one layer of the 703 carbon to the underside. We cut a length of carbon slightly longer than our board. Next, we donned our 832 Disposable Gloves and our 838 Sleeves, mixed neat 105/205 epoxy, and coated the underside of the board. Then we stretched out the dry carbon tape and stuck it lengthwise to the wet surface. We poured a rivulet of epoxy on top of the dry fabric and set to work, squeegeeing the glue into the carbon with a plastic spreader. When it was thoroughly wet out, we peeled the carbon tape off, flipped it over, and re-applied it to the coated plywood, pouring on just a little more glue and repeating the squeegeeing.
When Mikayla stepped in the middle, putting all her weight on it, the untreated plywood sagged exactly one half inch. We then removed the wheels and prepared to apply one layer of the 703 carbon to the underside. We cut a length of carbon slightly longer than our board. Next, we donned our 832 Disposable Gloves and our 838 Sleeves, mixed neat 105/205 epoxy, and coated the underside of the board. Then we stretched out the dry carbon tape and stuck it lengthwise to the wet surface. We poured a rivulet of epoxy on top of the dry fabric and set to work, squeegeeing the glue into the carbon with a plastic spreader. When it was thoroughly wet out, we peeled the carbon tape off, flipped it over, and re-applied it to the coated plywood, pouring on just a little more glue and repeating the squeegeeing.
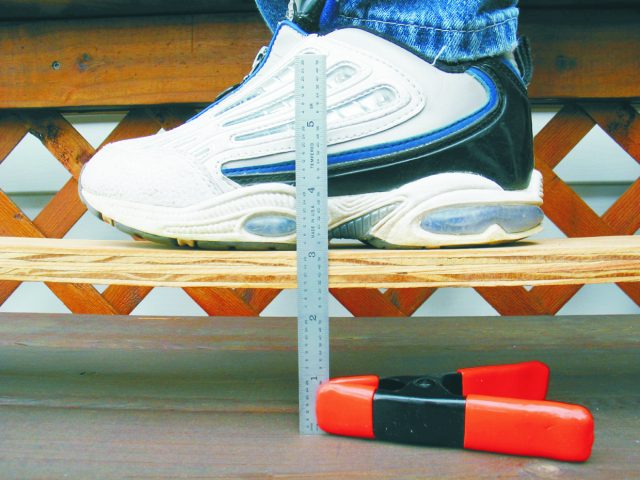
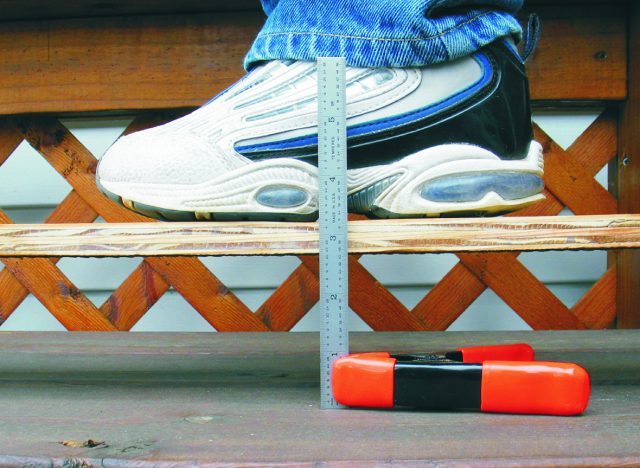
The same load, +1 layer of carbon reinforcement on the bottom. The top of the scootboard measures 3 9/32″ above ground zero (7/32″ flexure).
Note: Our technique was to squeegee from the middle of the carbon tape towards the ends, so that we would not end up with a wrinkle in the middle. Before the glue cured we swabbed the opposite-side bolt holes clean with a Q-Tip™ so that there would be no permanent obstruction.
The next day, we drilled through the carbon layer from the top, using the bolt holes as a guide. After putting the wheels on, Mikayla again applied her weight to the middle of the board. This time, we found that the flexure was greatly reduced, bending only 7 32″. The single layer of carbon applied to the tension side had cut the bending deflection in half.
Naturally, we did not hesitate to press on with Stage 3. The wheels were removed and we applied a length of the 703 Carbon Tape to the upper (compression) surface of the plywood, using the same technique as for the underside. Again, we made certain to swab the bolt holes clean so that they could serve as drill guides. When the glue was cured, I drilled through the newly-applied upper carbon layer (from below) with the bolt-size drill. That created guide holes for the 9 16″ hole saw, which I used to make clean cutouts through the upper-surface carbon for the recessed bolt heads. The excess carbon was also trimmed from the ends at this point. With the wheels now permanently installed, we repeated the bending test. With Mikayla standing in the middle, the measured deflection was 3 32″. The two applications of carbon tape had reduced the bending deflection to less than 1/5 of its original excursion.
With the experiment complete, we turned our attention to attaching the handlebars. A steel angle bracket served as the primary attachment to join the perpendicular parts. A smaller aluminum bracket on the front edge provided a footing for an aluminum brace for the oak stick. The brace was anchored to the oak with a small lag screw. At the opposite end, the oak stick was notched with an end mill to receive a length of ¾” dowel to be the handlebar. And that was it. As a finishing touch, we sealed the end grain of the oak with dabs of 105/205.
The scootboard project was an unqualified success, thanks to WEST SYSTEM 105/205 and 703 Unidirectional Carbon Tape. The finished weight with the carbon was only 4 lb 12 oz. It has now survived two years of rough service and given Mikayla great “street cred” with her pals. She is the only one on her block with a carbon-fiber scootboard.


