
by Brian Knight—GBI Technical Advisor
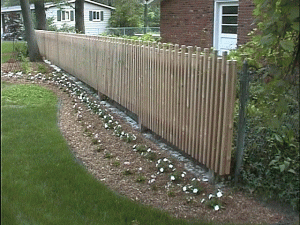
Rot is one of the major disadvantages of a wooden fence. Wherever there is a fastener—nail, staple or screw—there is a potential site for rot to begin. Water gets around each fastener and soaks into the wood. When the temperature and the moisture content are right, rot invades these areas. To make a fence that would not rot quickly, I used a rot resistant wood and eliminated fasteners, gluing pieces together instead of nailing. Not only was the process fast—I could assemble 42′ of fence a day—but warps and twists in the fence material were easily dealt with.
Our local lumberyard stocks construction grade cedar 2×4 and 2×6. I bought a stack of each and began by machining the spindles—240 of them—at my shop. I ripped them so they had a cross section of 1-1/2″ square. Next I cut them to length, cut a chamfer on one end, and sawed a shallow dado as an accent feature.
Starting with a jig


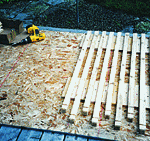
Once I had all the spacers installed, it was easy to lay the spindles between the spacers and at the same time align the bottom edge of each spindle flush with the edge of the OSB. This automatically aligned the height of each spindle. The good side of the spindles was placed face down on the jig.
Using the 2×4’s for stringers, I laid them across the spindles and marked their location on each spindle. I moved the 2×4’s out of the way, mixed some WEST SYSTEM® 105/206 with 403 Microfiber to a mayonnaise consistency, and put a glob of the thickened epoxy where the 2×4’s crossed each spindle. When I had the globs of epoxy in place, I set the 2×4’s in place and weighted them down until the epoxy cured. No screws were necessary to anchor the 2×4’s to the spindles.
I used the “cake decorator” technique to apply the thickened epoxy to the spindles. I mixed the resin, hardener and filler to the appropriate consistency and dumped it into a Ziploc™ plastic bag. I sealed the top of the bag, snipped a corner off the bottom and squeezed the material onto the spindles. The amount deposited is controlled by the size of the cut corner.
When the epoxy had set, I lifted the fence section from the jig and carried it over to the 4×4 posts that were already in place. I mortised the posts to accept the 2×4 stringers and glued the posts and 16′ section together. Then back to the fixture to build another section. Because the temperature was very warm and the epoxy cured quickly, I was able to build several sections a day.
Epoxy for gate construction

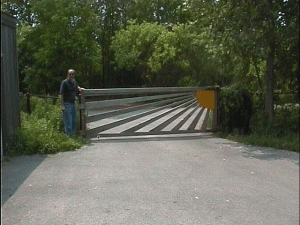
Epoxy can also be used to avoid stesses often associated with gate construction. If nailed, screwed or bolted together, the gate pictured would only last a year or two. The stress on the fasteners would begin to crush the adjacent wood fiber and elongate the hole. 
The boards that form the starburst pattern provide the strength to keep the gate from sagging. The long boards in the starburst are being pulled lengthwise, wood’s strongest direction. The shorter boards are being compressed, but, because they are short, they are not as easily bent as longer boards would be. The large gusset in the upper hinge corner of the gate distributes all the stresses over a large area.
Once it was properly engineered, building the gate was easy. It is a sandwich consisting of two rectangular layers, one on each side of the starburst pattern. One layer of the outer rectangle was cut and laid out on the floor. The starburst truss parts were laid on top of the rectangle and bonded to it. WEST SYSTEM epoxy was applied to both surfaces using the two step bonding procedure and the process repeated to bond the top rectangle. A little light clamping pressure was applied to the joints until the epoxy cured.
To complete the assembly, hinges and a latch mechanism were installed. Because the weight and leverage of the entire gate were concentrated at the hinge fasteners, these were good candidates for hardware bonding. As we pointed out in the last Epoxyworks, wetting the fastener pilot hole with epoxy doubles the pullout strength of the wood. Drilling an oversize hole and casting epoxy around the fastener will, at a minimum, triple the pullout strength.
Side loaded fasteners also benefit from being installed in an oversize, epoxy-filled hole. Epoxy around the hinge bolts better distributes the loads placed on them into the wood, and, as a bonus, the epoxy annulus keeps water out of the fastener holes.
Follow up—After five years of Michigan’s summers and winters, Brian attested in Fence Construction Revisited (Epoxyworks 21) that there was no rot in the fence nor had any of the spindles fallen off. There was no finish on the wood, so it weathered to a dirty silver color. One additional trick he sued was to apply a stripe of epoxy around the fence posts about a foot wide at ground level. This is where fence posts rot and break because this is the point where the post is continuously in contact with moist soil and also has oxygen available. Above this stripe, the wood is able to dry out and does not rot. Below this strip, the wood stays wet, but there is not enough oxygen to support the growth of the rot fungus so the wood cannot rot there either. The epoxy reduced the oxygen and moisture at the spot where it was most likely to rot. And five years later, no rot was evident.


