Marquetry Made Easy
Spring 2009

GET STARTED
FREE PRINT & DIGITAL EDITIONS
Spring 2009
There is a simple way for those of us who may be “artistically challenged” to produce easy marquetry inlaid furniture, jewelry boxes, canoe decks, trays, etc. with a modest investment in equipment and materials, in a reasonable period of time, and with eye-pleasing results. I have no formal training in making marquetry inlays but have found a method that works for me. I showed this method to a friend who is a shop teacher; he now has students as young as ten incorporating it into their school projects with excellent results. My method is adaptable, user-friendly within limits, and forgiving of minor cutting errors. Even novices can produce great-looking marquetry.
The most challenging part of traditional inlay is cutting pieces that fit together within high tolerances. In contrast to the window method commonly used for traditional marquetry, I accomplish this by cutting both the inlaid piece and the cutout in the background wood at the same time. In the window method the design is drawn on a waste sheet of veneer, then selected parts of the design, or “windows” are cut away from the sheet. Choice sheets of veneer are then placed under the windows to reveal the best color and grain placement. The shape of the hole is marked through to the selected veneer and cut to fit the window.
I use an entry-level scroll saw that cost about $150 a few years ago, with a 16″ throat equipped with fine 00 blades. On a given project I might go through as many as a dozen fine blades, but at $5 a dozen, cost isn’t a big concern. The blade specifications vary, but might go something like this: width .026″, 28 TIP, thickness .011″—this particular one is an Olsen 440R reverse tooth blade, but others could also be used.
I’ve found that wood species/density and thickness play a big part in determining ease and accuracy in cutting, and also affect how many blades break in the process. Because I do most of my inlay in hardwood, and my planer will take wood down only to about 1/8″ thick, that’s the thickness of most of my work.
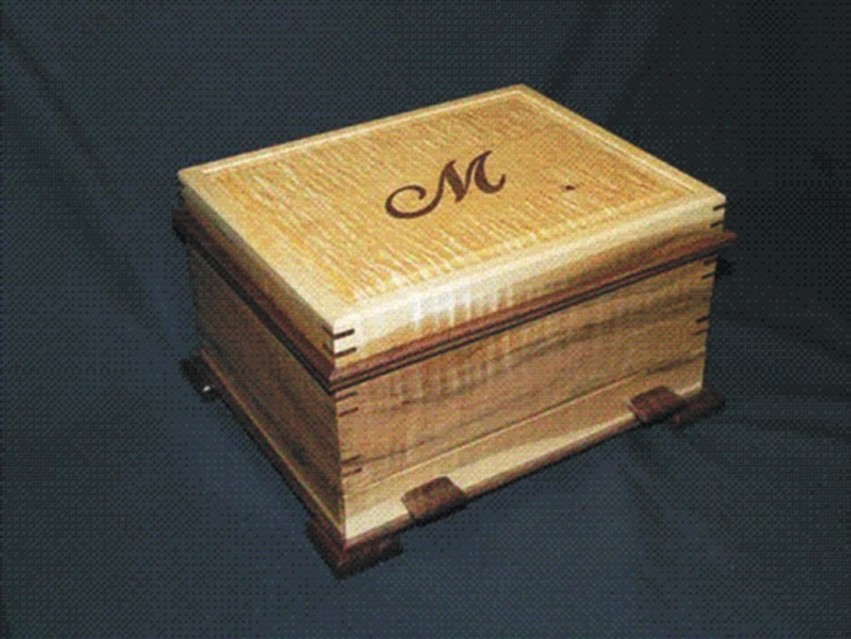
I laminate the finished inlay onto a backing material like Baltic birch plywood to provide strength and thickness. If both surfaces of the work are to be visible, such as in a jewelry box top, I laminate another piece of the background wood on the bottom to make a sandwich with the fancy woods on the outside and the plywood in the middle.
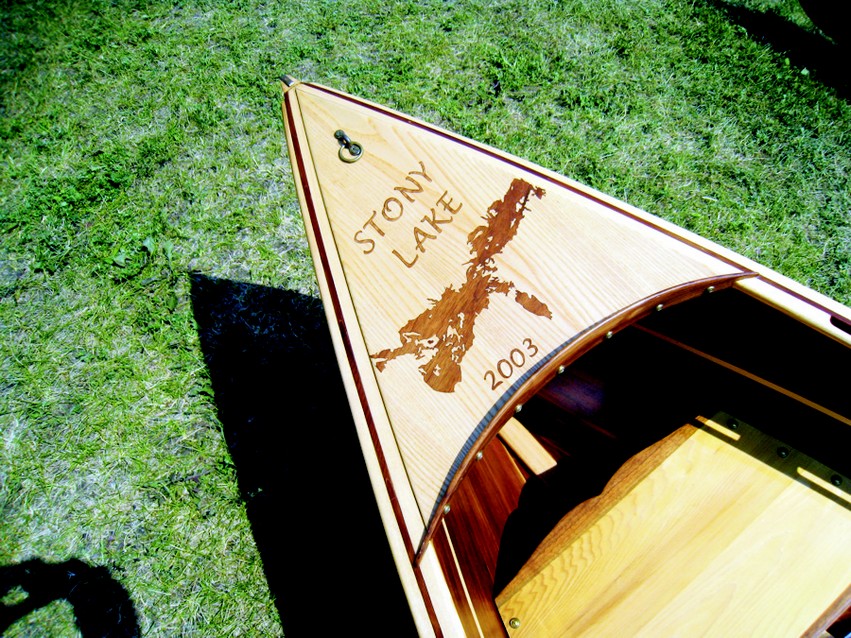
For some canoe decks I’ve made the inlaid piece for the top layer, then laminated it to homemade plywood made from ¼”-thick layers of cedar strengthened with fiberglass and epoxy (with successive layers having the grain oriented at 90° from adjacent layers). This results in a light but very strong deck, with the inlay on the top in a highly visible location.
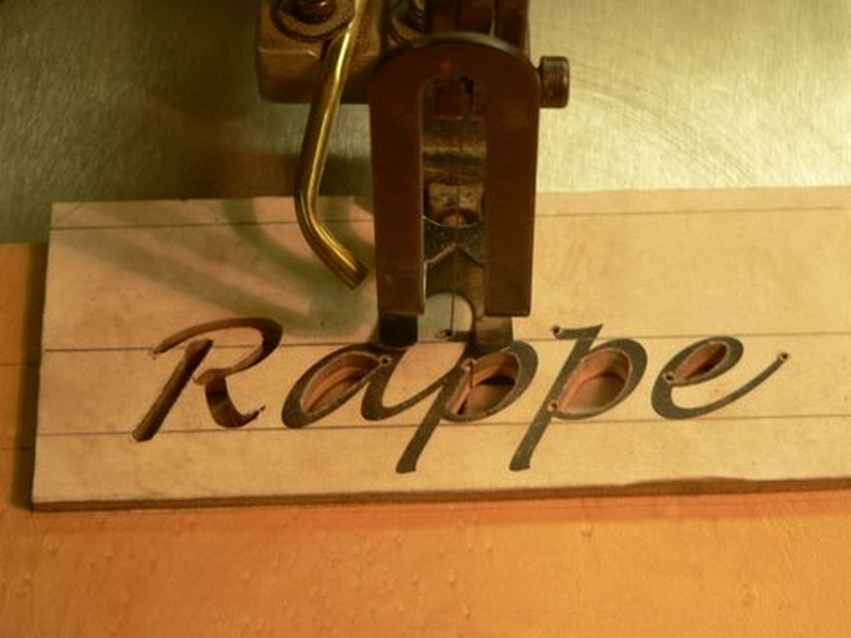
To create the inlay you need a pattern. Many of my pieces are given as gifts, with the recipient’s name or initial inlaid in a contrasting wood. I’ve also used lettering for significant dates, for a wedding gift, for instance. For this type of pattern, I use a computer graphic program to produce the letters and numbers. To create my pattern, I print out whatever I want to inlay on regular computer paper. Other sources of patterns could be pictures, photos, children’s coloring books, hand-drawn designs, letterset or newspaper headlines. The only limiting factors are your imagination, and patience in cutting out whatever form might take your fancy.
I spray the backside of the pattern with spray adhesive (available at craft stores) and stick the pattern on my inlay piece of wood which has been planed to thickness, say a nominal 1/8″. Follow the instructions for “permanent bonding” on the spray adhesive; this keeps the pattern from separating from the wood during cutting. Later, you can remove the pattern and residual adhesive with a little lacquer thinner and elbow grease.
With the pattern adhered to the inlay piece, use double-sided carpet tape to affix the inlay piece to the background wood. This wood should be roughly the same thickness as the inlay piece, say a nominal 1/8″ thick. Now you’ll have a unit consisting of two contrasting wood pieces topped with the paper pattern. Take care to ensure the inlay is positioned accurately on the background piece. I usually make the background piece oversized to allow for trimming to final dimensions after the inlay is glued in place.
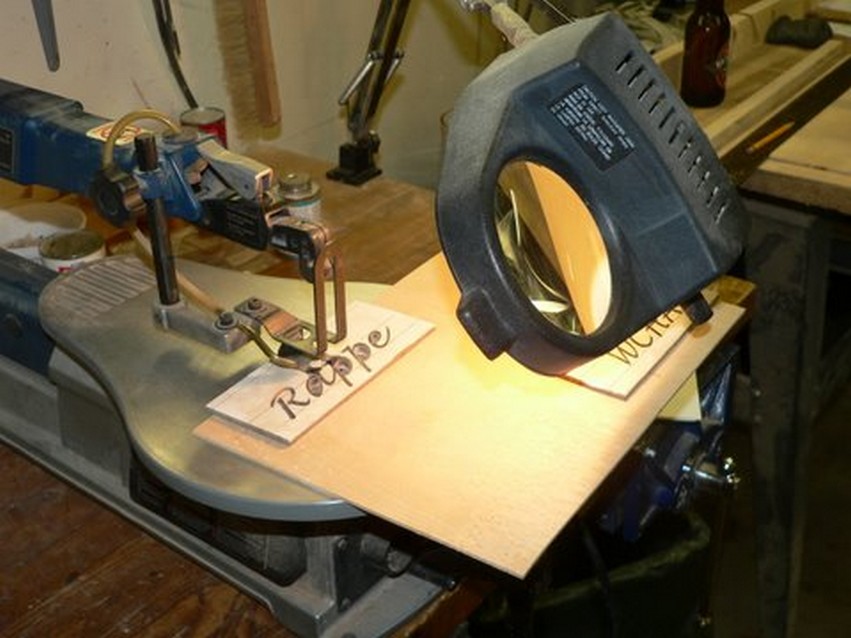
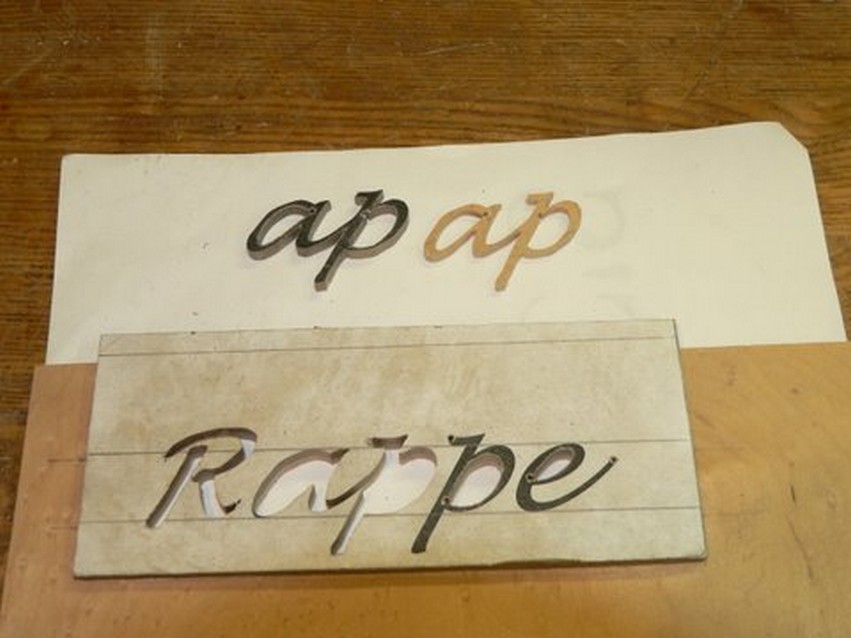
To cut out the inlay, drill a 1/16″ hole through all layers at the edge of one of the inlay marks on the pattern. With the scroll saw blade attached under the table, feed the blade through the hole and attach the top of the blade to the top arm of the saw. Cut out the inlay following your pattern. When completed, you have cut out a two-layered piece: your inlay wood on top, and the background wood on the bottom. You still have your background piece, now with a cutout in it. Carefully separate the two layers, then drop the inlay into the background piece. Now you have your contrasting inlay. Because you have to cut through both layers in the same cut, the inlay must match up with the shape of the “hole” created in the background wood. Next it’s a matter of gluing the inlay into the background color.
To facilitate gluing a number of pieces, some of which may be quite small, you need a glue with a long “open” time. In addition, the glue should provide good gap-filling qualities and accept coloring to match to the work. After experimentation, I settled on WEST SYSTEM® Epoxy (which I use for coating strip-built boats) because it has the best combination of these features.
When I’m ready to glue an inlay I cover my working surface with waxed paper and arrange all my supplies: background inlay pieces, small cup for mixing the epoxy, epoxy resin and hardener, nitrile or latex disposable gloves, mixing stick, small artist’s brush, lacquer thinner, paper towels, two pieces of ¾” plywood slightly larger than the workpiece, waxed paper, clamps and matching sawdust(s).
WEST SYSTEM 407 Low-Density filler is dark red-brown and 410 Microlight® is a light tan color. I do a lot of inlays using dark woods for the inlaid pieces—walnut, cocobolo, ziricote, etc., into a light-colored background like Birdseye maple. In cutting out the inlay in this case, I may favor the background color at the expense of the piece to be inlaid, and make up for minor imperfections in cutting by using the 407 Low-Density filler and walnut dust for coloring. The colored epoxy will match well with the inlay, and as long as your eye follows a smooth line along the contrast between the walnut/filler and maple, minor errors aren’t noticeable. If the background was dark and the inlay light, I’d reverse the options, favoring the dark background during cutting, then using the 410 Microlight filler and other pale dust to color the epoxy to match the inlaid piece. It is possible to use different mixtures at different places on the same workpiece if you need to color one dark and another light in order to mask imperfections in your cut pieces.
To start, I mix the WEST SYSTEM 105 Resin® and 207 Special Clear Hardener® in the proper ratio. Using a small artist’s brush I paint the mixed epoxy on all mating surfaces of the inlay piece and the “hole” in the background wood. At least two sides of each part will be end grain, which tends to soak up much more epoxy than face or side grain, so after letting the epoxy soak in for a few minutes I apply a second coating. If the end grain absorbs this too, I repeat with another coat or two until the end grain cannot absorb any more epoxy. At this point, I thicken the epoxy mixture with 407 Low-Density or 410 Microlight filler and the appropriate colored sanding dust. A small putty knife or plastic glue spreader is useful for packing the thickened epoxy mixture into the saw kerf to fill any gaps. I try to remove any gross excess of this colored mixture from the surface, using a paper towel moistened with lacquer thinner, but don’t fuss over every tiny bit because the surface will be sanded smooth after everything sets.
To ensure everything lines up, I clamp the workpiece between the two pieces of ¾” plywood covered with waxed paper and leave it to set overnight. For larger workpieces I use larger pieces of plywood, put them on my workbench and weigh them down with a cement block, a jug of water or whatever is handy and heavy.
After the workpiece has set overnight, I remove it from the sandwich of plywood and weights/clamps and sand the face reasonably smooth with a random orbital sander to 120-grit. Usually this reveals some gaps where the epoxy mixture didn’t quite fill the kerf. If so, I mix another small batch of epoxy and color it with fillers and/or sawdust to match, then fill in any remaining gaps and let it set.
After sanding the face again, this time to 220-grit or more, I laminate this thin (1/8″ thick) workpiece to a backing piece to provide strength and stability. Baltic birch plywood is reasonably resistant to changes in moisture, especially in the thicker pieces. For small pieces like trays, or if both sides are going to be visible I usually laminate another piece of the background wood to the bottom of the plywood. Having a sandwich with both outside layers of the same type and thickness of wood helps ensure that any seasonal changes in moisture absorption or release happen at the same rate in top and bottom layers, avoiding warping the finished work.
1. Use background wood and inlay wood of the same thickness, or have the inlay slightly thicker. If the background piece is thicker than the inlay, the inlay may be recessed, requiring an undue amount of sanding to get everything to level again. It’s usually much easier to sand a proud inlay down to level with the background than vice-versa.
2. Good light and magnification help during the cutting process. I use an inexpensive clamp-on lens/light and remove my bifocals to be able to focus through the lens onto the cut.
3. Make changes in cutting direction gradually; avoid sudden changes except at corners. Watch the blade carefully and slow the feed rate while you make gradual corrections if you see the blade drifting off the line of your pattern.
4. When cutting a pattern with shapes within shapes (inside of letters like A or O, or islands in lakes, etc.) always cut out the smallest shape first. That way, you still have the larger piece to hold onto and guide through the saw.
5. You can cut marquetry pieces larger than the throat dimension on the saw if you do them in sections then glue them back together. For example, I cut the deck of the Stony Lake Skiff by arranging the image on a lamination in the ash so the entry point for the first cut started right at the lamination before gluing that panel to the rest, and the cut continued across the north shore (i.e., top) of the lake. This allowed me to cut the long dimension from the rest of the work, leaving a piece of manageable size. I then cut out the rest of the islands and the south shore. After completing all cuts, I reassembled the pieces and side laminations and epoxied them together.
6. Multiple species of wood can be used in the easy marquetry inlay if you start with one species and the background wood. After you complete this cut, place the inlay in the background and repeat the process for the second species, etc. In this way, it is possible to build any number of species, and therefore colors and grain patterns, into the inlay.
7. Adding photocopier toner or WEST SYSTEM 423 Graphite Powder will darken an epoxy mixture. Use it to fill a kerf to produce a fine black line—for example, to replicate a kite string. The addition of white flour to a mixture can be used to lighten the final color.
8. For lettering, a script/handwriting font requires fewer holes to be drilled as entry points for the scroll saw blade as opposed to a font using individual letters. Drilling a 1/16th hole at an obvious turnaround spot (like the serif tail of a letter) facilitates making a clean change in direction with the scroll saw blade.
9. It can be easier to hide a drilled entry hole in dark wood filled with dark filler than in light wood filled with light filler. As the wood increases in darkness, subtle differences in shades of “dark” become more difficult to differentiate.
10. I try to save dust from other woodworking projects in a variety of species to allow more accurate color matching. Dust from bandsaw or scroll saw cutting, or sanding operations with the belt sander or random orbital sander seem to be best suited for this application. I keep my dust samples in spice jars or pill vials for easy color comparison. There is really no limit to the easy marquetry process except one’s own creativity. My artistic abilities are limited to drawing stick people, yet by tapping into others’ designs and computer graphics I can adapt these to produce works that look pretty good. If it works for me, it can work for anyone. Give it a try.
E-mail Al Witham at awitham(at)sympatico.ca for more information.


