


Why pressure-treated plywood is a poor choice
By Terry Monville — GBI Technical Advisor
A very high percentage of boats in the U.S. are at least 30 years old. It doesn’t surprise me when a boat’s plywood components fail due to water intrusion. In my experience, the transom is the first area to rot out in most trailerable boats. That’s not to say the first thing to rot couldn’t be the cockpit floor, stringers, or motor mounts.
I’ve seen well-maintained, 20-some-year-old boats that look almost new, but have a rotted transom. I’ve heard this statement from customers so many times over the years that I lost count: I waxed, tuned-up, and changed the fluids every year. I can’t believe they use plywood in a boat! I’m going to put in something that lasts forever.
After yearly maintenance on everything else, the transom somehow has water damage. The transom that you drilled holes into to mount transducers and such, and used caulk to fill the old holes and bed the new screws. Never remounting and sealing any of the factory hardware, like trim tabs or swim platforms. Is it surprising when the wood fails?
A surveyor friend of mine stated that marine caulk has a serviceable life of eight years. On average, I think that sounds about right. Some marine caulks are better than others and the quality of installation plays a part also. But if we double the caulk’s life, at 20+ years, we are still well beyond the usable life of caulk… you wouldn’t think of running the same oil for over 20 years.
When they look into getting non-plywood replacements, many boat owners find the cost a bit on the high side and this pushes them into a more cost-effective DIY project. There are not many appropriate materials that match the strength of plywood.
Replacing most plywood parts on a boat is not too difficult and can save a lot of money in hired labor costs. The tricky part is getting the right material to replace the old plywood.
Choosing the Wood
It’s understandable when a boat owner doesn’t want to use something that will rot again. We often get calls asking about using pressure-treated plywood, or exterior grade plywood instead of marine grade.
I would first like to clarify a few things. I think you could get a Ph.D. in plywood, between wood types, grades, and treatments. To keep things simple, we are going to focus on the plywood you’re most likely to find at your local home improvement store. To keep things even simpler, we will concentrate on ¾” plywood, which of course is not ¾” thick. The basic theory we will cover applies to other thicknesses of plywood too.
Basic Plywood Grading
These are the basic characteristics for each grade of the plies typically found in plywood available at home improvement stores:
“A” Grade
Sanded smooth, paintable. Though some neatly made manufacturer repairs are acceptable, you should have little trouble finding A-grades that are free of repairs and knots.
“B” Grade
Solid surface with some repairs, usually football-shaped patches and/or wood filler. May have tight knots (no chunks of wood missing) up to 1″ and some minor splits.
“C” Grade
Tight knots up to 1½” in diameter and knotholes up to 1″ in diameter. Some splits and discoloration.
“D” Grade
Knots and knotholes up to 2½” in diameter, some splits. Generally, no repairs.
Marine-grade plywood
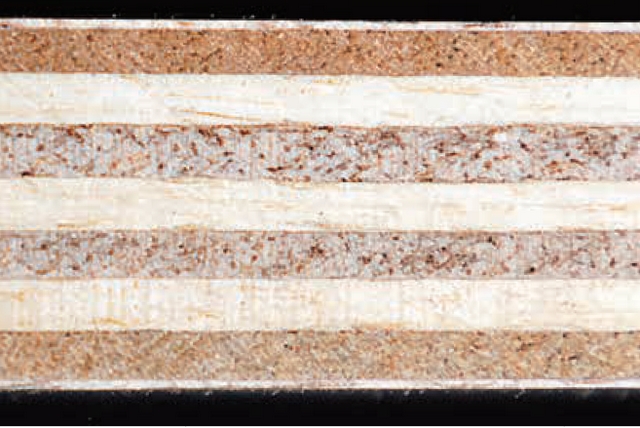
This plywood found in home improvement stores is generally A- or B-grade. The outer ply, is an A-grade, and the other side is a B-grade ply. The inner plies should be a B-grade or better. In total, the plywood should be a 7-ply lamination with most plies made from Douglas fir bonded together with waterproof glue. Sold as ¾” but will be slightly under due to the finishing.
A- and B-grade plies will be void-free. The higher the ply count for the same thickness, the more stable and resistant this plywood is to cupping and warping. The extra plies contribute to overall strength and stiffness.
Exterior grade plywood
This is generally B- or C-grade and sanded on one side. Sold as 23/32″ but referred to as ¾”, it is thinner than 23/32″ due to finishing. This plywood is typically made up of five plies of southern yellow pine with waterproof glue used between the plies.
With C-grade plies, voids, and gaps are common, and water may sit in them and start to rot the wood. With fewer, thicker plies, the flaws have a more significant effect on overall strength and stiffness.
For use in boat repair, I would limit the use of exterior plywood to areas where the overall strength of the wood is not critical, and the wood can be encapsulated in WEST SYSTEM® Epoxy. A motor mount would be a good example; the fiberglass carries most of the load, and the wood will be well sealed (provided the holes for mounting the hardware are also sealed).
Pressure-Treated Plywood
There are many different reasons to use varying grades of pressure-treated plywood. These include protection from fungal rot/decay, termites, marine organisms, fire, and more. Depending on the use of the wood and local climate, there are numerous different chemicals and different amounts of chemicals designed to remain in the wood fiber.
The pressure-treating process is relatively simple. Pallets of plywood are loaded into a larger chamber where a vacuum is used to remove the air from the wood. At this point, the chemicals-using a water or oil-based carrier-are injected into the chamber, often at 160 Psi. This part of the process takes twenty minutes to an hour to complete. The wood is removed from the chamber and moved to a drip-dry rack. Depending on the weather, it takes from two days to two weeks until the wood is dry enough for transport. This is not the only way wood is treated, but one of the more common. I’ve heard of some processes that use a kiln to dry the wood, while others use wax in the treatment.
Many different grades of plywood are pressure-treated, including marine-grade. The most popular, which you will find at home improvement stores, is exterior-grade plywood treated for ground contact. There are many rating levels of ground contact. Regardless of the grade of pressure-treated plywood, there are a few key things you need to know when using it for boat building or repair. Let’s look at the issue of moisture content.
Moisture Content
Plywood pressure treatment uses water or oil-based carriers that leave behind high moisture content. I’ve seen stacks of treated plywood sheets where the center of the stack is still dripping wet. WEST SYSTEM 105 Epoxy needs wood to be under 12% moisture content, and our G/flex® Epoxy under 18%. Most pressure-treated plywood is over 20% moisture content at the time of purchase. Also, pressure-treated plywood has lost 10% to 20% of its strength, mostly due to high moisture content, though some of this strength may return as the wood dries out.
When looking through a stack of plywood trying to find a nice sheet, the top few are warped like a potato chip. Further down the stack, you find a nice, flat piece. But because it’s down a few sheets, the piece is still a little damp. You think “that’s ok, I won’t get around to using it until next weekend anyway. It’ll have time to dry.” But drying treated plywood down to 12% moisture content takes weeks, if not a year. There is a high chance your nice piece of wood will warp like a potato chip, too, while drying out.
Once the wood is under 18% moisture content for G/flex, or 12% for the 105 System, you still have the issue of bonding to the chemicals in the wood fiber. With different chemicals and different amounts of moisture left behind by the treatment process, the only way to know for sure is to do a home adhesion test.
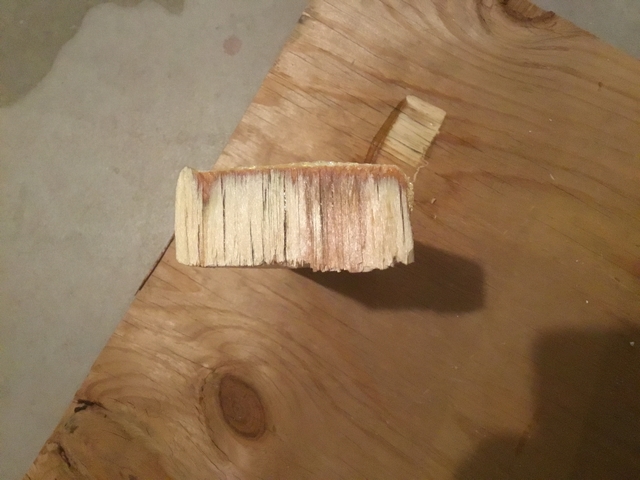
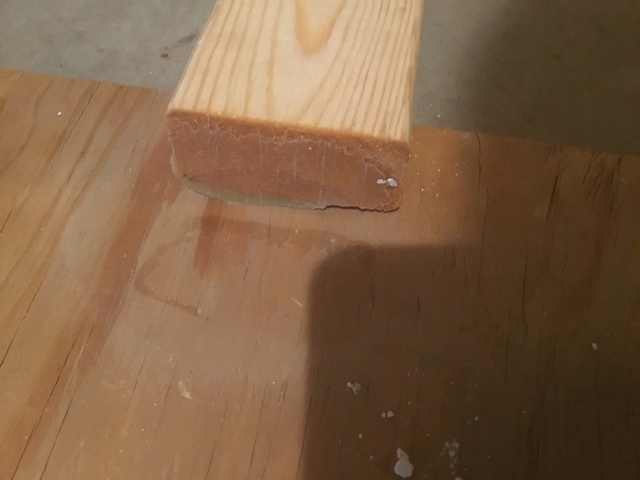
Home Adhesion Test
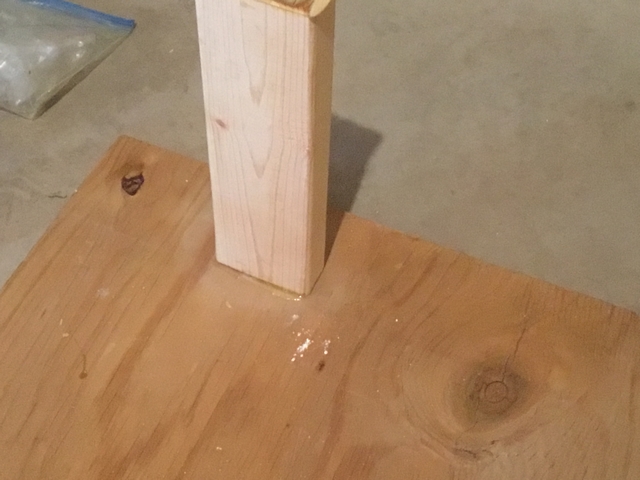
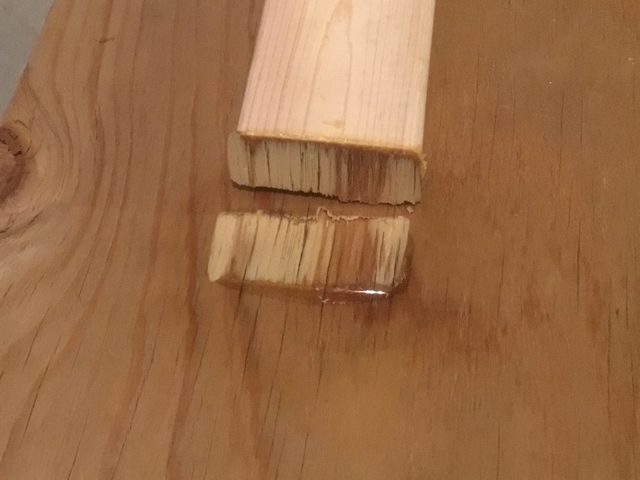
The home adhesion test is pretty basic. Take an 18″ long 2×2 or 2×4 and end-glue it to the wood or other substrate you’re trying to bond to. After the epoxy has fully cured, use a hammer to break the 2×2/2×4 off the wood. If wood fiber is stuck to the epoxy, you have a structural bond, which is what you want. If the epoxy comes off clean, your bond failed.
Pressure-treated plywood and lumber do a good job for their intended purpose. But for boat repair and building, I would shy away from them.
By using WEST SYSTEM Epoxy with marine-grade or non-pressure-treated exterior-grade plywood, you can make economical, long-lasting repairs to your boat. Encapsulating the wood in epoxy and using it to seal any holes you drill into the wood results in repairs that can outlast the original plywood by far.

Conclusion
There are plenty of wood replacements on the market, and the 105 System or G/flex Epoxy products should bond well to most of them. However, you don’t need to use a non-wood material. You just need to understand the properties of the materials you select and use them in suitable areas.


