by Brian Knight—GBI Technical Advisor
Faced with the expense of having several custom round windows built for his new house, Jon Staudacher figured it would be cost-effective to build the frames himself. He used his background as a boat builder and some of the characteristics of WEST SYSTEM® epoxy to help him along. Here’s how he approached the project. It’s a neat technique that you could use for a variety of projects.
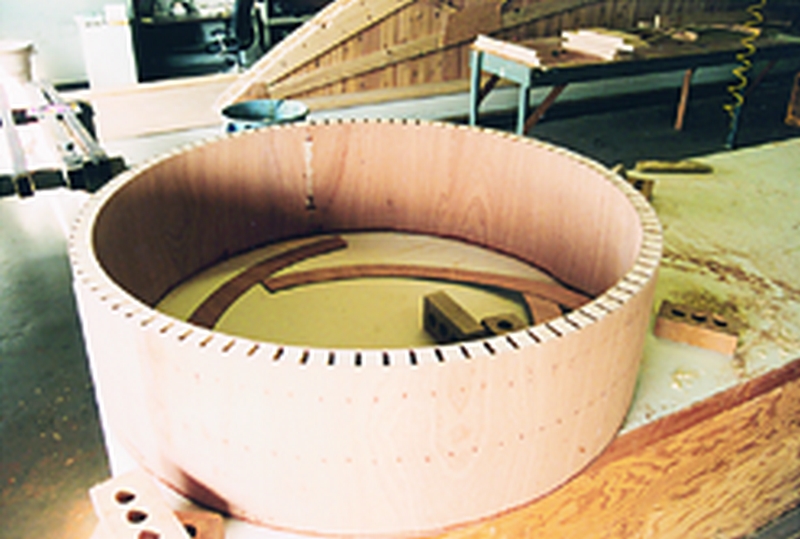
The windows vary in size from 4′ to 7′ diameter, with an 18″ jamb thickness – essentially short wooden cylinders. The frame for the largest window will double as a window seat. In other words, these are really big window frames.
Jon knew that “cored construction” would make the lightest, stiffest frame possible. He chose to use 6mm (1/4″) plywood skins separated by strips of 2″x2″ construction grade wood to build the frames. The glass portion of the window will be installed after the frame is in place.
Jon chose to build the largest unit first, then the next largest and so on. If he had made a mistake on the first unit (although Jon never makes mistakes, so I don’t know why he was worried), he could salvage the material for use on one of the smaller units.
First, he built a cylindrical male mold with the same outside diameter as the inside of diameter of the window frame. The mold is made of two identical, round plywood discs separated by 2 x 4’s.
To make the window frame, Jon called on his boat building background. He scarffed pieces of thin plywood together to make inner and outer skins longer than the frame’s circumference. He laid one scarffed skin on a long, flat table. Then using epoxy, he bonded 2×2 strips along the full length of the strip on carefully laid-out, evenly spaced lines. Instead of clamps, Jon used bricks to hold the 2 x 2’s in place until the epoxy cured. This would have been impractical with other adhesives that require greater clamping pressure. When the assembly was cured, he wrapped it around the cylindrical form with the 2 x 2’s facing outward and trimmed it to length on the mold.
With the inner skin assembly attached to the mold, he measured the length of the outer skin and cut scarfs on its ends, allowing for the scarf overlap. Again, using epoxy, he bonded the outer skin to the 2 x 2 core. After removing the frame from the mold and trimming the edges, Jon bonded mahogany plywood over ends of the cylinder to finish the frame. With the success of the first frame, the rest of the frames were built exactly the same way.
Using epoxy makes Jon’s construction technique efficient. The entire frame, including the hollow interior spaces, is sealed with epoxy.
Also worth noting: Years ago, Jon built a very flat work table for assembling airplane wings. While most of us do not have space for a 40′ table, it is desirable to have a large flat work surface – as big and flat as you can make it. If you do a lot of laminating or gluing, a dead flat surface is indispensable for gluing scarf joints and assembling projects.


