Building an Efficient Icebox
Spring 2002

GET STARTED
FREE PRINT & DIGITAL EDITIONS
Spring 2002
For maximum enjoyment when cruising on small craft, you need to carry food and beverages and keep them cold for the duration of the trip. While you can purchase good icebox/coolers in many shapes and sizes, these may not quite fit where you want or keep food cold long enough on extended cruises. Building a custom icebox with WEST SYSTEM® epoxy is neither difficult nor expensive. You can make it exactly the right size and build it in place or make it portable. You can also make it more efficient than a store bought icebox. I’ll show you how I built one to suit my needs, but these construction techniques are easily adaptable to your own requirements.
Design considerations
Here are some design considerations when building an icebox. For optimum performance, choose a top-opening rather than a side-opening icebox. Top packing is more efficient, and cold air won’t drain out whenever you open it. Try to keep proportions as close to a cube as possible, which will give you the most volume with the least amount of exposed surface area. The smaller the access the more efficient, but for obvious reasons you’ll have to compromise for convenience in packing and unpacking. Make the access airtight. Allow for cleaning and drainage. A drain at the bottom lets you remove melted ice without having to unpack and re-pack the icebox.
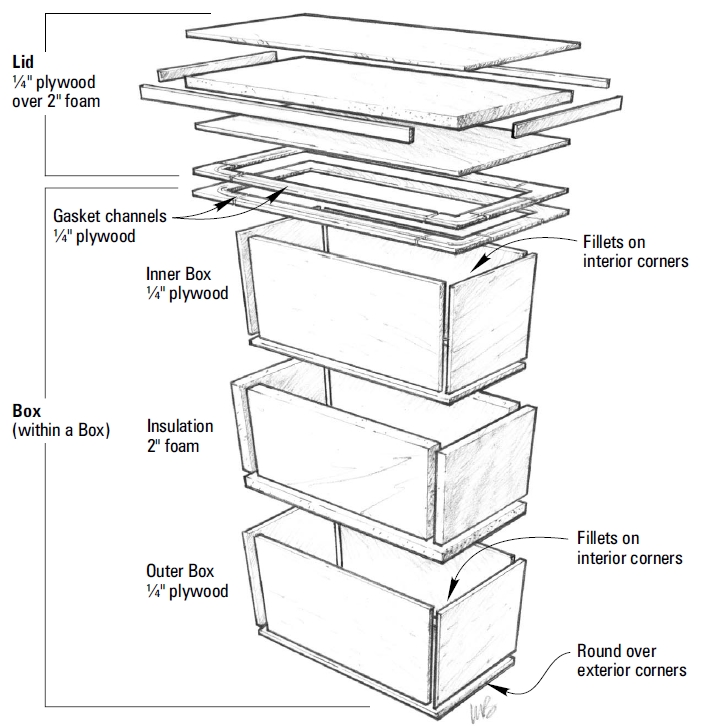
Basically, an icebox is a box within a box (below). Between the boxes is the insulation. The longer you cruise, the more thermally efficient your icebox should be. Thicker insulation means that you can carry a higher proportion of food to ice for a given duration. Any foam insulation will work, but look for the highest R-value you can get for a given thickness. You want maximum performance while taking the least amount of volume away from the interior. I used polyisocyanurate foam with aluminum foil on both sides. It is 2 lb density foam board, 2″ thick, with an R-value of 14. The foil provides a reflective radiant barrier. You can build up multiple layers if the foam is thinner or if you want a thicker-walled, more thermally efficient icebox.
The inner box should be tough enough to protect the insulation from hard objects such as cans, ice and solid frozen items. It must be watertight. It should be smooth with rounded inside corners for easy cleaning and sanitation. The outer box must also be tough enough to protect the insulation from bumps. If placed in the cockpit it will no doubt be used as a seat, so it must be rigid enough to support your heaviest crewmember. The outer box must also be watertight.
Building the outer box
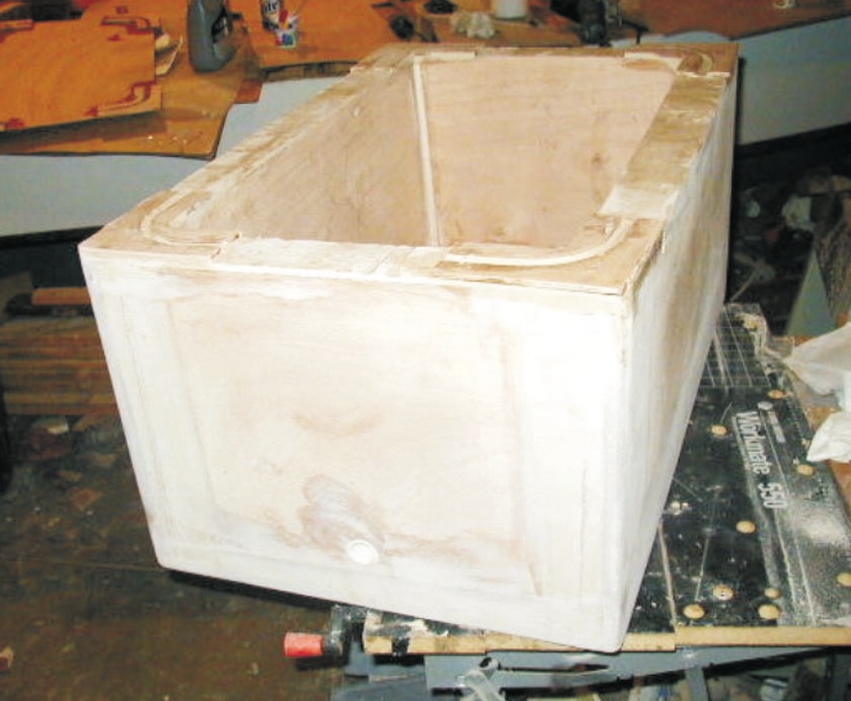
Construct the outer box from ¼” marine grade plywood. If you are building to fit a specific space, adjust the outer dimensions accordingly. If you are building to a specific interior shape or volume, add the thickness of the insulation to get the outside box dimensions. Using the stitch and glue technique, temporarily join the sides and bottom with plastic wire ties. When you are satisfied with the shape and fit, lightly form fillets on the interior joints. I used WEST SYSTEM 105 Resin with 206 Hardener for this project with 407 Low-Density Filler for joints and fillets. This is plenty strong enough, sands easily, and has some insulation qualities. When the fillets have cured, cut and remove the tie wraps, and then sand the fillets smooth. Apply 3″ wide, 9 oz fiberglass tape to the inside corners of this outer box.
Using a handsaw or saber saw, cut the insulation to fit tightly to the sides and bottom of the outer box. Sand the edges as necessary with 50-grit sandpaper on a sanding block to make a close fit.
Building the inner box
With the foam insulation temporarily in place, fit the inner box. Again, use ¼” marine grade plywood. Cut the bottom and sides close enough that the ends press firmly against the insulation and the outer box. When all of the pieces fit to satisfaction, disassemble, and then bond the pieces together in reverse order. Use an 809 Notched Spreader to spread thickened epoxy on all mating surfaces and reassemble. Clamp as necessary to hold everything in place. Form ½”-radius fillets on all interior corners and allow everything to cure. When cured, trim the top flush.
Cap the top edges of the box with ¼” plywood. Cut four pieces to fit around the top and bond them in place with 407-thickened epoxy. They can be slightly oversized and then trimmed later. To ensure that the cap is flat, clamp the cap pieces with thick flat plywood large enough to cover the entire box and use a weight to apply pressure. After the adhesive cures, trim and sand the cap flush with the sides.
Drains are a minor source of heat loss, but they are very convenient, especially if the icebox is built in. To install a drain, bond ¾” or 1″ PVC pipe into the sidewall, flush with the inside bottom of the box. Use a female threaded fitting on the end of the pipe flush with the outside of the box. Cut or drill a hole slightly larger than the outside diameter of the pipe. Cut the pipe to length so the fitting is flush with the outside of the box. Bond the pipe in with plenty of thickened epoxy, filling all gaps between the pipe and the box. Use a threaded plug to seal the drain when in use. Any number of plugs, draincocks or even an appropriately sized cork can work. Keep in mind the first principle of hydrokinetics -drains always plug up, plugs always leak.
Sand all interior fillets and apply 3″ wide fiberglass tape over all of the inside corners. Apply 6 oz fiberglass fabric on the bottom of the inner box. (Sidewalls are not covered with fiberglass fabric.) When the wet-out fabric has reached the slightly tacky cure stage, coat the interior with epoxy and 501 White Pigment. Apply using an 800 Roller Cover and a short-bristled brush for the corners. Tip off each coat with a foam bush before it begins to gel. Apply several additional coats of pigmented epoxy to the interior, waiting until the previous application is tacky.
Making the lid
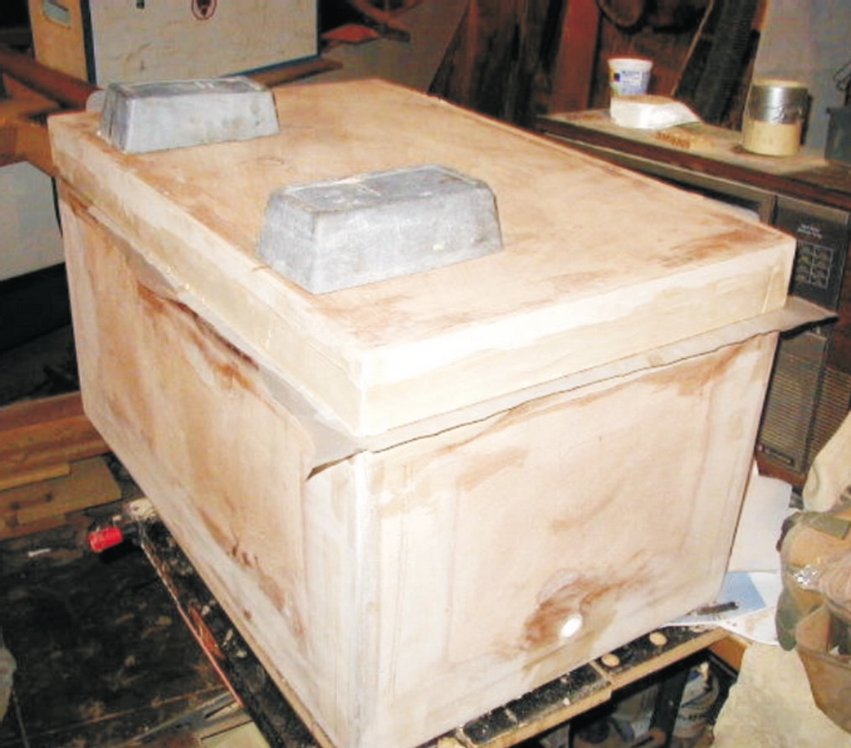
The lid is a slab of the 2″ insulation covered on all sides with ¼” plywood. To keep the lid perfectly flat, clamp it to a flat surface when bonding the sides, top, and bottom to the insulation. Cut the foam insulation ½” smaller than the top dimensions of the box. Cut and fit 2″ wide strips of plywood over the sides of the insulation. When finished, the sides of the lid should be flush with the sides of the box. Bond the plywood to the foam with epoxy thickened with 407 Low-Density Filler and allow to cure. Cut the plywood top and bottom pieces slightly larger than the wood-sided insulation slab. Bond them to the slab. Use weights about the perimeter and the center so the lid cures flat against the surface.
Making an airtight seal
The seal between the lid and the box is an important part of the icebox’s thermal efficiency. You can copy the detail of existing coolers or design the seal around a specific type of weatherstripping, as long as it is airtight. I used a basic, but reliable design that incorporates a ½” diameter round gasket material made of ETFE rubber. I built a channel on the top edge of the box and a mating channel on the underside of the lid to accommodate the gasket. The alignment of the mating channels is critical.
To make the channels, fabricate eight, two-piece corner sections out of ¼” plywood and bond one pair on each of the box’s corners (below). Separate the pieces by a ½” wide channel for the gasket. When cured, place sections of plastic bags (to prevent inadvertent adhesion) over corner sections and place waxed ½” diameter marbles or ball bearing spacers in the corner slots. Now place the matching pairs of corner sections for the lid over corner sections on the box top (with the plastic in between). Coat the top surfaces with thickened adhesive to be sure they are tight against the ball bearing spacers. Then lower the lid onto these corner sections, keeping the lid aligned with the sides of the box. Allow the epoxy to cure. When cured, remove the lid. The gasket slots at the corners of the lid and box should be perfectly aligned when the lid is in position on the box.

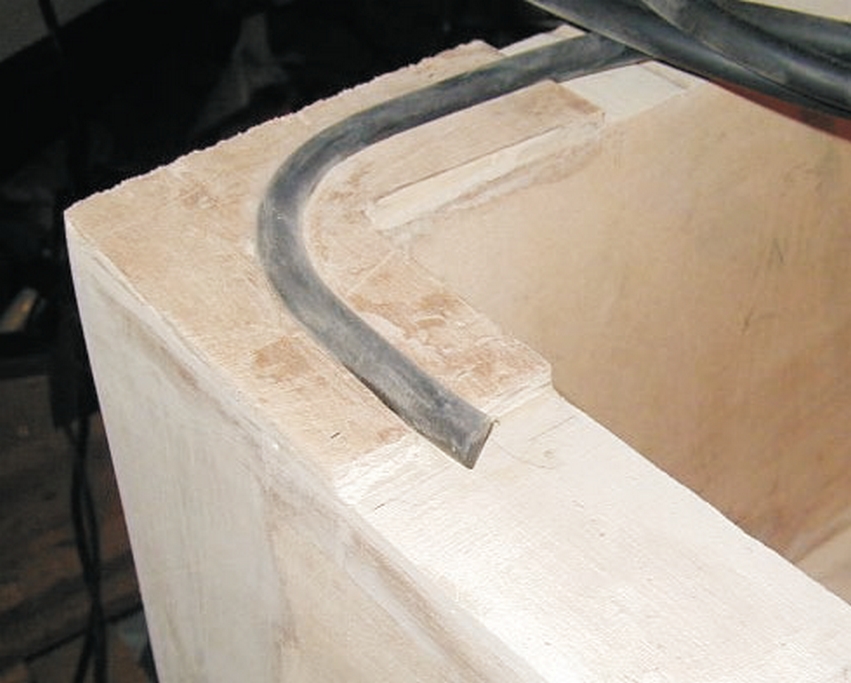
Left-Detail of the channel on the top edge of the box. This channel and a mating channel on the underside of the lid will accommodate the rubber gasket. Right-To make the channels, I began by fabricating eight, two-piece corner sections out of ¼” plywood and bonded one pair on each of the box’s corners.
Now cut and fit the sixteen straight sections of ¼” plywood necessary to fill in between the corner sections (one on each side of the slot on each side of the box and lid). Bond these pieces in place. When everything has cured, sand all of the joints and slots smooth. Break all sharp edges and fill any gaps or low spots with fairing compound. When cured, sand everything to your satisfaction. Apply three coats of white pigmented epoxy to the inside of the lid, including the gasket channel on the lid and on the top of the box.
Preparing for finishing
The icebox can be finished to match an interior or exterior finish. If it is built in or made to fit in an interior space, you can apply veneers, paneling, plastic laminate or other material to the exposed surfaces.
In all cases, round over the exterior corners and sand all exterior surfaces fair and smooth. Apply a layer of 3″ wide fiberglass tape over the corners. If it is a portable unit, or if it will be exposed to the elements or rough treatment, apply a layer of fiberglass fabric to the exterior. Fair any raised tape edges or low areas with 407-thickened epoxy before barrier coating. Coat the exterior with three barrier coats of epoxy. After the barrier coating has cured, wet sand the surface to prepare it for paint.
Mounting the hardware
Install stainless steel hinges and a latch by mounting them to ¼” plywood base plates, which are bonded to the box and lid. Before fitting the hinges and hasp, place some of the ½” marble spacers in the gasket groove, and then place the lid on the box. The spacers will assure the lid is in proper alignment when fitting the hinges and hasp.
Determine the hinge locations. Then fit and trim the plates about ¼” larger than the hinges and apply three coats of epoxy to exposed sides. After the epoxy cures, bond the base plates in position with thickened epoxy. Fasten the hinges with flathead stainless steel self-tapping screws that are long enough to pass through the plates into the plywood sides of the lid and box, clamping the base plates to the box and lid until the epoxy cures. Do not bond the screws or hinges at this time.
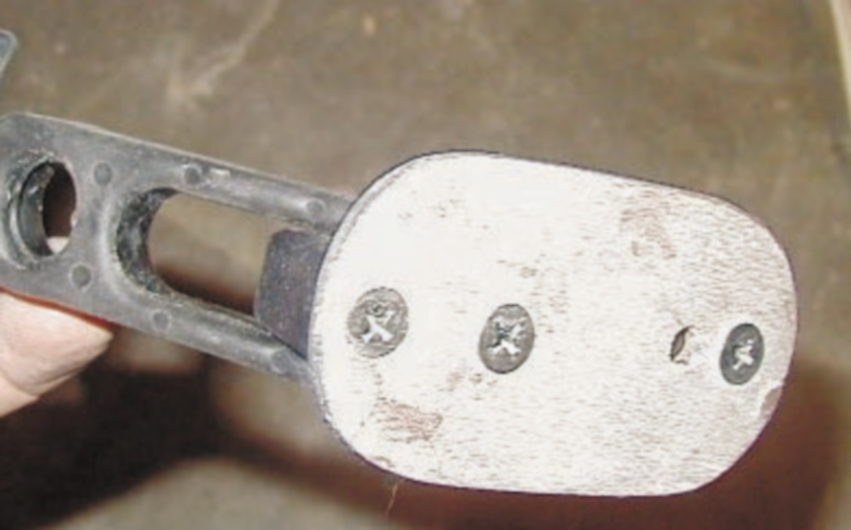
For the latch, I used a flexible rubber draw latch with a nylon strike. There are a couple of tricks to installing the latch which, like the hinges, is mounted on a ¼” plywood base plate. Make the base plate in one piece, with the latch and strike fastened to it in the latched position (below). Position the strike so there is a bit of tension on the draw latch. Coat the plate with three coats of epoxy before blind fastening and bonding it to the base plate using stainless steel flathead machine screws from the backside. Countersink the screws flush with the back surface. After this has cured, bond the base plate, in one piece, over the joint between the icebox and lid, using thickened epoxy. Hold in place with staples or clamps until the epoxy cures. When cured, open the latch and carefully saw through the base plate at the joint.
If the icebox is portable, apply handles. You can purchase handles at a hardware store or design and build your own.

Completing the project
Prior to painting, remove the hinges and complete any final sanding. Mask off the latch and hasp and then paint with good quality paint. Two-part polyurethane provides the toughest finish, but any marine or automotive paint will work.
Carefully bond the gasket into the icebox slot with thickened epoxy. Apply adhesive to the slot only and place the gasket in position, holding it down with a piece of plywood and light weights. After the epoxy has cured, replace the lid and install the hinges. Align the hinges with the screw holes in the base plate. Wet out the holes with epoxy before installing the screws. Apply a fillet of flexible sealant to the mating slot in the lid and let it dry thoroughly before closing the lid. The ½” gasket should form an airtight seal against the sealant in the lid slot.
If the icebox is portable, apply handles. You can purchase handles at a hardware store or design and build your own.
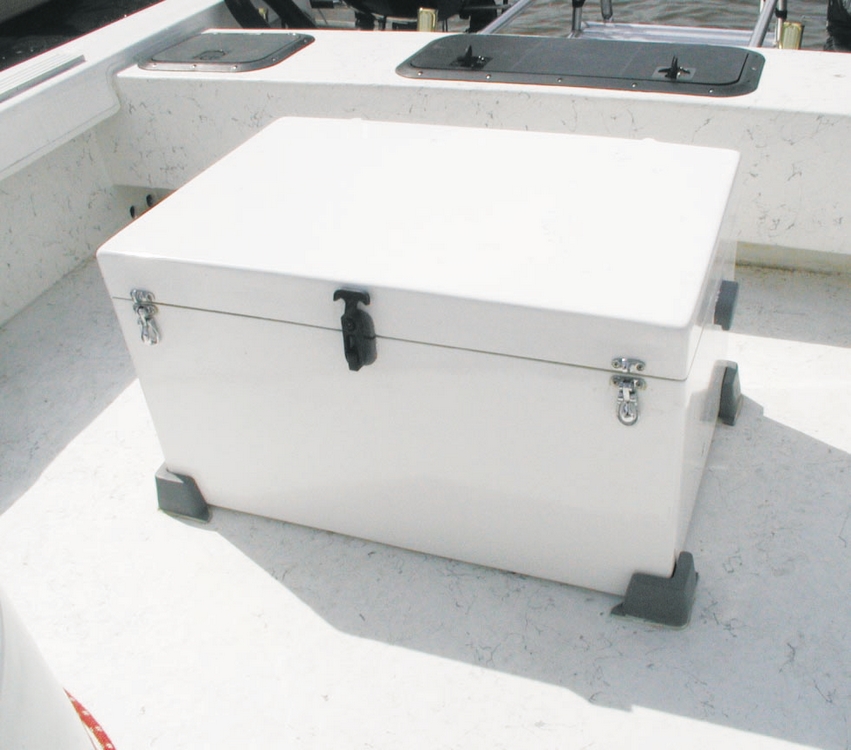
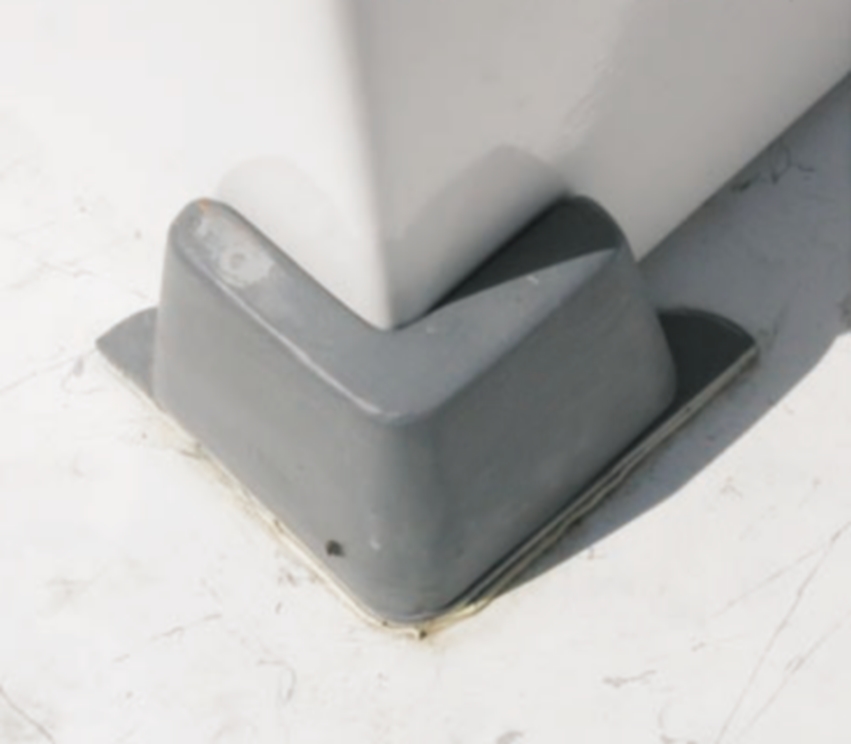
If a portable icebox is to be stored on deck, chocks should be constructed to keep it in place (below). I made chocks from laminated plywood scraps fastened with wood screws and adhesive to 1/8″-thick G-10 fiberglass laminate. Drill and countersink for fasteners to be applied to the sole. I also installed an eye in each chock so I could hold the chest down in rough weather with a bungee cord attached to the chest handles. Before using the icebox, it’s a good idea to line the bottom of the ice chest with a rubber pad such as Dri-Dek panels to protect from impact damage.
With WEST SYSTEM® epoxy, you can easily build a thermally efficient, durable, waterproof icebox. You also gain a lot of flexibility. WEST SYSTEM epoxy is compatible with all types of foam insulation. Using it, you can adjust the size, shape, wall thickness and finishing details to build an icebox perfectly suited to your needs.
Suppliers: The insulation used is available from Extol of Ohio, Inc. www.ExtolOhio.com. The ETFE gasket material and flexible rubber draw are available from McMaster Carr, www.mcmaster.com.


