Honeycomb Embedded Furniture
Spring 2019

GET STARTED
FREE PRINT & DIGITAL EDITIONS
Spring 2019
I am a designer/woodworker based in Yorkshire, England. I love using pieces of wood with interesting character. While a lot of people will avoid knotty, cracked and highly figured pieces because they can be difficult to work with, I embrace these imperfections and make them into a feature. However, it’s important to stabilize some of those features.
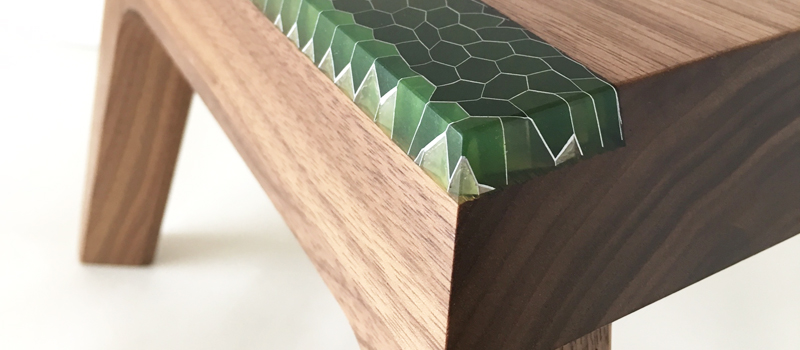
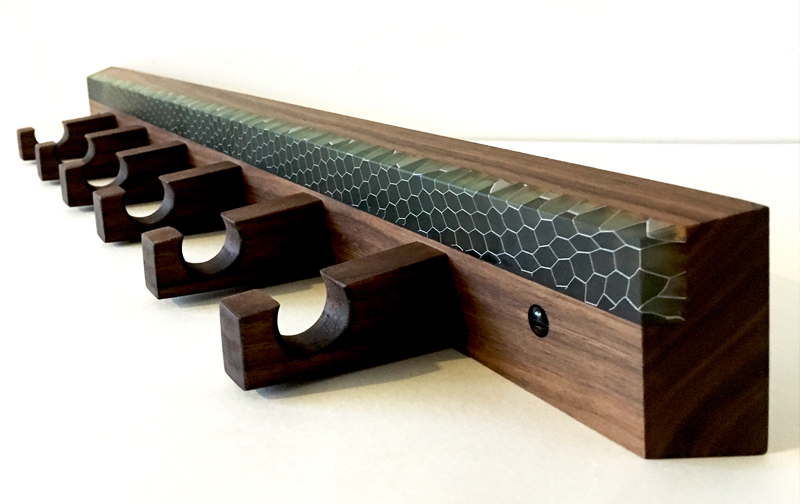
I started getting ideas about embedding high-performance aluminum honeycomb into epoxy to make more of a feature of the larger holes in timber that often need to be filled. Aluminum honeycomb is the same product that is supplied to the world’s top composites engineering, aerospace, and motorsport manufacturers.
My initial experiments with resin actually used another brand’s water-clear polyester resin. I found it incredibly difficult to sand without melting it, and it left an odor on the piece of furniture for around eight months.
I switched to a premium epoxy. In the woodworking community, WEST SYSTEM 105 Resin / 207 Special Clear Hardener is the go-to resin for filling cracks and knots. Usually, the idea is to choose pigments to match the color of the existing timber and hide the epoxy. I wanted to make a feature of it, so I used complementing but contrasting colors to draw attention to the honeycomb.
The 300 Mini Pumps make WEST SYSTEM Epoxy easy to use. The results immediately improved, although not without a few mistakes. In my first attempt, I made the disastrous mistake of using 205 Fast Hardener for a big pour. This ended up causing a massive exothermic reaction which led to cracking, foaming and smoking.
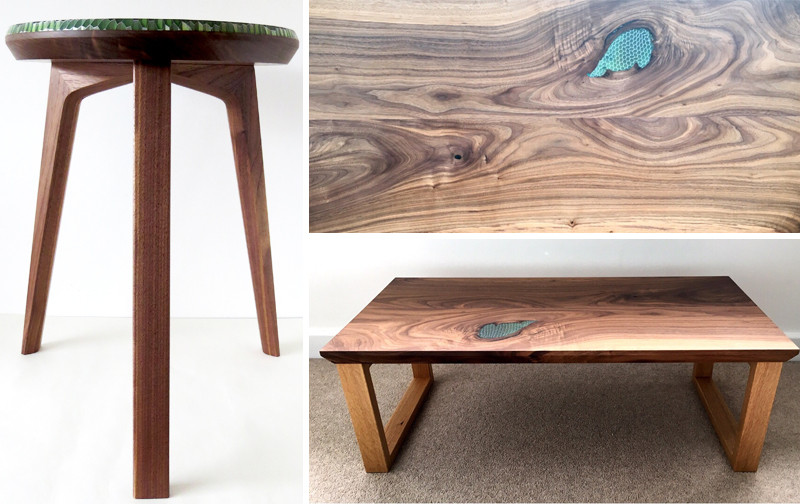
I posted my results on Instagram and received a lot of advice from various sources including WEST SYSTEM. They suggested I use either the 206 Slow or 207 Special Clear Hardener, make my pours no thicker than ¼” thick, and wait for a full cure between pours. This has worked extremely well for me. I had great results filling knot holes in a couple of coffee tables and embedding the aluminum honeycomb.
While filling these holes, I started thinking it would be interesting to expose the side of the epoxy as the aluminum behind the pigmented epoxy would reflect light in different ways at different depths. One of the products I produce is a small children’s stool, so I used this technique to incorporate decorative inlay into the top of one of these stools. The results are incredibly interesting, creating a slightly irregular pattern with the honeycomb. I was so pleased with these results. The cured epoxy can be sanded easily along with the rest of the surrounding timber. I apply my finish (osmo polyx) right over the top of it.
Since posting images of the stool on Instagram, I have had a number of people asking me how to achieve this look. I am really looking forward to experimenting more with WEST SYSTEM Special Clear 207 Hardener and finding more uses for this technique.


