

By Ray Locke
This is a project which will give your stainless steel helm’s wheel a beautiful wooden look, a softer and sturdier feel. Mine looks great and, with a new teak cockpit table, really improves the look of the helm station. It is done by wrapping the wheel with pieces of teak that have been hollowed out and rounded over, then epoxied together. The end product feels heavier than the stainless steel wheel, is about ½“ greater in diameter, and is beautiful.
The following describes how to “teak” a 32″ diameter wheel made out of 1″ round stainless steel tubing. If your wheel is made out of oval tubing, you’ll have to adapt.
You’ll need the following equipment, tools and materials:
- Router with a ½“ chuck to handle a 1″ diameter round nose bit, a ¾” radius round-over bit and a ¼“ straight bit
- A ½“ plywood jig, with a router mounted on a pivoting arm for cutting circles
- Sturdy work surface
- Short length of pipe on which the wheel will rotate with no slop
- About 16 pieces of ¾“ thick teak, 4″x 13″
- WEST SYSTEM 105 Resin® and 205 Fast Hardener®¹
- WEST SYSTEM 406 Colloidal Silica
- Two cups of teak sawdust
Before beginning the project, check the wheel for symmetry. My 32″ Yacht Specialties wheel was 1/8“ out of round.
Laying out the work
Lay the wheel pattern out on the work surface, using the plywood router arm with two holes drilled to tightly accommodate a pencil. Scribe two circles on the work surface. These will be the inside and outside circumference of the finished wheel. (In my case, a 15″ inside radius and a 15″ 16½“ outside radius.)
Cutting the teak
Using these lines as a pattern, lay out and cut eighteen 3″x14″ pieces of ¾“-thick teak that will cover the scribed circles on the work surface by at least ¼”. Of course, the wider the teak, the fewer pieces it will take to make a circle. To determine the angle of cut, divide 360 by the number of pieces. Mate these pieces to each other with rounded cuts. Drill countersunk holes at the corners and securely screw these pieces to the work surface. Make sure the screws are outside of the wheel’s outside diameter and not near any router path.
If you have enough bench space, do both halves at the same time. This will save you a lot of confusion.
Plane any high spots on the teak pieces so there is nothing to catch the router base. Re-scribe the insided and outside circumferences and lay out the wheel to double check your fit. Mark well each piece of teak, top and bottom.
Routing the groove
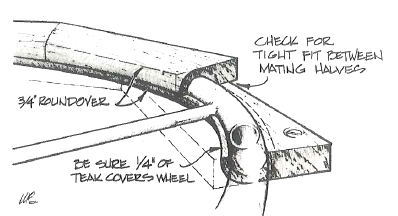
With a cove bit that is the same diameter as your wheel rim, use the router jig to slowly rout a ½“-deep groove into the inside face of the two wheel halves, centered between the two lines. Before routing the groove to its full depth, lay the wheel over the groove to check for fit. Place the wheel so that none of the spokes line up with any of the joints in the wood. If the wheel is out of round, you may have to make another center hole in the jig arm to alter the shape of the groove at one side to match the wheel. Route the groove to its full depth. Lay the wheel in the groove and check the wheel’s exact position in the groove. Remember that you will have less than the ¼” thickness of teak covering the wheel rim.
With the wheel in the groove, mark the position of the spokes, and the wheel’s direction as the spokes may vary in distance. Use a router or file to cut grooves for the spokes and spoke-to-rim weld fillets. Place the wheel in position in the groove, and verify that the depth of the groove is just over half the thickness of the tubing. At this point, it’s OK if there is a little play in the groove because the gap will be filled by the epoxy mixture.
Shaping the inside circumference
Now for the tricky part. Unscrew the marked pieces of wood and flip the entire wheel halves over end for end. You must now trim and round over the inside edge. Remember to countersink the holes on the backside. Be sure that the pieces of wood do not drift out of position when you are re-securing them to the bench. Line the pieces exactly and then scribe both the inside and outside circumferences again.
Using the router with a ¼“ straight bit, trim the inside circumference of each of the wheel halves. With the outer cutting edge of the bit at the scribed inside line, first make a shallow cut, then lower the bit in several passes so that the router doesn’t chip face of the teak.
After trimming the inside circumference, switch to the ¾“ round-over bit to round over the corner. It is important to keep the same pressure on the router all the way around the circle, and go smoothly. Round over both wheel halves.
Assembling the wheel
The pieces of wood are now curved, with a groove on one side and a round-over on the other. Now for the gutsy part: Unscrew the pieces of one of the wheel halves and do a test fit with the remaining over the other half, clamping the wheel in the middle. Trim and adjust the pieces to fit, making sure the groove is deep enough to provide a tight joint between the halves. Mark all of the pieces for position. Don’t worry if there is still some play in the pieces; the filler will compensate for this.
Use 80-grit sandpaper to abrade the stainless steel wheel so that the epoxy will bond to it. Prepare a mixture of 105 Resin and 205 Fast Hardener and wet out the inside of several opposing wood halves. (The number will depend on how many clamps you have available.) Thicken the remaining mixture with 406 Colloidal Silica, to the consistency of peanut butter. Add some teak sanding sawdust to create the right coloring, then spread enough of the mixture into the grooves to fill all gaps. Adjust so that the inside edges are even, then clamp. Excess epoxy should squeeze out, but will file off easily when after it cures. If you don’t assemble the entire wheel at one time, keep excess epoxy off of the exposed ends of the teak pieces so that the next piece will mate without gaps. It took me three sessions to glue up the entire wheel.
Once the epoxy has cured, use a half-round file to clean up the inside of the wheel. Now the rough looking wheel will begin to look finished.
Shaping the outside circumference
Lay the wheel flat on your workbench, with a vertically mounted pipe as an axle for the wheel. (I bored a 1″ hole in the bench to firmly mount the pipe.) Make sure that the wheel rotates smoothly, without slop. Now make a jig to mount the router in a fixed position at the outer edge. In this case, the router is steady while the wheel rotates. Use the ¼“ straight bit to trim the outside circumference. To make things a bit easier on the router, first use a jigsaw to trim the excess close to the scribed outside circumference line.
With the router in the same jig, use a ¾“ round-over bit to take the corner off of the outer edge of the wheel. Again, lower the bit gradually so as not to chip the face of the grain.
Flip the wheel over and repeat step the process to round over the remaining corner.
Finishing
Try to blend in any goofs and refill any grooves that didn’t get enough epoxy. This finishing work might best be done by rotating the wheel on a piece of pipe clamped to the edge of the bench. It doesn’t have to be perfect: if there are variations in texture, grain and even thickness, that’s the beauty of wood.
Another fun part is marking the king spoke. (Indicates rudder amidships when the king spoke is in the vertical position). It can be wrapped in twine or inlaid with a piece of contrasting wood, etc. So that my king spoke mark would match the spokes, I cut a strip of 14-gauge stainless steel and inlayed it into the teak. I then fastened it to the inside of the wheel with a tapped screw.
Finish sanding with 80, then 120-grit sandpaper. Finish the wheel with two coats of 105 Resin mixed with 207 Special Clear Hardener®, then apply a couple of coats of UV-filtering varnish.
My wheel turned out fine. There were no separations problems after a year’s use on the Bay and it looks great!
At the time of this writing, Ray Locke and wife Fran lived in Frederick, Maryland and sail AIRLOCK, a 37’ Hunter Cutter on the Northern Chesapeake Bay.
¹ When this article was written, WEST SYSTEM G/flex epoxies had not yet been developed. Because of G/flex’s superior performance with teak, this is what we now recommend for bonding in projects involving teak and other dense, oily woods. We continue to recommend finish coating with 105 Resin/207 Special Clear Hardener and a UV filtering varnish for a beautiful bright finish.


