

Editor’s note: We are nothing if not cutting edge at Gougeon Brothers, Inc. Technical Advisor Brian Knight (now retired) wrote this article in 1993 about how to build something that is now a fast-growing trend in the workplace: a stand-up desk. Brian’s “dual level computer stand” will still make a great stand-up option today, although we imagine yours will have a flat screen monitor rather than the cathode ray tubes Brian’s design accommodated.
by Brian Knight
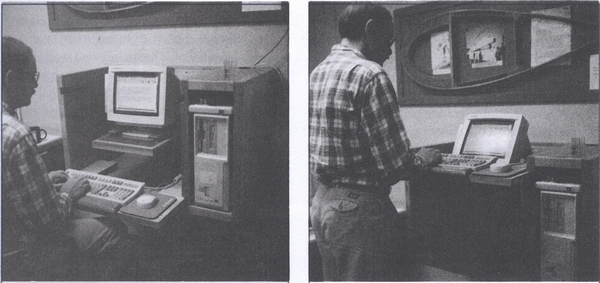
Because I spend so much time working at a computer, I designed a computer cabinet that would allow me to stand or sit while I work. It takes less than 10 seconds to convert from one position to the other. As an added bonus, moving the computer to its own stand freed some workspace on my desk.
The monitor sits on a hinged shelf supported by a hinged brace. By rotating the shelf upwards from a horizontal position and moving the brace to a secondary stop installed on the bottom of the shelf, the shelf angles upward allowing the monitor to be viewed from a standing position. The keyboard and mouse pad rest on a lightweight tray inserted into one of two slots. The lower slot enables you to sit and use the keyboard, while the upper slot allows you to use the keyboard while standing. The keyboard tray is U-shaped and the monitor is viewed through the open part of the U when in the standing position.
Since the keyboard tray has to be lifted to one of two positions, construct it using lightweight materials and methods. I chose to vacuum laminate a couple of door skins to a honeycomb core material. The result is a very lightweight, stiff tray large enough to support the keyboard and the mouse. Assembling the tray in a vacuum bag is a fairly easy project for anyone wishing to become familiar with vacuum bagging techniques.
While I was in my workshop building the cabinet, my son wandered in, looked at what I was doing and asked “Do you really need to use epoxy to build this or are you just trying to sell some product?” Normally, my standard response to his tough questions is “go ask your mother” but this time I felt compelled to defend myself. After all, it’s fairly common knowledge that WEST SYSTEM® Epoxy produces high strength, water-resistant joints, and coating. But why use epoxy instead of another type of adhesive or mechanical fasteners to build a simple cabinet that will never be exposed to an outdoor environment.
The structural advantages of epoxy
Low viscosity adhesives soak into the edge grain of plywood often resulting in a dry joint. High viscosity adhesives like construction adhesives don’t soak into edge grain, and they don’t penetrate into the grain very well either. They just sit on the surface of the wood. Epoxy, however, offers the best of both worlds. Thin epoxy penetrates wood grain easily, flowing into the microscopic crevasses and pores where it cures, providing excellent mechanical adhesion. Thickened epoxy resists penetration and prevents a dry joint. When gluing two surfaces together, always use two-step bonding. First apply an unthickened resin/hardener mixture to each surface for good penetration, followed by a coating of thickened epoxy that fills gaps and prevents dry joints.
I use plate (or biscuit) joinery to increase the surface area of the joints and to keep the pieces aligned during assembly. Epoxy’s gap-filling qualities make it easy to use with biscuits and the extended working time of epoxy makes large or difficult assemblies easier to cope with than faster curing water-based adhesives.
I decided to hang the cabinet on the wall instead of supporting it with legs. This puts a lot of tension on the side panels and the bottom of the unit. When exposed to a constant load, common carpenter glue deforms, while epoxy resists “creeping” and is not likely to fail after extended service.
Cosmetic advantages of epoxy
Application of one coat of epoxy to the plywood and cedar edging before sawing them into pieces accomplishes several things. It toughens the surface of the wood making it more resistant to scratches and dents during construction; it reduces the amount of splintering when plywood is cut across the grain; it eliminates the discoloration caused by adhesive squeezing out during assembly; and it seals the wood grain, reducing the number of coats of paint or varnish necessary for a good finish.
Roll a coat of epoxy on both sides of the plywood and the cedar used to cover the exposed plywood edge grain. Allow it to cure overnight. If the cabinet will have a natural finish, use WEST SYSTEM 207 Special Clear Hardener. Otherwise, use 206 Slow Hardener. (If you want to stain the wood, use an aniline powder stain mixed with water, allow it to dry overnight, and then coat with epoxy as described above.)
After an overnight cure, sand the epoxy using a dual-action or an orbital sander with 80 grit sandpaper and cut out the pieces.
Designing the stand-up desk computer cabinet
The dimensions shown in the drawing fit my computer, an IBM-compatible PC, and me. You’ll have to modify the dimensions to suit your computer and your own ergonomic proportions.
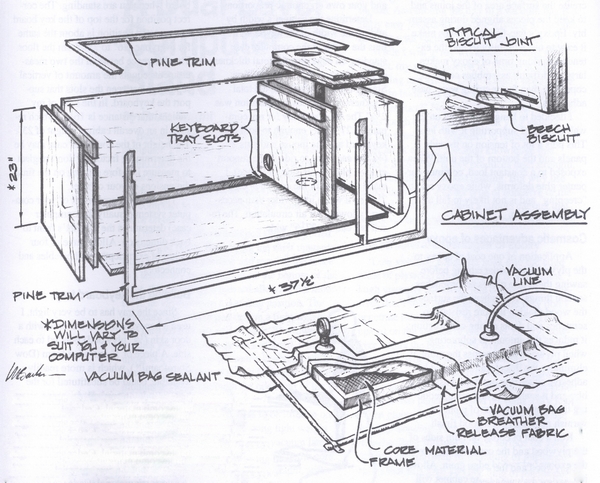
Determine the cabinet’s width by adding the width of the keyboard tray plus the width of the computer case standing on edge plus the total thickness of the sides and the center partition. Since I used ¾” plywood, the total thickness of the sides and partition was 2¼” The keyboard tray for my computer is 27″ wide: enough to hold the keyboard and the mouse pad plus 2″ (¾” on each side to ride in the support groove, plus a little side clearance). I made the hole for the computer case 7½” so it was a little wider than necessary, allowing for air circulation. The result is a cabinet 37½” wide.
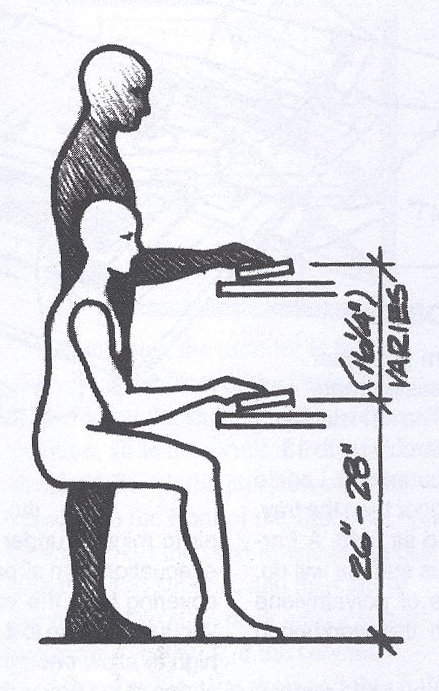
Establish the height of the cabinet by determining the height of the keyboard when it is at its upper position or the height of the computer case, whichever is greater. Determine the keyboard height by standing up and measuring the height of your fingers above the floor with your forearms making a 90º angle with your upper arms. This is the ergonomically correct height for the keyboard when you are standing. The correct position for the top of the keyboard in the seated position is about the same for everyone- 26″ to 28″ from the floor. The difference between the two measurements equals the amount of vertical separation between the slots that support the keyboard. In the case of my cabinet, that distance is 16¼” which results in an overall cabinet height of 23″. The height of the computer case may be the determining factor, so don’t neglect to measure it before settling on the final dimensions of your cabinet.
The deepest component of your computer system (usually the computer case) determines the cabinet’s front to back dimension. Allow three or four inches of extra depth for the cables and connectors.
Materials to build this stand-up desk
1 Sheet 3/4″ plywood
- 1 1x6x10′ lumber for covering plywood edges
- 3′ continuous hinge
- Plate biscuits
- WEST SYSTEM 105 Resin and 207 Special Clear Hardener
- 403 Microfibers or 406 Colloidal Silica filler
- Paint or varnish (optional)
Building the keyboard tray
Since the tray has to be very light, I used a honeycomb core material with a door skin (1/8″ plywood) bonded to each side. A piece of 1″ extruded foam (Dow Styrofoam®), which is more readily available, could be substituted for the honeycomb material. Cedar strips cover the edges of the core material.
To build the tray, begin by drawing a full-size outline of the tray on a piece of corrugated cardboard. Carefully cut out the shape, trace it on two pieces of door skin, and cut them slightly oversize. Cover the surface of the cardboard with a sheet of polyethylene to prevent any epoxy from sticking and glue the cedar frame together around the perimeter with G/5 Five-Minute Adhesive. The cedar frame conceals the edge of the core material so make it the same thickness as the core. “Tack” the core material to the inside of the cedar frame with G/5. Working on a plastic-covered bench, coat one side of each door skin with epoxy. Set one piece glue side up on the sheet of plastic, coat the core material/frame, and set in on the wet door skin. Coat the top side of the core material/frame with epoxy and set the other door skin glue-side-down on top of the frame. Use weights to clamp the assembly until the epoxy cures.
The keyboard is a good project for learning how to use vacuum pressure as a clamping method. It is relatively small and, if you use 206 Slow Hardener, you’ll have plenty of time to pull the vacuum before the epoxy cures.
Once the epoxy has cured, scrape off the epoxy squeeze it out. Use a router with a piloted straight bit to trim the overhanging edges of the door skins. Finish the tray with a final sanding and a couple of coats of epoxy.
Vacuum bagging the keyboard tray
Used with an air compressor, the vacuum generator included in the 885 Vacuum Bagging Kit will easily create enough vacuum to clamp the tray assembly. The kid includes everything you need to vacuum bag an assembly up to 13 sq ft.
To assemble the tray using vacuum clamping pressure, locate a work surface about a foot bigger than the tray. The workbench surface must be smooth, flat, and air-tight. A Formica-covered top is ideal, but any non-porous surface will do. Cover the area under the tray with a piece of polyethylene plastic to prevent the tray from sticking to the workbench surface.
Apply the vacuum bag sealant directly to the table surface about 2 or 3″ around the perimeter of the tray frame you’ve already assembled with G-5. Coat one side of each door skin with WEST SYSTEM epoxy (use 206 Slow Hardener if you haven’t made a vacuum laminate before). Set one piece glue side up on the sheet of plastic, coat the core material/frame, and set in on the wet door skin. Coat the top side of the core material/frame with epoxy and set the other door skin, glue-side down, on top of the frame. Drive a few small brads through the door skin and into the frame to keep the skins from sliding around during the vacuum process.`
Cover the assembly with a piece of release fabric and breather fabric. The release fabric will prevent the fuzzy breather fabric from sticking to the tray after the epoxy cures. The breather fabric allows air to migrate under the vacuum bag membrane so air can be removed from all parts of the bag. Next remove the protective covering from the vacuum bag sealant and apply a sheet of vacuum bag film to it. Leave a couple of wrinkles several inches high to allow enough slack in the bag so the bag material can conform to the shape of the tray without stretching. Keep in mind that the bag must not have any air leaks.
Connect the vacuum generator tubing to the compressor to start the vacuum. Connect the generator to the bag with a suction cup placed over a small slit in the membrane. Stop any air leaks so the bag can conform tightly to the tray. When this stage is reached, cut another small slit in the bag and attach the vacuum gauge with a suction cup. The gauge should show about 15 inches of mercury. If it is much less, keep chasing the air leaks until the gauge shows the appropriate number. Leave the vacuum on until the WEST SYSTEM epoxy has cured.
Building the cabinet
Saw the plywood sheet into pieces with the appropriate dimensions for your computer and your height. Layout and cut the biscuit slots in the cabinet pieces and bond the entire unit together. There are thirty-three biscuits used in this cabinet. Had I used yellow aliphatic glue, it would have been set up before I had time to apply the clamps. But epoxy with 206 Slow Hardener gave me plenty of time to clamp the case and clean the squeeze-out.
When the epoxy cures, remove the clamps from the cabinet, then lightly sand any glossy areas. Dulling the gloss this way ensures good adhesion of the final finish. Install the spacers for the keyboard tray slots, and apply the cedar edging to all exposed plywood edges. Rip the cedar edging about a 1/16″ wider than necessary and after the epoxy has cured, sand the or route the cedar flush with the plywood surfaces.
Cut several holes with a hole saw for cables and ventilation. Make the holes at least 2½” in diameter; big enough for the large cable ends. Drill one hole in the bottom of the computer case storage area to provide access for electrical power and the printer cable. Drill a hole between the computer case storage area and the monitor. This hole accommodates cables for the mouse, keyboard, and monitor. Locate all the holes near the back of the cabinet. Seal the edge grain of the holes with a couple of coats of epoxy to hold down the slivers.
Construct the monitor shelf, the shelf support, and the mechanism to hold the monitor on the shelf. Cut out the monitor shelf and its support and edge them with cedar. Make the monitor shelf with a 1½” edge for the support brace to lodge behind (see drawing). Devise something to hold the monitor in place on the shelf while it is being tipped to its upper position. Keep it simple, and remember that the monitor requires quite a bit of clearance with the back of the cabinet as it hinges to its upper position.
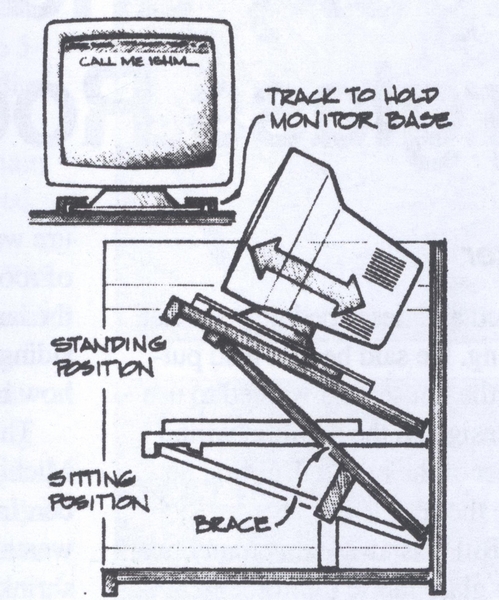
On my unit, the monitor is free to slide from the front to the back of the shelf. When the shelf is in the horizontal position, slide the monitor to the back of the shelf. To tilt the monitor, slide the monitor to the front of the shelf for clearance, lift the shelf upwards, reposition the shelf support, and then allow the monitor to slide back until it is resting against the back of the cabinet.
After finishing the shelf and the shelf support brace, fasten each onto the case with a length of the continuous hinge. The screws supplied with continuous hinges are very small and likely to strip when installed into the edge grain of the plywood. They will hold much better if the pilot hole is wet-out with epoxy just before installing the screws. Allow a little clearance between the bottom of the support and the cabinet bottom so it doesn’t bind when rotated to its upper position. Fastening the support onto the case is an awkward operation but stay with it, there are just a few more things to do.
After completing the installation of all the parts, apply the final finish. I applied two more coats of 105 Resin/207 Special Clear Hardener and left the finish as is. A coat of varnish provides a similar effect. Sealing the wood with epoxy provides a good base for either paint or varnish because epoxy fills the wood grain.
Coat the tray slots with several coats of epoxy to fill the exposed end grain. This will reduce the friction of the tray sliding in and out. A little wax or dry lubricant also helps.
A wrist rest in front of the keyboard is necessary especially when you are standing. I made mine from a piece of cedar, but the rubber style available from a computer store is more comfortable.
If the power switch for the computer is on the back of the machine, you’ll have to make other arrangements to turn it on or off. Most surge protectors have a built-in switch, so plug the computer into it and locate the surge protector where you can reach it.
After I installed my cabinet, everyone who looked at it made suggestions for improving it. Some of the printable ones are: build in multiple slots for the keyboard tray in the upper position to allow different people to use the cabinet comfortably; install a pull-out tray mounted under the computer case to provide a place for reference documents; build in storage for discs and other supplies.
After using my stand for several weeks (including the time I have spent writing this article), I don’t know how I got along without it. It’s a refreshing change to be able to stand or sit at will. It takes less than 10 seconds to convert from one position to the other, so I can move from sitting to standing without hesitation.


