Sea Hood Repair
Spring 2020

GET STARTED
FREE PRINT & DIGITAL EDITIONS

Spring 2020
After a few years of racing on the J22 This Little Piggy, the owner was ready to take a step back and gave me the first option to purchase it. I took advantage of the opportunity. As with many boats I’ve owned over the years, the first couple winters I plan on spending money upgrading and doing repairs. Not that a lot has to be done, but a few changes in hardware placement and re-bedding the deck hardware are at the top of my list.
The sea hood of the J22 is the control center with mainsail, jib, and spinnaker halyard cleats along with the pole topping lift and cunningham. In the early days of J22 sailing, everyone was sorting out the best placement for hardware on the sea hood. By the look of the number of holes punched in the hood and refilled, every idea was tried. Today there is one ideal hardware layout and I’m about 95% there. I just needed to re-bed and add two upright blocks for the jib and spinnaker halyards.
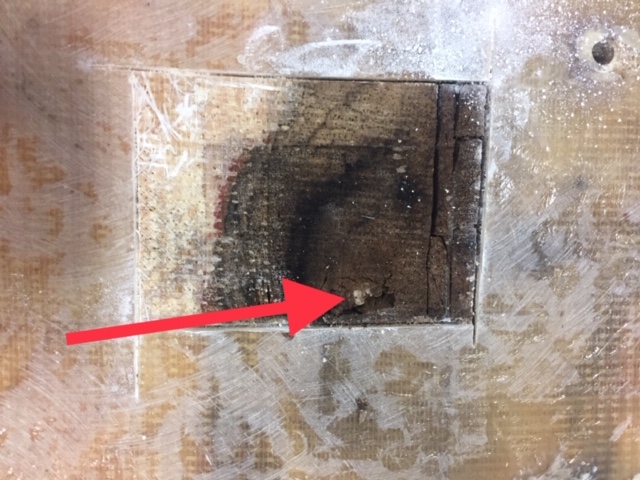
Looking at the hood from the top it was obvious that two holes had been filled with an adhesive caulk, which had failed, and water was getting in. Most of the other holes were filled with a popular epoxy putty and appeared to be in good shape. Removing the sea hood, I was surprised to find many of the epoxy putty-filled holes had leaked, which was signified by the dark core around them.
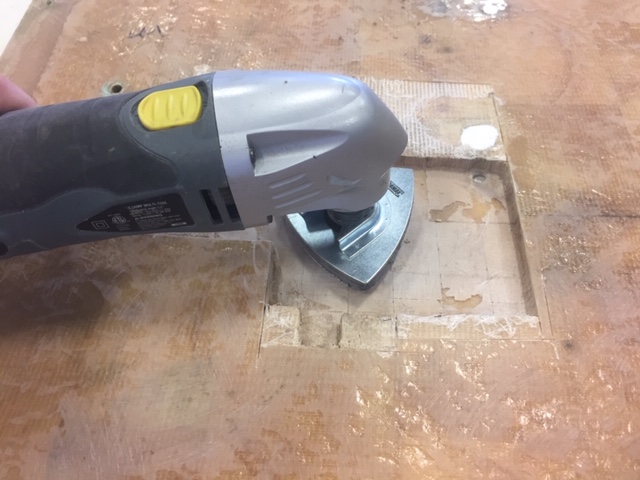
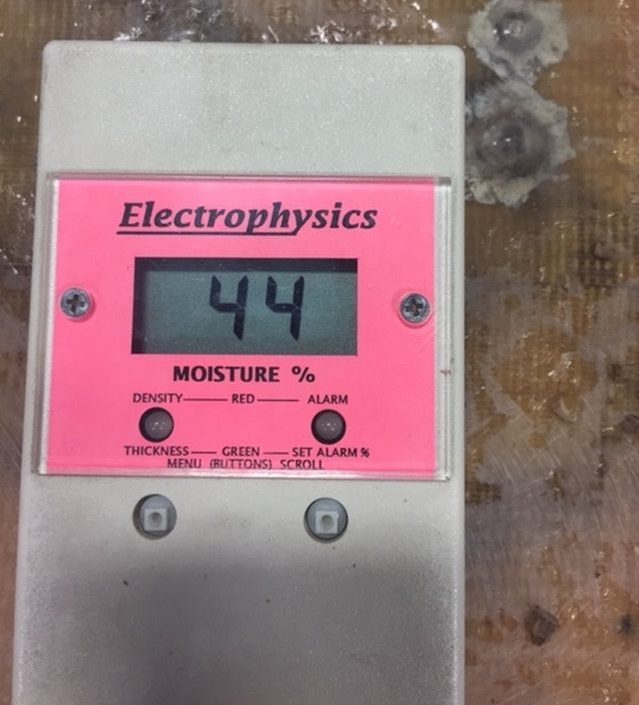
It was time to get to work. Fortunately, I could do the repair from the backside since it was not gel-coated. I removed all the hardware and planned out where I would need to remove the core based on its color and readings from a moisture meter. I cut the fiberglass skin back a bit from where I planned to remove the bad core. Using an oscillating saw with a fine-tooth blade, I cut through the fiberglass with good speed and control. After making my cuts all the way around the area, I used a wood chisel to pry up an edge of the fiberglass and peel it off.
The next step was to remove the core. Using the oscillating saw, I cut an outline of where I planned to remove the core. I then scraped and pried out the old core with a wood chisel. Removing it in nice straight lines with square corners made cutting the replacement material that much easier.
After removing the bad core, I let the surrounding core dry and then sanded the fiberglass smooth from where the core was removed. To prepare for the new fiberglass skin, I used the oscillating saw with a sanding pad adapter to sand a 12:1 taper, with a generous radius on the fiberglass around the cutout area.
Next, I cut and fit the new balsa core into the areas where the bad core was removed. I used three layers of 10 oz. fiberglass to create the same laminate thickness as had been removed. I cut the first layer to cover the area out to the end of my taper, with the next layer cut slightly smaller and the third slightly smaller than the second. I used release fabric over the repair area to smooth the edges and prepare the surface for the finishing steps. This was cut just bigger than the overall repair.
Now everything was ready to be put together. I used unthickened WEST SYSTEM® Epoxy to wet the balsa core on the sea hood, and the edges and side of the new piece of balsa. On the sea hood fiberglass surface, I used epoxy thickened with 406 Colloidal Silica Filler to the consistency of mayonnaise. This mixture fills imperfections and makes a nice bedding material.

With the fresh core material in place, I filled any gaps between the old and new core with the thickened epoxy and let it cure. The new balsa was thicker than the old, so after the epoxy cured I sanded it down to the same thickness as the old core. I then laminated the three layers of fiberglass and covered it with release fabric. If the coring had been the original thickness, I could have done the bedding and glassing at the same time. After the laminate cured, I removed the release fabric and was ready to install the hardware.
In a future Epoxyworks issue, I’ll cover hardware bonding and installation on my J22.