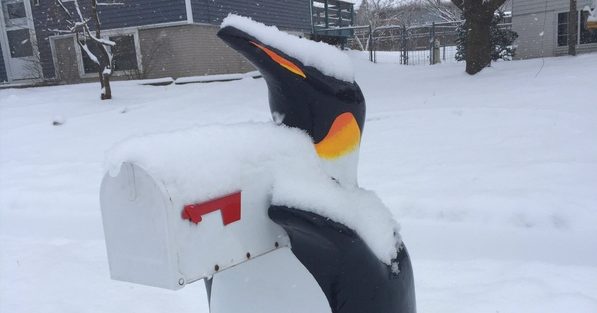
A Penguin in Iowa?
Spring 2018

GET STARTED
FREE PRINT & DIGITAL EDITIONS
Spring 2018
By Ryan Krafka
I first got the idea for this project driving through a neighborhood in Iowa City where my wife and I live and work. “You have to see this awesome mailbox,” I said to my wife as we drove through a neighborhood one day this past fall. There it was, a dolphin mailbox. Not just a mailbox with dolphins painted on it, but an honest to nature fiberglass dolphin with fins holding a mailbox beneath its head. I said to her “You know darling, our mailbox is looking a little lack luster these days, wouldn’t it be cool if we replaced it with something like that!?” A few days later we surfed the web for dolphin mailboxes, and nothing came up remotely close to what we had seen. We got to thinking, why not build it? And why not build a penguin instead of a dolphin? We live in Iowa after all, it’s equally, if not a little less outrageous to see a penguin than a dolphin, is it not?
As it happens we had just replaced the Styrofoam lid on our hot tub the week before, so we were flush with expendable material begging to be recycled. Also, I have an engineering degree dealing with composite materials (carbon fiber/fiberglass), a shop full of woodworking tools, and the bohemian artistry and audacity to pull off an eccentric project like this. Not to mention my dad and my extensive collection of WEST SYSTEM Epoxy that we both have used on many projects throughout the years at our home shops. To say the least, I was ready to dust off my knowledge of hands-on composites and put it to good use for our US postal system.
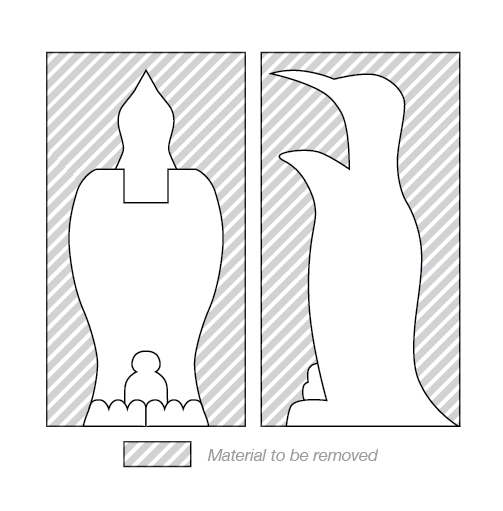
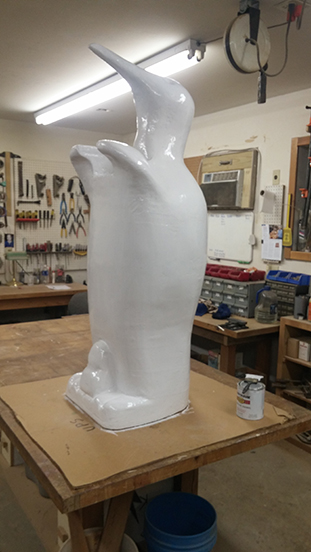
I began by cutting the Styrofoam hot tub lid into roughly 2 ft. by 2 ft. square pieces and gluing them with PL200 caulk into a big block formation about 5 ft. high. I grabbed my stick welder, which must weigh in excess of 100 lbs., and placed it on top for “clamping” pressure overnight. The next day I had a big block of Styrofoam ready to carve. I outlined the 4 sides of this block with what I envisioned a mailbox holding penguin would look like. Donning my personal protective equipment, I set about the foam first with a saber saw, then a diamond bladed angle-grinder, and lastly sandpaper. After a few days of finicky sculpting and excessive sanding, I was happy.
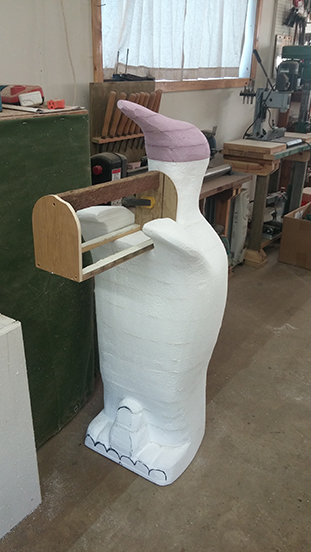
Next was to wrap this curvy, edgy penguin with fiberglass and WEST SYSTEM Epoxy. Of all the techniques I’ve employed over the years, I decided it would be easiest and best to do a wet layup. The process involved painting sections of the penguin with epoxy from top to bottom and apply strips of bi-directional woven fiberglass into the wet epoxy.

I had purchased four 8 square foot sheets of fiberglass, leaving ample material to spare. I cut these sheets into various lengths of 2 in. strips, which I found easiest for wrapping. Over the course of 3 days, after work, I would mix up small batches of epoxy and apply it by brushing small sections of the penguin working from head to toe. I would then lay my strips of fiberglass in the epoxy, ensuring every square inch of fiberglass was properly wet out and adhered to the Styrofoam mold. I maintained a minimal overlap of the strips.
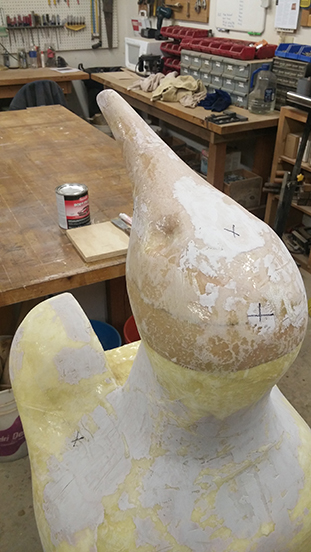
I considered using 205 Fast Hardener but opted for the slower 207 Special Clear Hardener to allow me plenty of open time each batch. It was tricky working the fiberglass over the feet and especially around the fins where the mailbox would be fastened. Having the extra working time proved beneficial.
After the fiberglass had been applied to all of the surfaces, I painted a layer of epoxy over the entire penguin to ensure cohesiveness before sanding. The next evening, using coarse 80-grit paper on a palm sander and a hand pad for finishing touches, I sanded over all surfaces removing small bumps, ridges, and excess epoxy. Noticing the penguin was far from streamlined, I decided to Bondo the slight dimples and shallow ruts that emerge from carving and sanding a stratified medium (i.e. glued Styrofoam stacks). Two nights of Bondo treatment and a significant amount of sanding later, the penguin was ready for painting. (Editor’s note: WEST SYSTEM Epoxy blended with 407 Low-Density Filler or 410 Microlight Filler could have been used instead of Bondo for the final fairing coat.)
If you think about it, mailboxes must stand up to a punishing array of barrages. Extreme conditions are normal, especially in Iowa, where weather shifts can be mind-boggling from day to day. Rain, snow, ice, high winds, heat, humidity, scorching radiation from the sun, snow plows piling snow against the curbs each winter, two or more people opening and slamming the mailbox shut day in and day out… It’s no wonder when you drive around towns it’s hard to see a perfectly plumb and intact mailbox these days. I kept these factors in mind throughout designing and building, and those factors lead to the conclusion that WEST SYSTEM was best suited for the job.
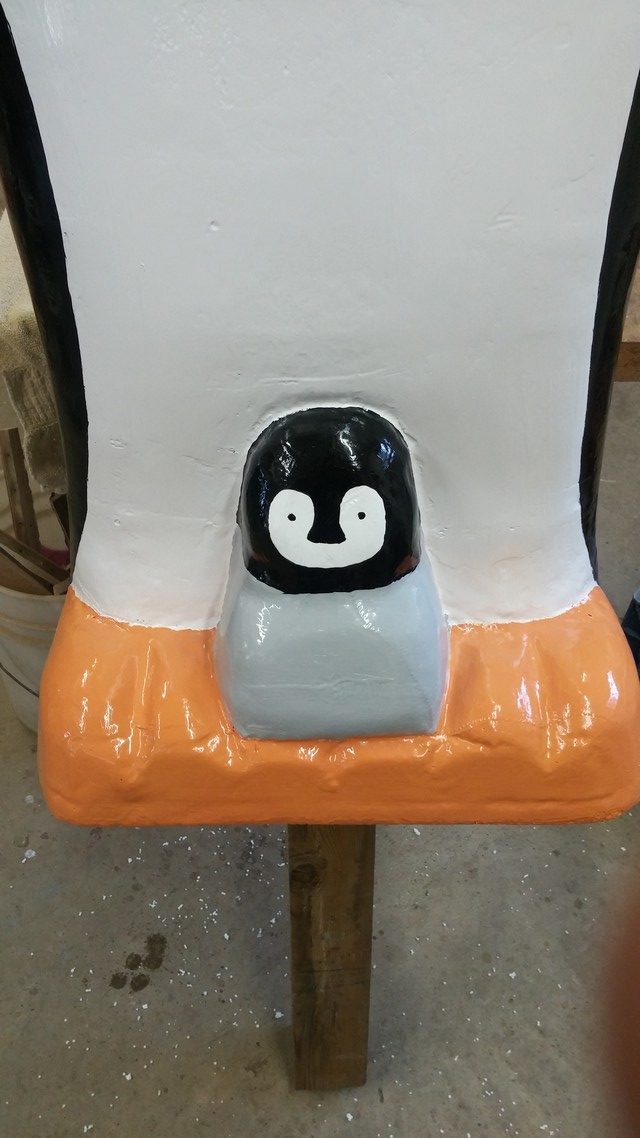
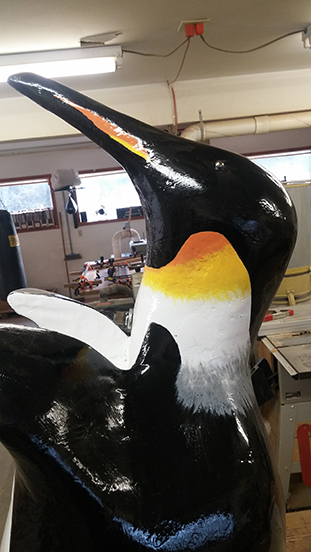
Along this same line, I also decided to use three coats of thick oil-based paints. The first “primer” coat was white. I then sketched the dichotomous emperor penguin color scheme on and applied two coats of black and white paint, accordingly white around the belly and neck then black around the head, back, and fins. The next day my wife gave me some of her good paint brushes and I set about painting the more colorful accents of the emperor penguin and its chick. Emperor penguins are a household favorite of ours and I must confess their feet are not orange… I wanted more contrast down low and remembered the penguin’s feet from Mary Poppins were both appealing and orange in color.
After painting, the last steps were to epoxy a bolt into the neck for attaching the mailbox, epoxy two marbles into its eye sockets, and lastly epoxy a treated wooden post 20 inches into the base of the penguin. My choice of epoxy for this was WEST SYSTEM Resin and Hardener mixed with their 403 Microfibers Adhesive Filler to ensure full, secure bonds between the bolt, marbles, wood, and Styrofoam.

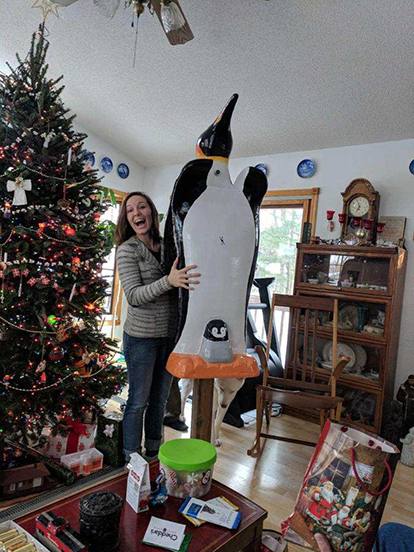
The penguin was finished just before Christmas and my wife, who had not seen it completed yet, was elated to receive it. After the holiday we tore down the old mailbox, dug/chipped a 30-inch deep hole in the not yet frozen ground, and cemented it in. A family member asked what we will do with it when spring and summer arrive… A pair of old sunglasses should do the trick!
This project was submitted by Ryan Roush-Krafka, founder of Krafka Kraft Inc. where he and his wife Jeanette design and build fine wood furniture. To see more of their beautiful woodwork, visit krafkakraft.com.
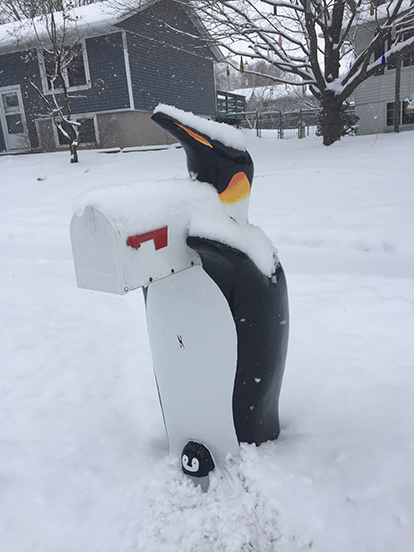
Top image: The Emperor penguin mailbox with chick in its natural habitat.


