Restoring a 1954 Cadillac Runabout
By Bruce Niederer — GBI Technical Advisor
One never really knows when the Fickle Finger of Fate will be pointing in your direction, but it sure did one day early last fall in 2015 at my brother’s shop—Nelson Niederer Woodworking in Bay City’s south end.
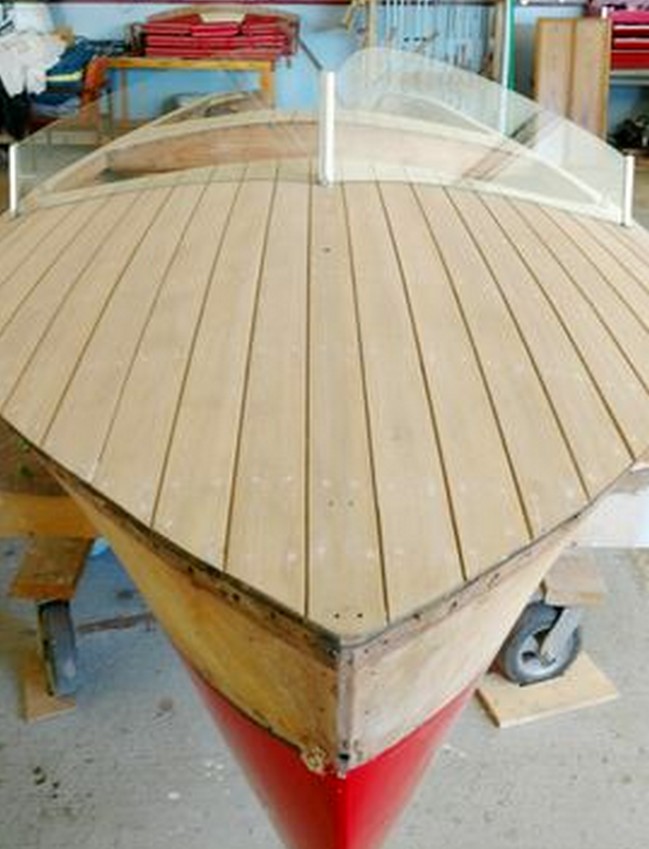
One day out of the blue a young man walks into the shop and relates a story about an old boat he found in his grandpa’s barn. He knew he wouldn’t really have the money nor the time and expertise to restore the boat. Nonetheless, he would hate to see it forgotten and disintegrating. Nelson told him to bring it by and he’d take a look. What he brought back was an extremely rare, 14′, 1954 Cadillac Runabout—in great condition! Cold molded, no frames. Mahogany veneer hull construction with a mahogany planked deck. The seat cushions and bimini top in good shape. No rot in the hull— only a little on the ends of the splash rails.
Not to say it didn’t need work. It had been on a trailer without moving for decades and had a permanent set of whoop-di-doos—uneven waviness caused by sitting so long on the trailer rollers—on the bottom, no outboard engine, the gas tank shot, the deck needed refitting, all the metal parts needed refinishing or replacing, the mahogany trim around the double cockpit set up needed replacing, the cockpit floors needed rebuilding and the trailer was too old to be practical anymore. Still… it was beautiful and love at first sight.
We were in!
Nelson struck a deal with the young man: he signed the title over to us for $1.00 so the restoration could proceed under the shop’s insurance. We would keep track of time and materials and he would get the first opportunity to buy it back after we show the boat at the Hessel, Michigan Wooden Boat Show in August of 2017. The restoration will cost in the neighborhood of $18,000 to $20,000 once completed. If he can’t raise the money for the restoration we will pay him $1,000 and the boat becomes ours—lock, stock, and title.
Cadillac Runabout history
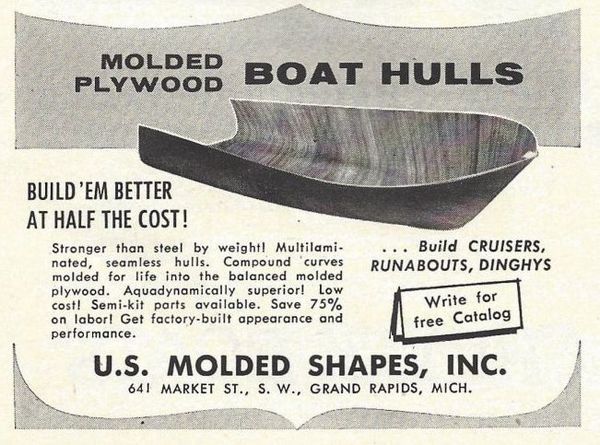
Part of the fun of restoring a classic boat is learning its history—and this Cadillac Runabout is no exception. The Algoma Plywood Company of Algoma, Wisconsin (a subsidiary of US Plywood Corp.) produced molded plywood boat hulls and had patented a cold molding technique through its Molded Shapes Department. This operation was sold in October 1949 to the Wagemaker Marine and Boat Company of Grand Rapids, Michigan. Andrew Kolarik, a US Plywood employee, was loaned to Wagemaker to help establish production in Grand Rapids because he had helped develop the original process and was experienced in boat design and construction. Shortly afterward he was hired by the Wagemaker Company as Plant Supervisor and boat designer of the new subsidiary of Wagemaker Marine and Boat Co.—US Molded Shapes, Inc.

US Molded Shapes was a major supplier of cold-molded mahogany plywood hulls. Many manufacturers such as Delta, Milocraft, Yellow Jacket as well as Cadillac used these hulls to build completed boats. Hulls were also available in kit form for home assembly.
A fire in April 1960 destroyed much of the equipment and production at the Grand Rapids plant. As a result, US Molded Shapes moved its operations to Cadillac, Michigan. Wagemaker Marine and Boat Company also moved operations from Grand Rapids to the plant in Cadillac. US Molded Shapes was combined into Wagemaker Cadillac’s operation as the Molded Shapes Department. Interestingly, at some point, GM sued Cadillac Marine and Boat Co. over the name. They lost because they cannot own the name of a city.
Another interesting aspect of these boats is the fact that there is no consistent or distinctive styling detail that might direct the restoration because the companies were free to finish the boats any number of ways, not to mention the kits finished by dealers and individuals. The hull that landed in our laps was built by US Molded Shapes in Grand Rapids, finished by Wagemaker Cadillac Boat and Marine Co. in Cadillac, and sold by Harwood’s Boat House and Marine Sales Detroit.
The particulars of this Cadillac Runabout
We found some “interesting” repairs and small modifications that must have been done by the original owners. For instance, refastening loose boards with construction nails instead of new screws. The nails were countersunk so that they were nearly impossible to find. Fun stuff like that is common in old boat restorations.
A wealth of early photos Nelson took using his phone are now lost forever because he dropped it in the drink. (Cloud…what’s a cloud? From now on I’m in charge of the photo record.)
Ours is laid out with the steering wheel in the front and the windshield is tempered glass split in the middle forming a sort of open book shape. This is new glass—the old glass had a crack on one side.
In my opinion, the glass windshield adds a bit of class when compared to the plastic windshield. Neither is wrong–they’re just different.
Getting the restoration underway
First, we had to remove all the hardware and windshield, the seats, steering wheel and cables, and the spray rails. This lightened the boat up so that we could easily flip it to start on the bottom.
As I mentioned, the bottom had what is commonly referred to as whoop-di-doos. Before we could fair the bottom we wanted to see how flat we could get it by bonding in two new white oak stringers and a new mahogany inner keel. Originally, the outer keel was fastened to the inner keel through the hull with brass screws. We removed the outer keel then bonded in all three inner parts using slightly thickened WEST SYSTEM 105 Resin/206 Slow Hardener and temporary fasteners.

We strategically placed a bunch of bricks to try to force the bottom down as flat as we could manage while the epoxy cured. We let the stringer/keel assembly sit for about a week hoping it would reverse or minimize the wavy set the wood had taken. The temporary screws holding the stringers would be removed and the holes filled when we flipped the boat over. The screws were sprayed with Pam® cooking spray which makes a fine mold release for fastener threads.
With the hull flipped and the outer keel removed, we began sanding. Now, sanding is always a lousy job but it must be done. It was made worse because the boat will be finished natural from the waterline up, meaning, no power sanding—only longboards in the direction of the grain. Cross-grain sanding scratches would show under the epoxy and top finish coats.
Once we got to this point the bottom was somewhat flatter, but the whoop-di-doos were still obvious and measurable using a long level as a straight edge.
Fairing the hull sides
First we covered the freeboard at the waterline to avoid messing up the hull sides. We coated the entire bottom with two applications of 105/206 with a bit of 501 White Pigment added. Once that cured, we sanded it then faired with 105/206 thickened with 410 Microlight filler.

Then came more longboard sanding followed by more 410 fairing mixture in the low spots, more sanding, followed by a full coat of 105/206 pigmented with 502 Black Pigment. This provided a color change to index from.

Now we began wet sanding and eventually decided it was good and smooth, flat and balanced side to side.
Some readers may be asking themselves “Once an epoxy bottom is applied, how can a restoration still be considered original?”
Transom improvements
The American Classic Boat Society (ACBS) determined some years ago that an epoxy bottom is now considered a safety improvement and in restoration competitions, a boat will not be dinged because of it.
We fashioned a new white oak keel and bonded it in place using some Six10 Thickened Epoxy Adhesive. The keel was also temporarily fastened with screws while the adhesive cured, then these were backed out and the holes filled with epoxy. The oak was encapsulated with 105/206. The bottom was meticulously faired using spot putty to fill pinholes and small blemishes.
This was followed by rolling on a mixture of 105/206/410 thickened to a ketchup consistency so it could be rolled over the entire bottom…followed by more longboarding, of course. Mercifully, this was the final sanding. We prepped the surface with a burgundy abrasive pad then painted the bottom with red Kirby’s® Marine enamel, which is a traditional color for the bottom.

It took three coats of enamel to cover the patchwork of black and white—which we did even though this application was only intended to protect our work once we flipped it right-side up. The bottom will get a final coat before we’re through.
The transom was messed up enough that repairing it wouldn’t have looked good, so we sanded and faired the drilled holes and low spots then bonded a mahogany veneer over it.

Pushpins were strategically placed with the intention of getting the veneer bonded nice and flat with no bubbles or bulges. It took us two attempts to get it installed to our satisfaction.

We may still decide to paint the transom—I wish we had used 3 mm mahogany plywood instead of veneer because no matter how carefully we worked to install it we always got bubbles under it, hence the additional fairing seen below prior to the application of a second layer of veneer.
Both the front and rear cockpits of this Cadillac Runabout had mahogany trim that I’m sure was steam bent to bend around their curved shape. These trim boards were full of holes, had some splits in them and generally looked pretty nasty. We decided they needed replacing.
Both front trim pieces were removed so we could trace their shape onto some chipboard which we used to build a jig. This would allow us to build new trim boards without using steam. I didn’t think it was necessary to bother with steaming if we employed a technique I used to build some support davits for canoes in the GBI shop (Epoxyworks 39 “Simple, Effective Home Repairs and Projects”)

Cold-molding techniques
The technique follows typical cold molding principals—we cut two thinner boards that equaled the thickness of the original trim pieces. We sprayed them with hot water getting each piece good and wet to soften the wood as we slowly, over a couple of days, pulled the pieces tight to the jig. Each time we snugged up the clamps we sprayed the wood again.
Below is the jig fixture we built for the two front trim pieces with one new piece almost pulled into shape. Once the pieces were clamped tight to the jig, we left them clamped for a week so they would hold the curved shape. Then we applied 105/206 thickened with 406 Colloidal Silica to glue the two laminations together, clamping them back in the jig until the glue cured.
Once removed from the jig, the new pieces were trimmed to the correct width and sanded then clamped to the original to check the basic shape. The new pieces turned out as close to a perfect match as we could hope for.
Well, after taking the summer off it’s time to get back to the restoration. Stay tuned for the exciting conclusion to the tale of the Cadillac Runabout restoration. Hopefully, we will have earned 1st place at Hessel by then.
Nelson’s work has been featured in Epoxyworks many times: #28 Building an Arch Davis Sand Dollar, #33 two articles about building bars and pouring 105/207 Special Clear Hardener on a bar top, and #41 Restoring a 1964 Chris Craft Super Sport 17.


