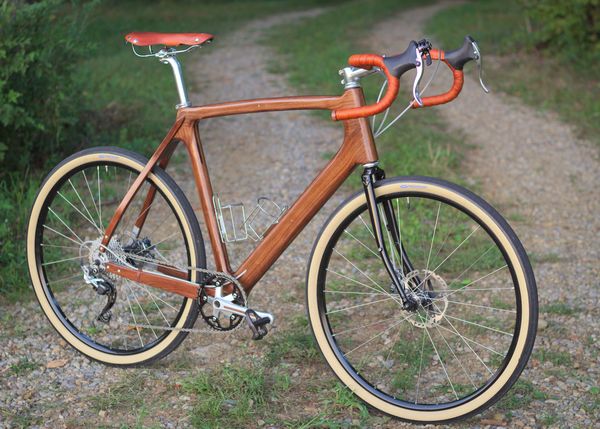
A Wooden Bicycle Frame
Spring 2017

GET STARTED
FREE PRINT & DIGITAL EDITIONS
Spring 2017
For the past ten years, I have enjoyed an increasing passion for cycling including wooden bicycles. Cycling is the perfect combination of effort and motion for me. I’m fascinated with the details and getting “hands-on” with bicycles, both designing and building them. All types of bikes have interested me: road bikes, cross bikes, gravel bikes, mountain bikes, and more. I ride these bikes several thousand miles each year on all types of terrain.
As my interest and passion for bikes and cycling grew, I discovered the world of custom, hand-built bicycles. Expert craftsmen work through every detail of design and fabrication to deliver custom frames and completed bikes to their discerning customers. The imagination and touch that goes into these bikes is impressive and stirring.
Inspired by custom-built bicycle frames, I wanted in on the action. I decided I would build my own wooden bicycle frame. For several years I considered a frame building class or even going at it myself, but I realized I’m not set up to do metalworking. Interested, yes, but it was not a match for my experience or workshop tool arsenal. In the spirit of “run what you brung,” I began to consider another possibility: building a bicycle frame of wood.
I grew up in my father’s woodshop and had a front-row seat for the design and building of many impressive furniture projects. These experiences set me up for the possibility of building a wooden bicycle frame. Having seen some wooden bike frames in pictures, the question in my mind was always just how functional are these wooden bicycles? Meeting Jay Kinsinger of Sojourner Cyclery clearly answered this question for me.
Jay has built a dozen or more wooden frames and graciously shared his methods with me. Furthermore, he has tested his frames in a laboratory setting, and in real-world testing, on some really epic rides. Wooden frames have proven functional, dependable, and durable, and I was going to build one.
One of the first steps of my project was to decide what type of bike to build. I settled on a touring style road bike intended for comfortable road riding, designed around efficient, large volume road tires. I began filling in the details of the design, choosing wheels, crankset, handlebars and more. With these components identified, I started designing the frame.
Using free CAD software, I began defining the geometry of the bike. The topic of bicycle geometry is thick with details. I chose a conservative geometry for this bike for comfort and stability. I drew the shape of the main triangle and then defined the rear triangle with the head angle, seat angle, chainstay length, wheelbase, stack, and reach.
Of particular challenge was fitting the rear tire into the frame with adequate clearance for the chain ring, crankarms, and heel clearance when pedaling. My friend Rody Walters, the mastermind of Groovy Cycleworks, is particularly adept at manipulating his custom designs to accommodate larger tires. Rody passed along some good frame design ideas and helped with metal fabrication support later in the project.
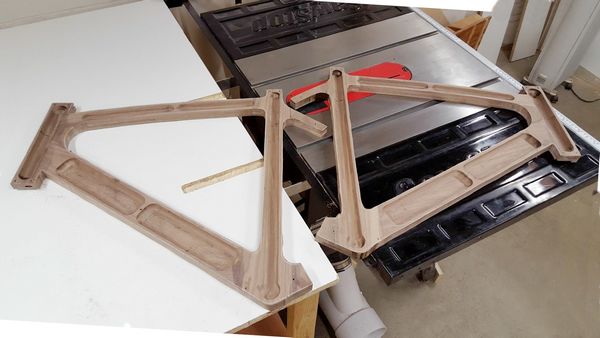
The main triangle of the frame would be made from custom-laminated right and left halves. These blanks would have pockets hollowed on the inside and then be cut and formed to shape on the outside. Full-size drawings were used to create external and internal plywood templates.
The rear members of the frame would be made from solid, bent laminations. Again, full-size drawings were printed and these were used to create plywood bending forms.
Excitement high, I made a predawn visit to an Amish lumber yard to purchase several black walnut boards. It was time to turn a couple months of design and planning into flying sawdust and the building of a wooden bicycle frame.

The rough sawn boards were resawn, planed, and sanded to 5mm thickness. I made a lamination layup drawing to show each of the four layers that would comprise each right/left half of the main triangle. The grain orientation of the pieces in each layer was varied for strength at the high-stress areas of the frame.
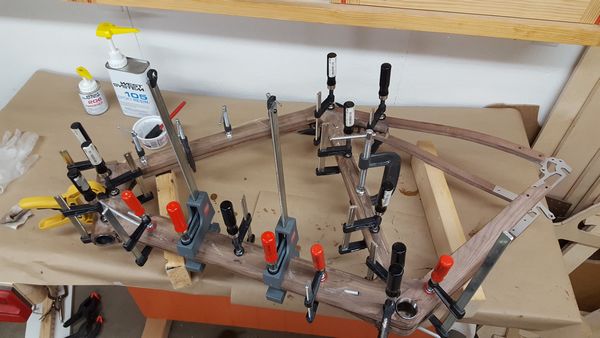
After an informative technical support call with WEST SYSTEM, I began laminating both main triangle halves. The plies were layered on backer boards which allowed brad nailing in waste areas to secure the individual pieces. I used a second backer board, cauls, and a lot of clamps to compress the laminations while the 105 Resin and 206 Slow Hardener worked their magic. I added one layer at a time and allowed the epoxy to cure until I had four layers per frame half.
Once the blank was fully cured, I routed internal pockets. The top tube and downtube were hollowed to reduce weight. I expected this to contribute to the feel of the bicycle when riding. The head tube and seat tube were hollowed to receive steel inserts that receive headset bearing cups, seat post, and bottom bracket bearings. The next step was to roughly cut out the main triangle and then follow a pattern to route its external shape.
In a similar process, the seat stay and chainstay components were made from laminations. The grain on these pieces all went in the same direction and thin plies were clamped in a form to achieve their shape. I made a mistake of not leaving one of the chainstays in the form long enough to fully cure. It may have also had a dry joint from excessive clamp pressure. In hindsight, I would make the plies thinner for these pieces so they would require less clamping force to achieve their shape, and, of course, not rush the cure time.
During this phase of the project, further design was needed for the rear dropouts. I guess this was my time to learn some metalworking and I did it in a very manual way. The dropouts are the pieces that join the frame members at the rear wheel axle. For my design, they also accept mounting of the rear disc brake caliper on the left side as well as the rear derailleur on the right side. I worked through five design iterations, testing each one with plywood mockups before committing to a whole lot of effort with a piece of 4140 pre-hardened chro-mo steel. Using an angle grinder, drill press, files, rotary tool and ambition, I handcrafted my one-of-a-kind custom dropouts.
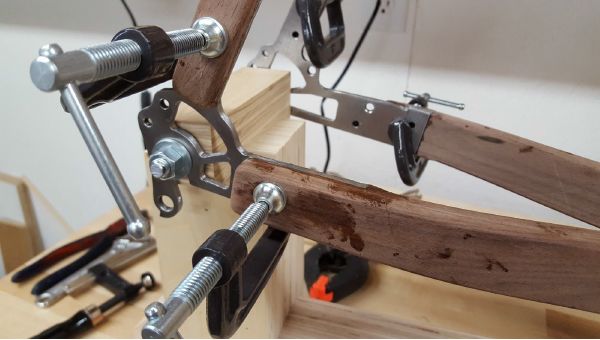
A frame jig was made for assembly with proper placement and alignment of each component. By design, the dropouts were not symmetrical per side. I observed some differences in the chainstays from side to side. Fitting the rear triangle onto the main triangle with the jig would keep everything aligned on the centerline of the frame.
I called WEST SYSTEM technical support again to get some expert advice on the best epoxy choice for bonding the wooden stays to the metal dropouts. They recommended G/flex. Again, I appreciated the detailed discussion and advice. I also used G/flex to bond the stays to the main triangle, thinking its flexible properties and ability to absorb the stresses of shock and vibration would be advantageous at these critical junctions, particularly while bouncing down a chip and seal road at 45mph on my bicycle.
After doing some cleanup and initial shape refinement on the left and right halves, I placed the steel tubes and epoxied the two halves together with 105 Resin and 206 Slow Hardener. Another clamp collection was on display to compress the halves for curing.
The construction and assembly was exciting every step of the way. To my surprise, the shaping and finishing was an enjoyable process too. I employed a multitude of tools and techniques to take away all the wood that I didn’t think should be part of my bike frame: chisels, planes, rasps, a rotary burr in a hand-held drill, an oscillating spindle sander, and lots and lots of sandpaper. It was pleasing to see the chunky, blocky shapes become more refined until finally, I was satisfied with my frame and ready to apply the finish.
This frame was not built just to look at; it was built to be ridden and that means a scratch or dent is inevitable. I considered several types of finishes but settled on an oil-based finish, thinking it would be easier to touch-up and maintain over time compared to other finishes.
Visions of finely finished walnut gun stocks led me to Birchwood Casey Tru-Oil® finish. Here’s another company with excellent technical support. After a phone call, I was confident in this finish choice for my wooden bicycle frame. As advised, I applied the finish by hand one finger dip of oil at a time. Five coats resulted in a beautiful gloss finish. It’s a wooden bicycle frame!
As my cycling friends know, there’s nothing like the excitement of building up a frame then taking it out for the first ride. Let me say, that excitement was tenfold for me this time. I spent extra time on the build, partially to ensure it was well done with all the details correct, but also to savor the experience of building up my first hand-built frame.
Rolling out on the first ride I was a little nervous, but I smiled for 30 miles and enjoyed every pedal stroke. The back roads around my house are familiar, and strangely enough, this brand new wooden bicycle felt familiar too. While it was the first ride, I had imagined this first ride many, many times throughout the project. I thought, “Wow, this bike feels like it was designed just for me.”
The ride was smooth and efficient, the fit was perfect, and the entire experience, in addition to the final product, was extremely rewarding. Every time I see my wooden bike, I want to take it out for a ride and I often do.


