

By Hugh Horton
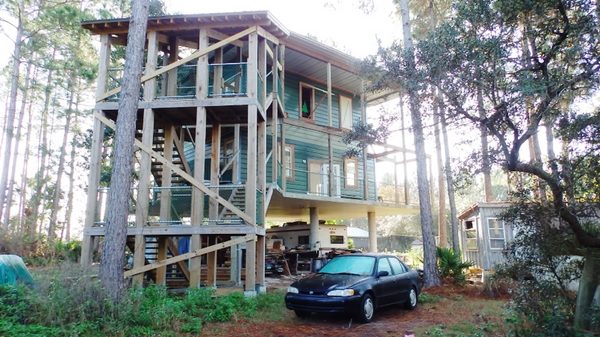
The project was creating a shower pan for an Americans with Disabilities Act (ADA) bathroom in the home I’ve been building in Cedar Key. How does one satisfy shower pan requirements of Levy County Florida and meet ADA suggestions, too, when the floor is concrete, twelve feet above ground?
A conventionally built two-story “stick” structure, 24′ by 32′, is bolted and steel strapped to the 40′ by 48′ concrete platform on six columns. It’s engineered to withstand winds of up to 130 mph. For ADA access, the stair tower can fit a commercial elevator.
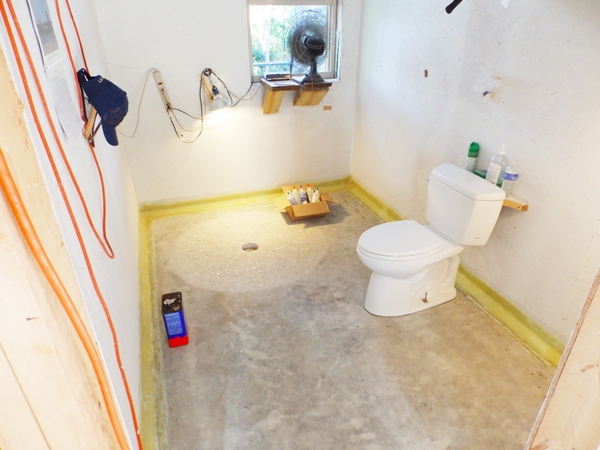
To me, the 12″ thick concrete is like a ground floor conventional slab, so, the slab should be the floor of the shower. A shower dish had been cast into the concrete in 2010, but it didn’t meet my current plans.
An ADA shower must have space for a wheelchair to turn around, and a sill low enough to roll over. The whole floor can be the shower pan, and the whole room, walls and all, can be hosed down. This bath’s walls are steel sheathed like the outside of the house.
To prepare the surface I gouged it up with a diamond blade on a hand grinder, then scrubbed and rinsed it with alcohol. I cut and ground a new dish an inch deep, four feet in diameter. Then I ground a ½” radius around the drain. With a 1.5″ high bathroom door sill, I’d meet the 2.5″ depth requirement for shower pans.
The first inspector went by the book and said I must have a conventional 40 mil vinyl membrane as is used under tiled shower floors. Water must not get to the 2×6 pressure-treated pine floor plate. I felt as if the weight was on me of every failed shower wall in Florida since the advent of pressure water systems.
Vastly experienced Sarasota home builder and third-generation native Floridian, Pat Ball, suggested a Corian baseboard, stuck down and joined at the corners with 3M® 5200. My thought was a fiberglass-epoxy border, two inches onto the concrete and four inches up the oriented strand board under the steel sheathing.
The new boss and chief inspector of the Levy County building department visited since he was near Cedar Key one day, and wanted to take a look at the eight-year project he’d inherited. He was inofficious, friendly, and strolled around asking about this or that feature.
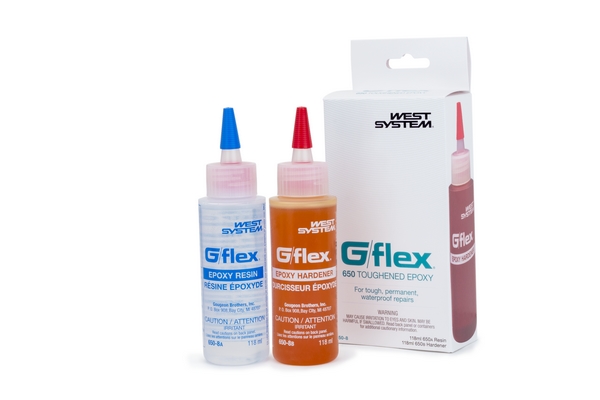
We came to the ADA bath floor. I offered the two ideas: 3M 5200 or G/flex epoxy. “Yeah, sure,” he said, smiling. “Anything you want.”
G/flex 650 seemed right because of its permanence, bond onto the concrete, and its flexibility to cope with movement from temperature and humidity changes.
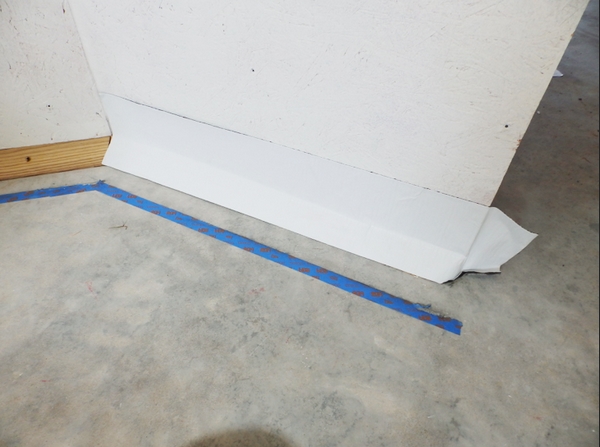
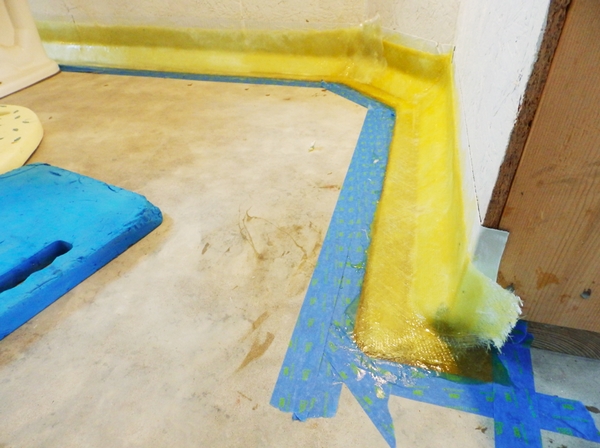
The oriented-strand board (OSB) on the walls comes down to a half-inch from the floor. I filled the half-inch with pressure-treated pine strips, and screwed on a 45 degree beveled piece ripped from “two by” pressure-treated lumber.
Next came 6″ wide “peel and stick” flashing membrane on the beveled wood and up the OSB. This allows movement between the wall and the epoxy-glass, to protect and not stress the water-tight bond at the concrete.
When epoxy mixing time finally came, it was June 19th, 2015, and 88°F. My helper Ryan, a thoughtful, 24-year-old Army veteran, had done a bit of heavy glassing on workboats but hadn’t used epoxy.
The glass to be wet out was two layers of 6″- wide, 17-ounce biaxial with 3/4 oz. mat.
My earlier experiences with G/flex 650 had been in cooler weather. Because epoxy is exothermic, I considered the ambient temperature, but other than using fans and knowing we’d need to work quickly, I did nothing else to counteract the heat.
I’d masked the margins to be glassed, and prepared the surface by coarsely gouging it with the diamond blade on a hand grinder, then scrubbing and rinsing it with alcohol.
Ryan measured and mixed half-cup batches as fast as I could unroll the tape I’d pre-cut and had re-rolled. As we worked around the wall-floor joint, it was obvious that shorter, convenient-to-handle lengths with overlapping joints were better to cover long sections. But, at corners, precise cutting or individual patches made a neater job. It also was evident the G/flex was curing faster than I’d expected. I couldn’t go back and slightly shape and manipulate the first glass fabric applied. It was cooked, and we’d used more epoxy than anticipated.
After removing blush with water and a 3M Scotch Brite™ General Purpose Hand Pad and lightly whisking the surface with a grinder, I rolled on a couple of fill-flow coats of WEST SYSTEM 105 Epoxy Resin and 207 Special Clear Hardener. The results pleased me.
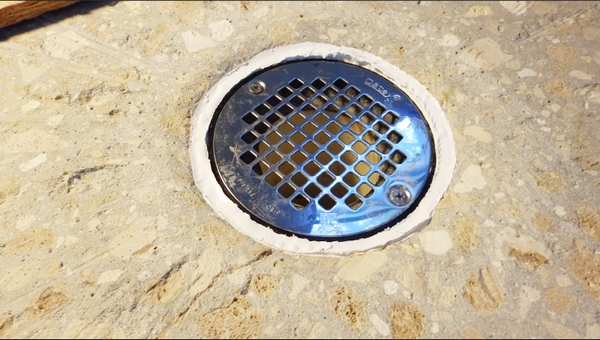
How to secure the shower drain in the hole in the concrete slab? G/flex 650 would form a collar locking the drain into it. Because the drain pipe and the shower drain are PVC, cutting it out is easy if replacement is ever necessary.
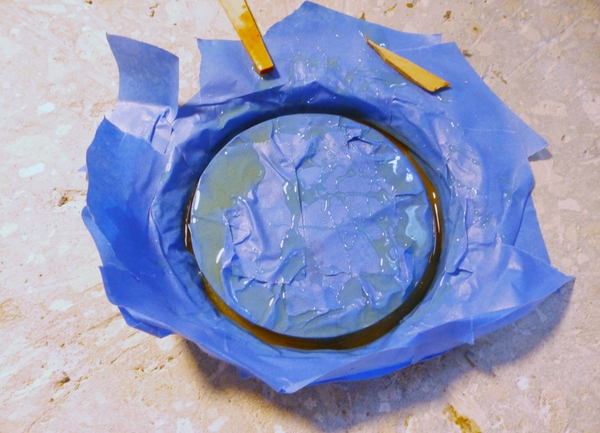
To hold the 3″ drain and pipe at the right height, I wedged a vertical 2×4 under the pipe from the ground below. Working from a ten-foot stepladder under the concrete, I shoved in wedges around the pipe to center it in the hole, and checked my centering job from above. Also from above, using a 4″-diameter diamond saw on a grinder, I cut a horizontal, quarter-inch wide and deep groove a half-inch below the hole’s rounded edge.

When the drain was where I wanted it, I needed to prevent the G/flex 650 I’d pour in from oozing out. From beneath I stuffed 5/8″-diameter flexible foam “backer rod.” If the foam rod came up too far when seen from above, I jammed it back down. Working from above and below, I was convinced it was closed off. Because it was well above 80°F, the temperature helped to make the G/flex 650 runny enough to pour easily into the gap around the drain. After pouring I ran below to check for drips or runs. None!
Were I to do it again in Florida’s summer heat, I’d ask the Gougeon Technical Advisors how to slow down the G/flex 650 for glassing. Maybe by adding a small proportion of mixed 105 Epoxy Resin and 209 Hardener? [Editor’s note: this would work, although it would slightly reduce flexibility. For more information see “Mixing G/flex Epoxy with other WEST SYSTEM Epoxies,” Epoxyworks 26, Spring 2008]
In November, the Levy County chief and electrical inspectors came out. They looked under the slab. They looked in the bathroom. Besides a signed electrical inspection, they left with approving grins and holiday well wishes.
Postscript: June 16th, 2016 the house passed the Certificate of Occupancy inspection. As of August 2016, kitchen trim and shelving are coming along. The top floor epoxy deck-roof has performed impeccably.


