


by Brian Knight—GBI Technical Advisor
Race boatbuilder Jon Staudacher suggested this mini hydroplane design for my 12-year-old son Paul several years ago. It is an 8′-long hydroplane, powered by a 5 to 15 HP outboard motor and can accommodate a driver up to 150 pounds. Paul and his friend built the boat in three or four days.
The only power tools necessary for constructing this boat are a saber saw and a power drill. A cordless drill that can drill or drive screws is the most effective. To ensure safe use of epoxy and power tools, a knowledgeable adult should supervise the project.
Getting started on your mini hydroplane
Study the drawing of the frame structure before getting started. This will make the building process go more smoothly. To assemble the frame, you will need the following materials:
- two pieces of 1″ x 10″ x 14′ long number 2 pine
- one piece of 1″ x 10″ x 8′ long number 2 pine
- two sheets of 1/4″ (one good side) lauan plywood
- one pound of 1 5/8″ drywall screws
- one pound of 1″ drywall screws/flat washers
- a few 1 1/2″ finish nails
- one “Group B” WEST SYSTEM epoxy
- one roll #732-10 fiberglass tape
- several #800 foam roller covers
Building the hydroplane frame
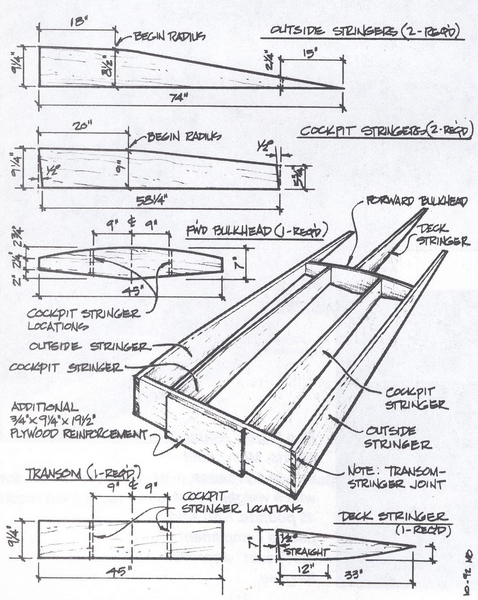
Begin by sawing one of the 14-foot boards into two 7′-lengths. Tack the two pieces together and layout the sides of the hull on these boards using the drawing. Saw the pieces while they’re still nailed together to obtain two identical parts. From the remaining 14′ board, cut two pieces approximately 5′-long and one piece 3′-long.
Tack the 5′ boards together. Layout the cockpit stringers on these boards and saw both of them while they are still tacked together. Cut the deck stringer from the 3′ piece of lumber. Finally, from the 8′ board cut the transom and the forward cockpit frame.
To build the frame, locate a flat surface about 4’x 8′. Temporarily fasten the hull side stringers to the ends of the transom with drywall screws. Drill and screw the forward frame in place to the hull stringers, 59″ from the transom. Screw the cockpit stringers and the deck stringer temporarily in place. Mark the location of all pieces and remove the screws.
Bond the frame together following the instructions in the Bonding with Fillets section (page 31) of the WEST SYSTEM User Manual. Use drywall screws as temporary clamps and remove them after the epoxy cures. Apply three coats of unthickened resin/hardener mix to all of the wide surfaces of the frame. Don’t worry about the narrow top and bottom surfaces right now. They will be coated when the deck and bottom are installed.
Applying the bottom and deck
Place the frame on saw horses and be sure there are no twists in it. Before installing the plywood, bevel the top and bottom edges of the frame to allow maximum contact of the deck and bottom skins. Bend a flexible batten across the stringers and use a hand plane or coarse sandpaper to bevel each stringer until the batten rests fully on each one.
Work on the deck first, since marking the cockpit outline will be easier without the bottom skin in place. Tack a sheet of plywood in place with a few finish nails, making sure the good side is up. From underneath, trace the outline of the hull and cockpit on the bottom of the plywood, and mark the forward end of the deck stringer. Remove the plywood from the boat, tip the sheet over on a pair of saw horses, and draw an arc to form the bow of the boat. Take your time making this arc is fair and symmetrical. Allow large radii at the front of the cockpit as shown in the drawing. Use a saber saw to cut the outline of the deck and cockpit, leaving the skin just a little oversized.
Put the cut sheet of plywood back on the hull frame and tack it down again. Pre-drill holes in the skin for the 1″ drywall screws. These screws act as clamps while the epoxy cures, so drill them close enough to each other to provide even pressure (about 4″ on center). After drilling the pilot holes, remove the panel again and place it upside down on a workbench. Scrape off any splinters that formed during the drilling operation.
Roll a coat of unthickened WEST SYSTEM epoxy on the backside of the deck skin (the surface that will be down when installed) and a coat on the top of the hull frame. Thicken a batch of epoxy with 403 Microfibers to a catsup consistency and apply enough to the frame so that a small amount will squeeze out when the skin is screwed down. Carefully set the deck skin in place and screw it down with the short drywall screws that have a small flat washer under the head. These washers will distribute the pressure of each screw over a larger area.
Tighten the screws just enough to pull the plywood to the frame. Too much pressure may squeeze the adhesive out of the joint resulting in a weak bond. When the epoxy has cured, remove the screws from the deck, plane or file the edge of the deck flush with the hull and cockpit edges, and fill the screw holes with epoxy/410 Microlight mixture.
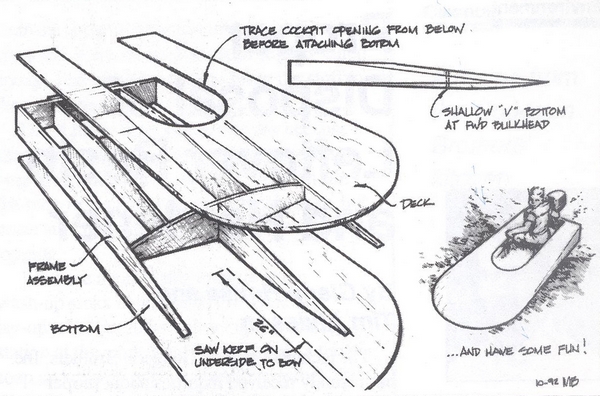
Repeat the procedure with the bottom skin. Additionally, you will have to cut a kerf about 30″ long to allow the plywood to conform to the slight “vee” near the bow. Fill the kerf with thickened epoxy/403 mixture after completing the bonding operation. Be sure to use a generous amount of thickened epoxy/403 where the deck and bottom meet at the bow. This mixture will hold the bow together where there is no framing.
Final finishing of your mini hydroplane
A few finishing touches and the boat will be ready for painting. The transom needs to be reinforced with a piece of 3/4″ plywood where the motor will be mounted. Additionally, two strakes need to be bonded to the bottom of the boat to provide directional stability. They should be 3/4″ x 3/4″ x 4′ long and glued to the bottom in line with the cockpit stringers. Wrap a piece of 4″ wide fiberglass tape around the bow area to reinforce the seam between the deck and bottom.
Fill all holes and dings with a mixture of WEST SYSTEM epoxy and 410 Microlight. Sand the entire boat smooth, round any sharp edges, and roll three coats of epoxy on all exterior surfaces. When the epoxy has cured, wash and sand the coating. Then paint the boat with enamel paint, install a small outboard engine, put on your life jacket, and have some fun. (Mandatory operation conditions include smooth water and a Coast Guard-approved life vest.)


