SHARP CHEDDAR needed her liner repaired. This San Juan 24 was badly damaged in a storm blew her out of the Saginaw River. The boat bounced on the bottom of her slip for about 18 hours. When SHARP CHEDDAR was removed from the water a couple of days later, the keel actually wiggled back and forth. The keel to keel boss joint looked fine, with absolutely no sign of cracking or damage. There was little indication of the severity of the damage, but when the keel wiggled, the bottom of the boat flexed in and out. My friend John, who has owned the boat for about 15 years, was pretty upset. He was afraid it could not be repaired.
John and I enlisted the help of Tim Botimer, an old friend of ours who had been puttering with boats for years. We then went to work developing a plan for the repair.
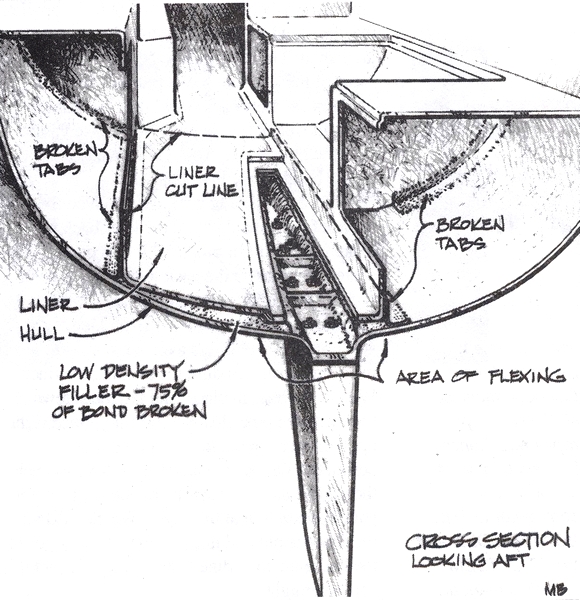
We looked inside the boat and found that the liner had broken loose from the hull. Originally, the liner was bonded to the bottom of the boat with polyester resin and some sort of low-density filler. This bond was broken over about 75% of the area of the main cabin sole. The vertical sections of the liner, such as the galley front and the dinette, were tabbed to the hull with a layer of woven roving, but these tabs were broken as well. There were also two floors which were bonded into the keel boss but, you guessed it, both broken. There were also bulkheads at the forward end and the aft end of the main cabin. Two of the four sections of bulkhead were broken loose from the hull.
When developing the plan for repairing the liner, we decided to cut and remove a section of it to ensure a total bond when we replaced it. The cut lines were laid out so we could reuse the liner section, with the non-skid section intact. As it turned out, we did have to cut across the non-skid at the aft end of the cabin. We were able to reach through the storage access doors and fasten little pine cleats to the inside of the vertical surfaces which would span the cut. We then drilled through the boat’s liner and into the cleats and put sheet metal screws above and below the cut line. This was a guide to relocate the liner in the proper position when it was replaced.
We made the cuts with a Fein Triangle Sander with the optional saw blade. This machine works very well for composites. The blade oscillates at 20,000 but does not revolve. It cuts clean and straight without making dust. You can control the depth of the cut by taping a block of wood to the head of the machine.
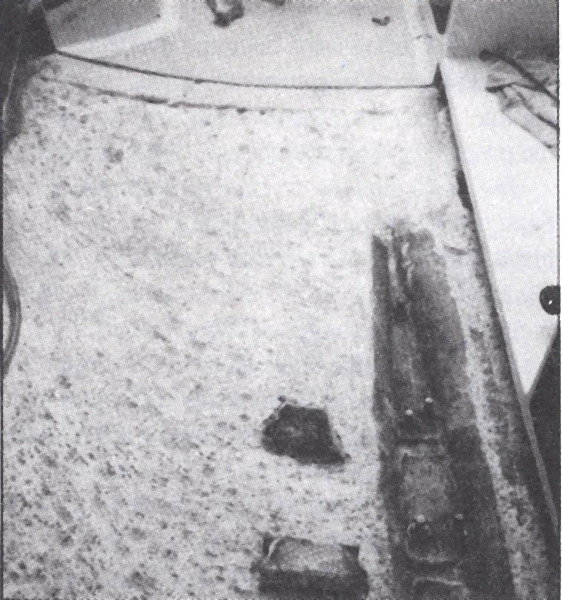
Next, we pried out the boat’s liner. About half of the filler was stuck to the liner, and half stuck to the bottom of the boat. We chipped and ground away the filler to allow rebonding the liner when the repairs were done. We now had access to the bottom of the boat from the main bulkhead aft to the companionway, and from the centerline out about two and a half feet on both sides (photo).

We applied three layers of 738 Biaxial glass with WEST SYSTEM® 105 Resin and 206 Slow Hardener to the bottom of the boat. The glass went from under the dinette, through the keel boss, and up the other side under the galley front. This was done to stiffen the bottom of the boat to compensate for a loss of stiffness due to fatigue. The keel bolt nuts and washers were removed before applying the glass and replaced after the glass was laminated. This allowed the new glass to take up some of the keel loads. We put the keel bolt washers and nuts back on while the laminate was still wet. Then we put 879 Release Fabric over the glass so we would not have to sand before bonding the boat’s liner back in.
After an overnight cure, we removed the release fabric and dropped the liner back in to make sure it still fit properly. It was perfect. We coated the liner on the back with a thin coat of 105 Resin and 206 Hardener. Then we made a mixture of 105/206 with 404 High-Density and 407 Low-Density fillers to create our own medium-density mixture for bedding the liner. We put the liner in place and ran the screws back into the pine cleats. Everything lined right up, with an even cut line all around the perimeter. We had to stand on the liner to push the middle back where it belonged, and we got good squeeze-out at the edges. We cleaned up the squeeze-out and made a fillet at the edges of the liner under the dinette and galley. We let this cure overnight.

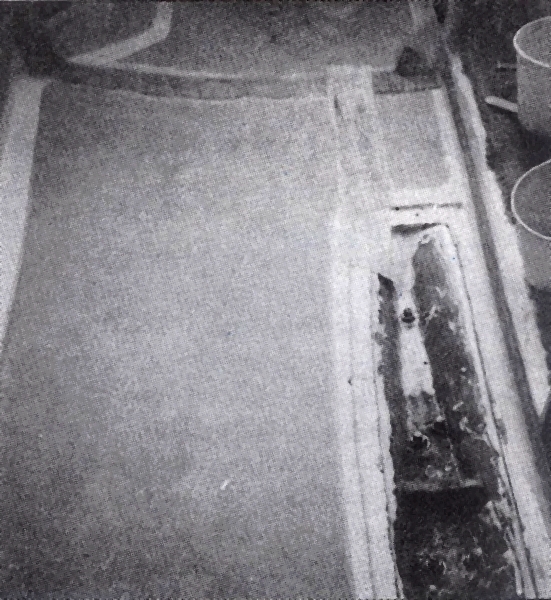
The next day the cut line was glassed with three layers of #731 glass tape and the 105/206 mixture. We put the widest layer on first and followed with the narrower ones (photo). We also tabbed the vertical sections and all the bulkheads with two layers of #738 Biaxial glass. We had to cut an access port in the bottom of the dinette to reach the edge of the liner to glass it in place. We just cut a piece of white Lexan™ and made a drop-in cover, creating a new storage area.
Once the cut line repairs were sanded, we faired the repairs with 105/206 and some low-density filler. We taped out a 3″ wide straight line at the cut line which went across the non-skid area. We sanded this area smooth to match the smooth section around the perimeter of the non-skid. We painted the entire area white with two-part linear polyurethane paint. Then we taped out the non-skid and painted that gray. Once we removed the tape, you could not tell we had done anything other than paint.
With a lot of help from our friend Tim, we were able to complete the repairs in about 85 man-hours. The boat is now sailing again and structurally is probably better than new. The grinding and cutting was a lot of hard work, but John got his boat back, and it was kind of fun besides.


