Creating Wood Veneer Stair Treads
Spring 1995

GET STARTED
FREE PRINT & DIGITAL EDITIONS
Spring 1995
Project by Dick Lemke
At Dick Lemke’s house, what began simply as a plan for new living room carpeting has resulted in inlaid, wood veneer on his stair treads and front entry floor. His split level house has a stairway going up to the living room and down to the family room. He created an inlaid herringbone patterned floor using his ingenuity, wood veneers and WEST SYSTEM® epoxy. He said the flooring looks great with his new silver-gray carpeting. Here’s how he did it:
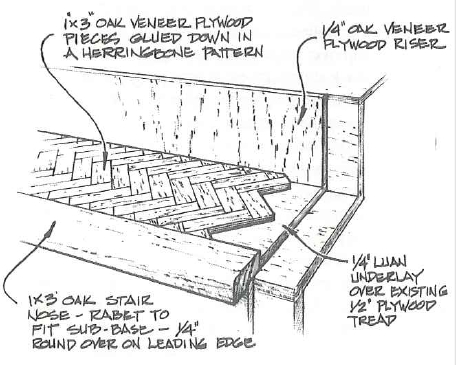
After removing the old carpet from the stairs, Dick was left with ½”-thick plywood sub-steps. These were the base from which he began the project. For a substrate, he cut ¼” luaun underlayment to fit the stairwell opening, leaving space for a 1½” nose board. He selected ¼” oak veneer plywood for the final wood grain finish.
For the risers, he cross-cut the oak panel into 7″-wide strips, with the wood grain running vertically. He finished these to 36″ lengths, and stained them with an light oak stain. He followed this with two coats of WEST SYSTEM epoxy with 207 Special Clear Hardener®, sanding between coats, and finished with three coats of MinWax® polyurethane.
The most intensive labor effort began with the stair treads. Dick cross-cut the oak plywood on a table saw, using a plywood blade. These strips measured 3″ high by 4’ long (the width of the plywood panel). He cross-cut the panel so the grain was vertical on the wood strip. After cutting enough strips, he used a stop block to cut 1″-wide pieces. This resulted in many 3″x1″ pieces that were ¼” thick. Two and a half strips yielded enough pieces to do one step. He did twelve steps and the stair landing.
Using WEST SYSTEM 206 Slow Hardener with 105 Epoxy Resin, Dick coated the luaun substrate. He sealed the wood with one coat, then applied another. While the second coat was still wet he placed the 1″x 3″ pieces on the luaun at a 45° angle in a herringbone pattern. After applying epoxy and arranging wood pieces on each step, he set it aside to cure.
Dick allowed the steps to cure overnight, then stained them with a light oak stain. He slightly thinned the epoxy by warming the resin and hardener separately before mixing. We don’t recommend adding solvents, doing so can significantly weaken the epoxy. He used a small amount of epoxy to recoat the finished stair treads. He thinned the epoxy to assure it would penetrate the fine seams between each of the veneer pieces, and provide and initial sealing of the wood surfaces. (Warming the epoxy is the preferred method for thinning epoxy.)
He waited for the steps to cure, lightly sanded them and applied a layer of 4 oz. fiberglass cloth. This created a more level surface over the herringbone pieces. Although they were all cut from the same panel, the veneer thickness varied slightly over the 8’ length. It also provides abrasion resistance and will allow for future refinishing without abrading the thin veneer surface. Next he “flowed” on second and third coats of epoxy, filling the fabric weave. He washed and lightly sanded the epoxy between these coats. The grain pattern is visible through the 4 oz. cloth.
For the final finish, Dick applied three coats of polyurethane, resulting in a finish of six coats. He sanded and used a tack rag between each coat of polyurethane.
Next he rabbeted the nose boards to fit the steps. He finished these in a similar manner to the step surfaces, except for the fiberglass cloth. It wasn’t necessary for the nose boards, which are solid oak with no thin veneers to abrade through.
Dick thought he might want to remove the steps at some point in the future, and left this as an option by installing them with yellow carpenter’s glue and blind brads. He countersunk the brad heads and filled the recesses with a color-matching putty.
After installation, he applied a final coat of polyurethane.
For the 6’ x 12’ entry floor, he nailed luaun over the vinyl flooring and laid 2″ x 6″ pieces in a herringbone pattern. He also placed 2″-wide strips to define the floor’s 2’ x 4’ squares. This work was done in place, directly on the floor. The Lemke family had to enter through the patio doors for a few days. On the floors in front of exterior doors, Dick was sure to use enough epoxy to handle any water from melting snow.
Although the labor was intensive, he now has a signature detail that is unique to his house and he receives many favorable comments.


