
by Brian Knight—GBI Technical Advisor
Mold building is a straightforward concept. Way, way back when I was in kindergarten, I made an imprint of my hand in clay for a Mother’s Day gift. I was given a ball of soft clay into which I pressed my hand. When the clay hardened, a permanent reverse shape of my hand, or mold, was created. If I ever needed to, I could coat the mold with a thin coat of wax, pour in some plaster and reproduce exactly what my hand looked like when I was 5 years old. I could do this hundreds of times if I so desired.
Model makers, prototype designers, or anyone who occasionally needs to make a few identical parts, can benefit from using a mold. Depending on the quality, a mold allows you to make anywhere from a few to thousands of identical parts. A mold is especially valuable for reproducing complex parts, but unfortunately mold construction is an expensive, time consuming process. I will describe the methods and materials I used to build a reasonably inexpensive light-duty mold that is strong enough to build several identical parts.
Molds are expensive. Building a mold is a labor intensive project. First, the part itself, or rather an exact replica of it, must be built (and is often thrown away after the mold is built). This process is called building a master pattern, a.k.a. a “plug.” Next, a mold is built over the plug. As you can see, we have built two structures and still do not have a finished part. It makes sense to build a mold only if you need to make several identical, complex parts.
Building a plug and making a rigid mold from it requires spending money on materials that do not go directly into the final product. But the materials in both of these structures can be inexpensive, especially if you need only a few parts. The more parts you need to make, the better mold you will need to make, which means more money spent on materials.
Molds come in two basic forms: male molds, where the final part is built over a convex surface; and female molds, where the final part is built into a concave surface. With a female mold, the inside surface of the mold defines the outside shape and surface quality of the finished part. If the mold is not fair and smooth, the part will not be either.
Building a female mold directly (not building it over a plug) is difficult. The surfaces on a plug are usually convex and are much easier to sand fair, and you have the advantage of seeing what the finished part will look like. The disadvantage of making a female mold over a plug is the expense of building a plug that will be used once and discarded.
A male mold is faster to build and requires no plug, so no materials are wasted. But the finished part is smooth on its inside surface. If you want the outside of each part to look good, you need to fair and finish each one individually. Male molds work well if you are building parts with mostly concave finished surfaces, like fiberglass shower stalls. However, most projects require the good finish on the outside of the part, and this requires a female mold.
The project
Last winter my son and I decided to fabricate a device to protect our snowmobiles from slush and flying stones when they were being trailered. We could have cut a sheet of plywood and anchored it to the trailer with angle brackets, but that’s not in keeping with my philosophy of life which states in part “never do anything the easy way.” I decided the guard should have an aerodynamic shape and be very light weight. The realization that I would eventually have to make guards for at least four trailers, convinced me to build our slush guards from a mold.
Deciding whether to build a mold or build each part individually is based on the number of identical parts you need to build, the materials the parts will be made from, and how difficult it would be to build each part separately. In the case of the slush guards, I decided that while I could build the parts individually, each part would have been heavier than I wanted, and finishing the outside surface of each part would take a prohibitively long time. With a female mold, the outside surface of each part would automatically be as smooth as the surface of the mold. It seemed to me that producing one smooth mold surface would be faster than finishing the surfaces of four individual parts.
Choosing materials and methods
I would start the process by building the master pattern or plug. A plug is constructed to look exactly like the finished part, but it can be made of almost any material that is strong enough to temporarily hold together and accept a good finish. In this case, I constructed it from some of the cheapest materials I could find—particle board, ¼“ lauan plywood, and lots of staples and drywall screws.
You can see from the photo on the next page, that the shape of the guard is fairly aerodynamic. You cannot see, however, that the guard is also very light. It has to be removed each time the snowmobiles are loaded or unloaded, so I wanted it to be as light as possible. In order to make the guard light and stiff, I decided to build each part using “cored” construction. Two lightweight fiberglass skins, separated by a very low density core material—in this case phenolic paper honeycomb—resulted in a guard that weighs only 35 pounds. These materials require the use of a mold. The wet fiberglass cloth and core material have to be pressed against a solid surface and left there until the epoxy solidifies.
Once again, following my philosophy to build everything in the most difficult manner possible, I chose vacuum bagging as the method for clamping materials into the mold. Vacuum pressure forces the wet fiberglass and core material evenly against the mold surface and holds the whole mess there until the epoxy cures.
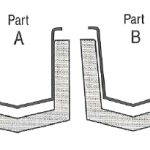
As you consider the shape of the plug, keep in mind that you are going to build a mold over its surface and that you have to be able to remove the mold from the plug when you are done (as well as the part from the mold). This means that all vertical surfaces need to be tapered slightly. The top of the plug must be smaller than the bottom. The taper is referred to as “draft,” and typically, a minimum 2° slope is used (about ¼“ per foot). As you can see from the diagram, it will be very difficult to remove part A from the mold, while part B will come out easily.
Building the plug
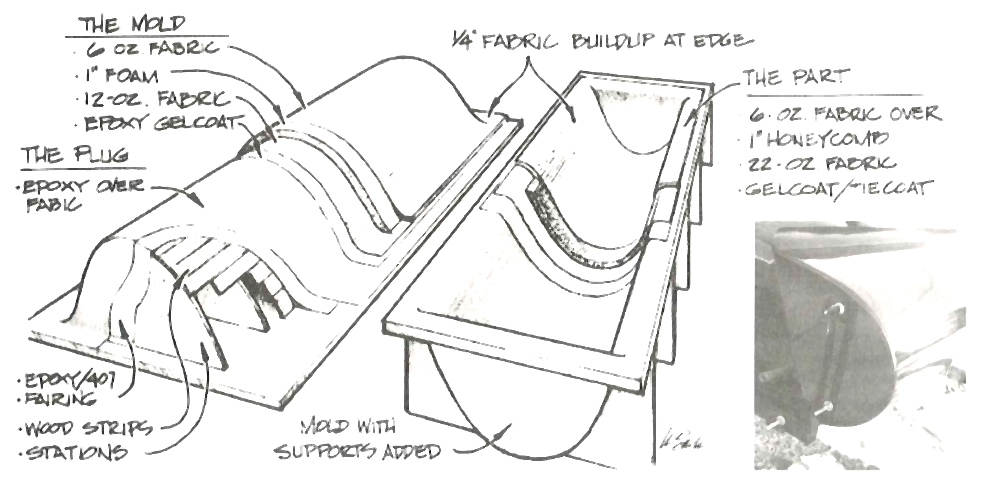
I built the plug as shown in the drawing on the next page. I cut out particle board shapes, or stations, carefully aligned them, fastened them to a sheet of particle board, and stapled wood strips over them. I troweled a putty of epoxy and 407 Low-Density Filler over the gaps in the seams. Since the surface quality is important, I applied a layer of fiberglass cloth and epoxy over the wood strips. This gave me a stable surface that I could sand smooth. Notice also the flanges at the perimeter of the plug. These stiffen the open end of the mold and provide a flat surface on which to seal the vacuum bag.
The quality of the plug’s final finish determines the quality of the finished part. If the plug surface is fair and smooth, both the mold and the parts will be equally smooth, so I spent a good deal of time finishing the plug’s surface. I made a couple of flexible sanding blocks and glued sandpaper to them. I started sanding with 80-grit dry sandpaper and worked my way through the grits, finishing by wet sanding with 600-grit. I filled all pinholes and low spots after the initial 80-grit sanding before continuing with the finer grits. To polish the plug surface, you need to sand at least to 600-grit or you may have trouble getting the mold to release from the surface. Do not skip any grit numbers. 600 grit paper won’t remove 80 grit scratches. Any remaining porosity may cause the mold to stick to the plug, so examine the surface carefully before you decide you have completed sanding. Finish the surface by buffing with successively finer grits of rubbing compound.
When I was satisfied with the quality of the plug surface, I began applying a mold release to it. A good mold release needs to fill the porosity that exists on a microscopic level. A good quality automotive paste wax will usually work, but there are also products made specifically for the job. Expect to apply 4 or 5 coats of wax, buffing between each application.
Building the mold
With the plug thoroughly coated with mold release, I began constructing the mold. I used the materials described below, but depending on the size of the mold and the number of parts you expect to make, you can make the mold heavier or lighter.
I first applied an epoxy “gelcoat” to the waxed plug surface. The gelcoat is made of WEST SYSTEM® Epoxy thickened with 406 Colloidal Silica. The epoxy must be thickened to a ketchup-like consistency to prevent it from fish-eyeing on the polished surface. After allowing the gelcoat to cure hard, I washed it with water and lightly sanded it. Then I applied one layer of 12-ounce fiberglass cloth over the sanded gelcoat with epoxy. If the mold is large like the one I built, use 206 Slow Hardener to allow yourself some working time. Use 205 Fast Hardener if the mold is small or if the shop temperature is cool.
Before the layer of glass cloth cured, I used a notched trowel to spread epoxy thickened with 407 Low-Density Filler over the entire surface. Then I squished 1″ thick by 1″ wide strips of polystyrene foam into the thickened epoxy. Most of the strips stayed in place in the thickened epoxy by themselves, but some required a little help from duct tape.
When the epoxy holding the foam strips cured, I applied a layer of 6-ounce cloth to the exposed foam surface. I applied a couple of foam and glass supports to provide a flat, stable base for the mold and to help stiffen the entire assembly.
Separating the mold from the plug after the epoxy cured was a quite a task. In spite of my efforts to polish and wax the plug surface, the plug and mold stuck together tenaciously. The nearly vertical end surfaces presented too much area to shear loose, and the flange prevented me from deflecting the side of the panel inwards. After much pulling and prying (and gnashing of teeth) I decided the only way I was going to separate the two pieces was to remove the plug piece by piece. So I broke out the particle board stations, which then allowed me to flex the plug surface away from the rigid mold. Slowly the mold released the plug. Do not let anyone tell you that epoxy is not a good adhesive. I know from bitter experience it sometimes sticks where you least expect.
Once the plug was removed (read destroyed), I was looking into a polished female mold. But I was afraid to build a part in the mold for fear it would not completely release. I surely did not want to destroy the mold to get one part out of it. So before trying to build a part, I “seasoned” the mold.
If the epoxy in the mold’s surface has not cured for a long time, it is a good idea to season it a couple of times before attempting to build a part. Seasoning consists of waxing the mold’s surface 4 or 5 coats of mold release, and applying a gelcoat only with no glass reinforcing, to the mold surface. After it has cured it remains flexible enough that even if it chemically bonds to areas on the surface, you can generally pry it loose or scrape it off.
Building the part
Finally, I felt the mold was ready for building a part. I waxed the surface one more time for good luck. This time I applied a polyester gelcoat. I wanted the shrinkage in the polyester film to help release the part from the mold. But epoxy will not cure if it is applied to partially cured polyester, and it won’t stick to the waxy surface of cured polyester. There are two ways to get the epoxy laminate to stick to the backside of the gelcoat film. One is to remove the wax from the cured gelcoat and sand it. The other is to apply a tie coat to the partially cured polyester gelcoat. Tie coat is a film that adheres to both polyester gelcoat and epoxy, and doesn’t require extra surface preparation. I used the tie coat. I applied the gelcoat to the mold surface, allowed it cure for an hour, applied the tie coat and allowed everything to cure overnight.
Laminating of the actual part required several steps, all of which had to be accomplished before the epoxy cured too hard to clamp. I needed several hours of open time to accomplish the lay-up, so I selected 105 Resin and the 209 Extra Slow Hardener. The 209 Hardener gave me about 5 hours of working time at 65°F, my shop temperature. (For detailed information on working with epoxy at lower temperatures, read Cold Temperature Bonding.)
Since the outside of the slush guard takes a lot of abuse, I used our heaviest fiberglass cloth, 738 Biaxial Fabric with mat, 22 ounces of biaxial fabric and chopped strand mat all stitched together. I chose 1″ honeycomb for the core material. For the inside skin, which doesn’t receive much abuse, I used 6-ounce glass cloth. I reinforced the ends of the part with 3/4“ plywood instead of honeycomb because I needed to install some mounting hardware and I felt the honeycomb core didn’t provide enough strength.
I applied one layer of the 22-ounce cloth to the gelcoat/tie-coat surface using 105/209 mixture. When the cloth was wet-out, I pressed it into place with a squeegee. I did not spend a lot of time doing this because later the vacuum pressure would press out any air bubbles. I applied several layers of fiberglass tape to reinforce all corners and flanges. Then I made a “core bonding putty” by adding 407 Low-Density Filler to the 105/209 epoxy and applied it to the wet-out cloth with a notched trowel. I pressed the pre-fit honeycomb core material into the putty, along with some solid wood blocking where the hardware attached. Next I rigged the vacuum bag and applied enough vacuum pressure to firmly press the glass cloth and the core against the gelcoat surface.
When the epoxy cured hard, I shut off the vacuum pump and removed the vacuum bagging materials. Finally, I applied the 6-ounce glass cloth to the inside of the core material.
Removal of the part from the mold went much easier this time. The polyester gelcoat shrank as expected, releasing it from the mold. All that was necessary to pop the part loose was a little strategic prying with wooden wedges.
The second part I built from the same mold had a different finish. I wanted to paint the guard the same color as the towing vehicle, so instead of using gelcoat, I sprayed a paint primer in the mold and laminated the same cloth/core schedule as above.
To be sure the primer released from the mold, I used PVA (polyvinyl alcohol) on the mold surface. PVA is a liquid that can be brushed or sprayed on the surface of the plug. It is easily dissolved in water, so you can wash it off the finished mold surface. No solvents or sanding are necessary to remove the residue. The PVA surface lacks the smoothness of a polished wax surface. But I was not too concerned about the surface quality of the part, because I knew I would have to sand the primer before I could apply the final paint job. Since I used paint primer, I did not need to use a tie coat. I simply let the primer dry on the mold surface, sanded it lightly, and applied the glass/core/vacuum bag as described above.
Last year my son and I built two slush guards. This year we hope to build two more. The mold should hold up for a few more parts before it starts to deteriorate from the abuse it takes whenever a part is released.