Plywood Scarffing Methods
Spring 1996

GET STARTED
FREE PRINT & DIGITAL EDITIONS
Spring 1996
There are many ways to machine scarf bevels on plywood panels. The best method depends on how many scarf joints your project requires. If you need to scarf only two sheets of 3mm plywood, using a block plane and sanding block is a good low cost option. If you have a daily need to scarf many panels, a reliable machining method is a wise investment. This article reviews several popular scarffing methods and tools, to help you decide which is best for you.
There is some divergence of opinion on the appropriate bevel for scarfs used in boatbuilding. We believe that an 8-to-1 bevel is reliable for joining plywood in boat construction. To determine the scarf size, multiply the plywood thickness by the desired scarf ratio. For example, to achieve an 8-to-1 bevel on ¼”-thick plywood, the bevel should measure 2″.
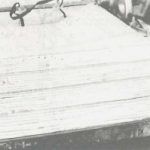
You can bevel several sheets of plywood at once, without using special scarffing tools. To begin, stack the sheets at the end of a table and offset them by the size of the bevel. Clamp the sheets together, then draw a reference line across the top panel to identify the back edge of the bevel for that panel. Use a power plane, disk sander or belt sander to remove the wood steps formed by the ends of the plywood . An 8″ disk sander equipped with a hard-back sanding disk and 20 or 24-grit floor sanding paper will quickly remove the steps in the plywood stack. Use the glue lines in the plywood as a visual aid. Try to keep the glue lines straight and parallel as you remove the excess material. If the plywood glue lines become wavy, it is because there are humps and hollows. Use a straight edge to check flatness. Wear a dust mask if using a sander.
The method described above is an excellent way to bevel several panels at once. However, there are more efficient methods if you have many panels to cut. These involve specialty tools or fixtures to guide your power planes, circular saws or routers. Some of these fixtures you can build yourself. Others, like the Scarffer™ and the Planer-Scarffer Attachment™, attach to power tools you may already own.
You attach the Scarffer to the base of a circular saw. It cuts an 8-to-1 bevel on plywood up to ¼” thick. It will cut panels up to 3/8″ thick, if you don’t mind removing a step at the end of the scarf with a hand plane or disk sander. It features a safety shroud that covers the blade. The Scarffer is a popular choice for builders who work with plywood up to 3/8” thick. It is available from WEST SYSTEM dealers.
The Planer-Scarffer Attachment is another popular scarffing tool. This patented device will cut an 8-to-1 bevel on plywood up to 3/8 thick, if your power planer has a 3¼”-wide cutter. It will cut the same bevel on plywood ½“-thick if your planer has a 4 3/8” cutter. The Planer-Scarffer Attachment works best when the plywood rests on a flat surface while machined. It’s a nice tool for the job, and is available from John Henry, Inc.
You can also tool up for scarf production with a router box. Mount it on an extra long base plate. A pair of accurately positioned steel tubes support the router and base plate at the appropriate height and scarf angle while you machine the plywood. The steel tubes span the plywood. Use a fly cutter router bit, which extends below the router base plate and can be lowered in increments when scarffing plywood that requires more than one machining pass. The router method works especially well if the table is equipped with a vacuum hold-down feature. (See The Vacuum Table.) The downside of using the router method is that, as in the previous two methods described, it ties up the power tool while it is attached to the scarffing device.
Circular saw method
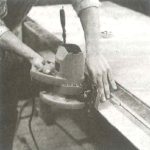
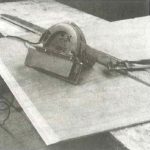
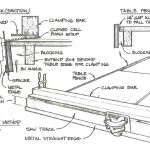
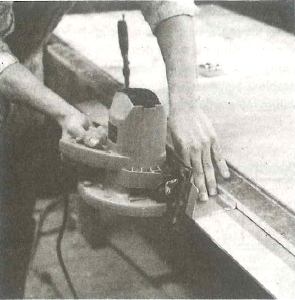
There is a method that works well and doesn’t tie up your power tools. It calls for a circular saw to cut the bevel along the end of a plywood panel. The saw is guided by a track mounted on the end of the table, below the table’s edge. You can make the guide of ¾” plywood. Mount it at the appropriate angle to form an 8-to-1 bevel, with relation to the table top, when the saw is set for a normal 90° cut. The plywood forms a flat plane that the base of the circular saw can follow. A permanently mounted straight edge strip holds the saw at the appropriate height and guides it along the length of the cut (below).
Set this tool up with a clamping bar to hold the plywood flat against the table. The clamping bar can include a feature that will protect the operator from the exposed saw blade while the scarf is being cut. This unit lets you use the saw without modifications. Nothing is attached to the circular saw, and the retractable blade guard is left to operate freely. This is worth noting, because hand-held routers and power planes are not equipped with safety guards. You must handle them more carefully because the cutters spin freely for several seconds after you turn the tool off. It’s a good idea to set up a special tool rest when using routers or planers, so you can safely set them down while the cutters are still spinning.