Producing Parts in a Matched Mold
Spring 1996

GET STARTED
FREE PRINT & DIGITAL EDITIONS
Spring 1996
As winter wore on, I ran out of things to do. There was no snow for skiing and no ice for ice boating. I figured it was a good time to make something fancy for the new catamaran. I reckoned that fairing the compasses that stuck up out of the deck would reduce windage and make everything look cleaner. I decided to make carbon fiber compass hoods with a clear finish inside and out. This was a good application for the matched mold technique of composite construction.
In an open mold, you place the wet laminate over or into the mold and allow it to cure. You can cover the laminate with release fabric and an airtight bag, then add vacuum pressure to ensure interlaminate and mold contact during cure. In open mold construction, the only finished surface on the part will be the one that was in contact with the mold.
By contrast, in a closed “matched” mold, both top and bottom surfaces of the part are in contact with the mold, resulting in two finished sides. The top mold and bottom mold match when clamped together and a cavity the shape of the finished part, between the two halves, is filled by the wet laminate. The cavity and laminate thickness can be constant throughout or varied to provide added strength in specific areas or produce a 3-dimensional shape, such as a foil shape. What’s nice about this construction method is, it doesn’t require special equipment, like a vacuum pump.
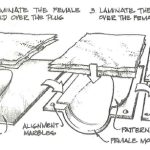
The first step in fabricating my compass hoods was producing a plug to represent the outer surface of the hood. You can build plugs of wood, foam, plaster or any material that can be fabricated and shaped. (A great book on plug, mold and composite building is Fiberglass & Composite Materials by Forbes Aird.)
I always try to use the simplest approach possible without compromising the aesthetic, functional or structural design. I achieved this by making my plug from a section of cardboard tube cut at an angle. For trimming purposes, the plug is longer than the finished hood. I coated it with a mixture of WEST SYSTEM 105 Epoxy Resin and 205 Fast Hardener to produce a hard, non-porous surface, then sanded it to a smooth finish.
When designing the plug, keep in mind that for mold to release from the plug, and for the finished part to release from the mold, you’ll need at least two degrees of “draft.” This tapering allows the distance between the mold and the part to increase as they are separated. Without it, friction would prevent them from easily separating. For example, it’s difficult to separate two stacked square boxes that are close in size, yet easy to separate two stacked paper drinking cups.
Building the female half of the mold
I waxed the plug, placed it on a glass plate and coated the mold area with epoxy. The epoxy coating will be the finished mold surface. When the coating had gelled, I laminated multiple layers of fiberglass fabric over it. The fabric extending onto the plate would form a flange on the hood that would allow me to bond it to the deck of my boat, and provide several areas to clamp the mating molds together. When it cured, I pulled the mold from the plug and trimmed beyond the edge of the flange.
To help align the mold halves during the final part layup, I drilled marble-sized holes in the corners of the female mold outside of the finished flange. Then I bonded marbles into the hole, with half of the marble above the mold surface. The marble will leave a dimple in the male mold that will realign with the marble when the mold halves are joined.
Before building the male half, I needed to determine how thick I wanted the finished part to be. The part’s shape, size and function dictates a particular stiffness, which will require a specific amount of material. I knew that a flat test sample laminate of three layers of plain weave 10-ounce carbon fiber would be stiff enough for the part I was building. (The chart at the end of this article lists various materials and their thicknesses.) I also knew the finished part would be stiffer, due to its conical shape. My test sample laminate was 1/32″ thick — the thickness of the cavity that I would need between my two matched mold surfaces.
I placed a layer of 1/32″ patternmakers sheetwax in the female mold, to create a cavity in the male mold when it is cast against the female half. The wax easily conforms to the cylinder and the flange, duplicating the finished hood. Patternmakers sheet wax is available in various thicknesses. If you require more laminate thickness for reinforcing in a particular area, add successive layers of wax and use an iron to melt and smooth the step transition.
I waxed the exposed areas of the female mold surface (including the marbles) and coated the surface with epoxy. After the coating gelled, I wet out multiple layers of fiberglass, laid them over the female mold surfaces, and allowed them to cure. I applied plenty of glass to produce a rigid mold. The two matching mold halves must be rigid enough to resist deforming under clamping pressure that is firm enough to press the wet laminate into the cavity between the mold halves. When it cured, I separated the two molds and removed the wax. The marbles stayed attached to either one of the molds.
The finer the finish or detail on your mold surface, the higher quality surface and more detail your part will have. Using curved surfaces with straight-line elements allowed me to lay Mylar drafting film onto the mold surface to give it a high gloss finish. I used the glossy back side of the Mylar for the final mold surface because it easily releases the cured epoxy part. The Mylar’s front side (that you would normally draw on) is rough and will not release. I cut and trimmed the Mylar to cover the mold surfaces and bonded it in place with 3M #77 Spray Adhesive. Typical Mylar drafting film is just .0051″ thick, which allows plenty of room for the laminate thickness inside the mold. This trick saved many hours of tedious sanding, buffing and polishing.
I laid three layers of 10-ounce carbon fiber into the female part of the matched mold, then cut the layers to shape. If you want an area of the part to have an aggregate build-up of material to handle higher loads, simply add more material in that area (but be sure to compensate beforehand by duplicating the added laminate stack thickness with wax when building the male mold). A dry laminate stack, thus arranged, is called a “preform.”
Surface preparation is crucial to successful bonding. Similarly, proper preparation is the key to reliable release from mold surfaces. Mold releases prevent adhesion by “contaminating” the surface. I used Vydax 00517 Dry Film Mold Release to coat all the surfaces where I would be placing wet laminate.
With the preforms fabricated for both compass hoods, I coated both mold surfaces with epoxy and allowed it to gel. This coating provides the finished surface of the part and prevents the fabric from printing through the surface. Before the epoxy “gelcoat” cured, I thoroughly wet out the fabric with epoxy and laid it carefully into the female half of the mold. I made sure there were no wrinkles in it, then placed the male half of the mold over the wet laminate. The marbles ensured proper alignment. I then applied clamping pressure to the flanges. As I slowly tightened each clamp to exert even pressure over the mold’s flanges, excess epoxy squeezed from the ends and edges of the closed mold.
When the laminate cured, I separated the molds and released the part. Then I repeated the process for the second hood.
Cured composite parts can sometimes be tough to cut. I prefer using a tool with a vibrating blade (opposed to oscillating or spinning). The one I use employs a circular blade that attaches to a detail sander. After trimming the flanges to about ½” wide, I tapered the top edges and rounded all of the other exposed edges. I roughed up the bottom of the flanges and bonded them directly to the painted surface of the deck with thickened epoxy. Although bonding to a painted surface is not often recommended, I did it so that if I ever have to service to compass, I can peel the hood off the paint. <F”Wingdings”P11J4>
Sources: