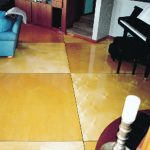
Jon Staudacher, renowned boat and airplane builder, and his wife Kathy recently designed and installed a unique floor in their house in Bay City, Michigan. Their extensive collection of house pets were more than the existing carpet could take, so they decided a wooden floor would be more wear-resistant and easier to maintain. The resulting floor is easy to keep up, while maintaining the contemporary look of their house.
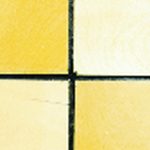
The floor consists of 5′ x 5′ x 3/4″ sheets of birch plywood, installed diagonally in the living area. The grain direction of each panel is alternated so the floor resembles a checker board. The top surface is varnished and the seams between the panels, which are 1/4″-wide, are filled with epoxy tinted black. They figure they will occasionally sand and re-varnish the floor to renew the finish.
Installing the floor
Prepare panels
Sand bare wood
Varnish several times sanding between each coat
Prepare subfloor
Remove carpet, pad and carpet tack strip
Set all raised nails, smooth out any other bumps
Vacuum thoroughly to remove dirt
Plug all holes that penetrate the subfloor to keep the epoxy from leaking through
Snap a grid-work of chalk lines to help position panels
Apply epoxy adhesive
Thicken epoxy with WEST SYSTEM 403 Microfibers to a mayonnaise consistency
Apply the epoxy with a notched spreader. The depth of the notch depends on the smoothness of the subfloor.
Spread about a 6″-wide strip of epoxy following the guidelines previously snapped on the floor.
Distribute globs of epoxy every 6 inches over the remainder of the area to support the center of the panel.
Install the panels
Set the panel carefully in the wet epoxy using the chalk lines to guide the location. The weight of the panel will provide adequate clamping pressure.
Allow the epoxy to cure before walking on the panels.
Fill the seams
Use 502 black pigment to tint the epoxy black. Be consistent with the measurements for tinting the epoxy to maintain a consistent color from batch to batch.
Pour the tinted epoxy into the joint carefully. Remove any spills before the epoxy gels.
Frequently check the level of epoxy in the seams. It soaks into the end grain of the plywood and if you are not careful, will leave you with a partially filled seam.
Watch for air bubbles to rise to the top of the epoxy. Break them as necessary.
Jon and Kathy’s finished birch plywood floor.
The 1/4″ seams are filled with epoxy tinted black.