Big Batch Mixing Methods
Spring 1997

GET STARTED
FREE PRINT & DIGITAL EDITIONS
Spring 1997
Most of us use epoxy in small batches, mixing several ounces at once. This gets the job done 95% of the time. But for some projects, such as large laminating jobs, you may need large batches of epoxy. Before you begin, you should understand what’s involved in mixing big batches of epoxy.
Mixing large batches requires careful planning because large batches cure faster than small batches.
The key to slowing down epoxy’s cure is to create more surface area, exposing more of the mixture to the air. Epoxy will build up heat unless the epoxy is spread into thin film or quickly poured off into multiple small containers. This allows the epoxy’s heat to dissipate, extending the working time.
Because working time is shorter, it makes sense to use a slower curing hardener. We’ve done many large laminating jobs with 105 Resin and 206 Slow Hardener. To extend our working time further in warm temperatures, we switch to 105 Resin and 209 Extra Slow Hardener.
Epoxy requires accurate resin-to-hardener ratios. The pre-calibrated Mini Pumps you ordinarily use are not practical for metering large batches of epoxy. There are a variety of methods for achieving fast and accurate dispensing for large epoxy batches. Some cost almost nothing, while others involve expensive motor-driven pumps that deliver the epoxy at an exact ratio.
Many people prefer volume measure for delivering accurate ratios. Straight sided containers with no taper, like coffee cans and 5 gallon pails, work nicely. To set up for mixing in volume measure, you will need the following:
To mark your measuring stick. assume you are using 205 or 206 hardener and your mix ratio is 5:1 (with 207 or 209 hardener, the mix ratio is then 3:1.):
a. Measure up five equal increments (inches) from the bottom of the stick and place a mark. This will be your resin fill line.
b. Measure up one increment (inch) further (six increments from the bottom of the stick) and place another mark. This is your hardener fill line.
Before pouring the resin and hardener, have items in place for mixing the epoxy. Meter resin and hardener by volume as follows:
1. Place the measuring stick in the bottom of the container. Be sure the stick is standing straight up in the bucket.
2. Pour the resin into the bucket until it reaches the resin fill line. Be sure to stop on the mark to maintain the proper ratio.
3. Pour the hardener into the bucket until it reaches the hardener fill line.
4. Mix thoroughly with the measuring/mixing stick (smaller batches). Remove the measuring stick before power mixing <R>(large batches).
Weight measure is one of the most accurate metering methods available. It works especially well if you use a scale with a tare button. Use the following method to achieve accurate ratios using weight measure: We’ll assume again that the required ratio is 5:1.
1. Tare your mixing container. The scale should read zero.
2. Add five pounds of resin to the container.
3. Tare the scale again so that it reads zero.
4. Add one pound of hardener.
This method is more accurate than the volume method, especially if the mixing buckets are reused. The tare allows you to zero out the bucket’s weight, including epoxy that is left in the bottom from the previous batch.
[Editor’s note: This section was updated January 12, 2016 to reflect latest pumps available]
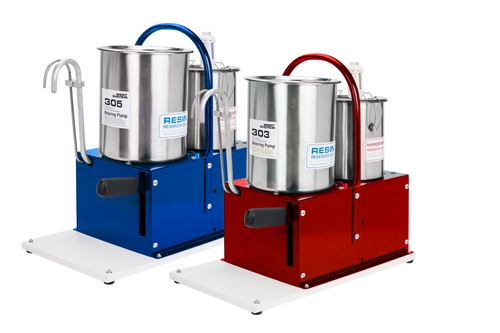
Another convenient device for metering large batches of epoxy is our WEST SYSTEM Positive Displacement Pump. These new pumps are extremely robust and dispense epoxy faster than any pump we’ve ever offered. Positive Displacement Pumps work by trapping a fixed amount of resin and hardener then forcing (displacing) that trapped volume into the discharge pipe or system. This offers improved epoxy pumping performance because changes in viscosity due to temperature change are no longer an issue.
The 303 Positive Displacement Pump is calibrated for WEST SYSTEM 3:1 ratio epoxies (with 207 Special Clear Hardener or 209 Extra Slow Hardener) and is easily identified with a red base. The 305 Positive Displacement Pump is calibrated for 5:1 ratio epoxies (with 205 Fast Hardener or 206 Slow Hardener) and has a blue base. Pricing on positive displacement pumps are listed on the WEST SYSTEM Price List.
Positive Displacement Pumps may also be ordered with drum fittings. These connect directly to your WEST SYSTEM Resin and Hardener drums so there is no need to decant materials. This set up conveniently streamlines the metering process for high-volume users, saving both time and money. The 3:1 ratio drum accessible positive displacement pump can be ordered using part number 313 and the 5:1 part number 315.
Several manufacturers offer high volume pumps that deliver epoxy at upwards of several gallons per minute. Several well-respected pump manufactures are listed at the end of this article. Their pumps are specially designed to meter resin and hardener simultaneously at specific ratios. Some of these pumps can meter resin and hardener through a static mixer, so additional mixing isn’t required. These pumps are nice for those who require lots of epoxy and can afford them.
Thorough mixing is critical for success, and mixing quickly is important when mixing large batches. Using a powered mixer greatly reduces the time necessary to mix thoroughly.
Companies that require high volumes of epoxy often pump their epoxy through static mixers. Static mixers deliver mixed epoxy that can be applied immediately to your project. These mixing devices are located inside high-pressure tubing. Resin and hardener are forced through a maze of baffles that tumble the epoxy hundreds of times before it comes out of the mixer completely mixed. This type of mixer requires a delivery system that is unaffected by considerable back pressure created by the in-line mixing device.
A variety of motor-driven mixers can be used to thoroughly mix epoxy. They are essentially paint mixers or variation of paint mixers chucked into a variable speed drill. When mixing with a motorized mixer, we recommend the following three-step approach:
1. Mix for 30 seconds with a drill motor mixer.
2. Stir by hand with the measuring stick, thoroughly scraping the corners and sides.
3. Mix for 15 to 30 seconds more to blend completely.
Some of the best types of mixers are homemade. Joe Smith from Island Boat Works in Hatteras, North Carolina, mixes lots of epoxy building 57-foot cold molded hulls. He recommends making your own mixer from a fan blade salvaged from a worn out automobile alternator.
Mount the fan blade on the end of a 1/2″-diameter x 24″- long threaded rod with large washers and a nut on either side of the blade.
We tried it here and are amazed at how well it works. This mixer is best kept at 500 rpm or less. We tried running ours in both directions to see which way worked best. We found it was easiest to control when the drill motor ran in reverse. The blade tends to center itself in the bucket and is less likely to damage the side of plastic bucket when run in reverse.
Another popular mixer, used here over the years, can be made from a modified WEST SYSTEM 801 Roller Frame. Remove the plastic handle from the frame and grind the metal tangs off the shaft where the handle was. Bend the last inch of the roller shaft up 90° to keep it from cutting into the side of the mixing bucket. Attach it to an 18″ x 1/4″ drill bit extension and secure with set screws. This mixer works particularly well for mixing large batches of thickened epoxy.
There are a variety of quality mixers you can buy. Jiffy Mixer provides an excellent line of mixers suitable for mounting in drill motors. They offer several for mixing one quart, one gallon and several gallons at a time. Jiffy mixers are available through Indco, Inc.
Mixing large batches of thickened epoxy can be messy work. Drill motor mixers spinning at high speed tend to drive light-weight fillers into the air. Clumps of thickened epoxy are flung from the mixer during the blending process, creating a sticky mess in the area. You can minimize these problems by planning ahead and using common sense in your approach.
To prepare for making thickened epoxy:
If your project calls for several batches of the same material, it is best to come up with a recipe. So much epoxy and so much filler per batch. Add measured amounts to the first batch until the viscosity suits your specific need, keeping track of the total amount added. For the remaining batches, all of the filler can be added at at once, and the batches will be consistent in viscosity.
The WEST SYSTEM Technical Manual & Product Guide can help you come up with a mix recipe. Say you wanted to mix a large batch of epoxy with 403 Microfibers. The manual provides a Filler Proportion Guide that recommends two gallons of mixed epoxy and a 20 ounce container of 403 Microfibers to achieve a mayonnaise consistency. This guide includes recommendations for a variety of viscosities for each of our fillers. Keep in mind that it is just a guide. It’s a good idea to thicken the first batch in stages.
Mix a batch of thickened epoxy as follows:
1. Mix the resin and hardener together thoroughly before adding fillers. Use a paddle to scrape the corners and sides.
2. Add the measured amount of filler to the bucket.
3. Cover the bucket with the slotted lid prepared earlier.
4. Insert the mixer through the lid and into the epoxy.
5. Start the mixer slowly, gradually increasing the speed.
6. Move the mixer up and down and from side to side to blend the filler with the epoxy. Thick batches of epoxy will labor the motor initially as the filler starts to blend in. This will ease up as the mix becomes smooth and creamy.
7. Remove the lid and mixer from the bucket.
8. Scrape the corners of the bucket to blend any unthickened epoxy left there with the rest of the batch.
9. Put the mixer back in and stir briefly until blended uniformly.
Remember to get the finished mixture spread out or applied quickly so that it does not overheat.
Before mixing that big batch, consider quality control. Resin and hardener must be thoroughly mixed. We all know this, but tend to forget during big projects when we’re pressed for time. This is not the place to look for short-cuts. If you don’t follow certain guidelines, a fancy electric mixer will not make up for it.


