Hardware Bonding
Spring 1999

GET STARTED
FREE PRINT & DIGITAL EDITIONS
Spring 1999
My first experience with hardware bonding occurred shortly after starting work at Gougeon Brothers in 1980. Having just been hired into the wind turbine blade plant, I was excited to be part of this interesting company.
I was intrigued by the large gluing operation where workers injected epoxy into a number of oversized holes in the root-ends of the wood and epoxy wind turbine blades. Threaded metal studs were temporarily attached to a flat installation plate, coated in thickened epoxy and inserted into oversized holes that had been filled with epoxy, gluing them in place. After an overnight cure, the metal plate that held and positioned the fasteners was removed, exposing the cured epoxy and metal studs that were in an exact pattern.
I was amazed that 12 glued-in fasteners could carry the loads generated by a 26′ wind turbine blade in operation. Two of these blades were attached to a hub creating a swept area 54′ in diameter. I recall thinking it didn’t seem possible for so few studs to do so much. As it turned out, history would prove that the epoxy-bonded studs were more than up to the task.
A few years later, I heard an interesting story rumored among the employees. A wind turbine, equipped with our blades, was out of control in sustained high winds. The turbine was designed to shut down in high wind situations but the shut down device had been disabled in order to complete testing on the machine. Unfortunately, high winds arrived unexpectedly and the technicians were unable to stop the machine. In 60 mph winds, the machine produced electricity for days until the generator finally overheated and stopped functioning. Without the drag of the generator, the blades began to free-wheel. At one point, the story goes, the blade tips actually broke the sound barrier. (This may have been an exaggeration . . . you know how rumors are.) The blades finally exploded after withstanding days of conditions vastly exceeding what they were designed to withstand.
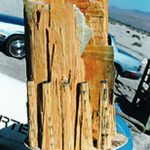
All that was left at the hub of the machine were huge chunks of wood still attached to the metal studs. Rumor has it that the blades were eventually found some distance away in a farm field among some very nervous cattle.
Any previous doubts about hardware bonding that remained from my first days on the job were erased a few weeks later when a crate arrived carrying the root-end remains of the wind turbine blades. Sure enough all of the studs were there, each with jagged wood/epoxy laminate still attached.
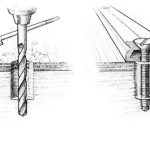
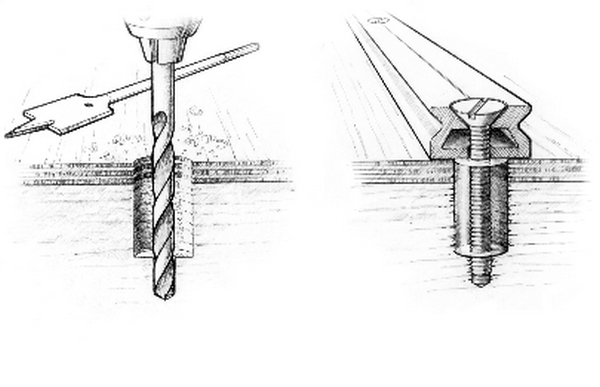
Hardware bonding, as the name implies, refers to gluing hardware in place. It should not be confused with “bonding” for electrical protection. Hardware bonding in one of its simplest forms could be a 1″ long screw-eye that is glued into a standard pilot or lead hole in softwood.
Let’s compare pull out strengths of screws installed into a standard pilot hole into softwood (side grain) where one screw is glued in and the other is installed conventionally in a dry pilot hole.
The pull out strength advantage of the glued in screw is just one of the benefits of hardware bonding. Another benefit; the pilot holes are sealed from moisture and not likely to develop leaks or lead to rotted wood in the future.
Keeping the wood dry is of paramount importance, not only because of concerns over rot, but also because the pull out strength of a screw in wet wood is about half the pull out strength of a screw in dry wood.
Hardware bonding can also dramatically improve the side load carrying capability of fasteners. This is especially true if a counter bore is incorporated at the top of the pre-drilled hole. Wood has relatively low side grain compression strength. When a screw is side-loaded, it often crushes the wood because the wood is relatively weak compared to the small diameter of the fastener.
To gain additional side load carrying capability, countersink the original pilot or lead hole to remove the wood immediately surrounding the top of the screw. This creates a space for an epoxy annulus. The epoxy, with its high compressive strength, handles the point-loading of the screw much more effectively. The epoxy spreads the side load exerted on the screw into more of the surrounding area so the wood is not damaged in the process. (see More on Hardware Bonding)
When gluing fasteners into oversized holes, it is important to use a two step approach to applying the epoxy. We recommend that you first apply unthickened epoxy to soak into the wood fibers. Then fill the hole with thickened epoxy and coat the threads of the fastener with thickened epoxy to minimize entrapped air bubbles around the threads. 404 High-density filler is the best filler for hardware bonding, especially where very high loads are anticipated. Insert the fastener into the epoxy-filled hole and leave undisturbed until cured.
Hardware bonding as a concept has been tested aggressively at Gougeon Brothers over the years. Our involvement in building wind turbine blades forced us to develop test methods that would distinguish good resins from bad. Wind turbines operate in a severe fatigue environment and our blades needed to survive 30 years of service.
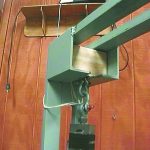
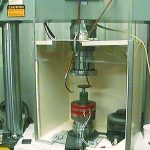
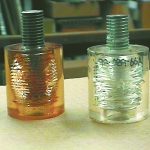
One of the fatigue tests we used and continue to use to screen epoxy formulations is the Annular Shear test. This test utilizes a cast-in-place fastener that is supported only by the epoxy attached to the screw threads. The tips of each of the metal threads sets up a stress concentration in the surrounding epoxy as a load is applied to the fastener. The load is applied and quickly released and applied again several times a second for several thousand cycles until the epoxy cracks or shatters. The test is run again on additional samples at a slightly higher and lower loads to predict long-term fatigue characteristics.
We have found that an epoxy used for gluing in fasteners needs to have a good balance of properties — high compressive strength, creep (durational load) resistance and fatigue resistance — to be effective.
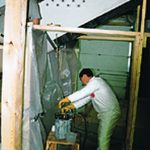
Hardware bonding has been used extensively to build the 124′ sloop ANTONISA at Hodgdon Yachts in East Booth Bay, Maine. Several photos from that vessel are shown. The photos (see gallery below) show the large potted fasteners being glued into the deck. These will carry tremendous side loads exerted by a massive winch. The large bronze inserts are required to transfer the loads from the winch base into the epoxy annulus and then into the surrounding wood and epoxy deck.
The photos (see gallery) show the huge head stay fitting of ANTONISA being glued in place. Creative Hodgdon employees devised a unique way of gluing in what Bruce King referred to as a headstay chainplate. The composite fitting was dry fit into an oversized slot in the stem. Then the void between the fitting and stem was filled with epoxy, which acts as a buffer between the high modulus plate and relatively low density wood laminate in the bow and stem.
To fill the void, the fitting was first glued in place with thickened epoxy only around its perimeter, to create a leak free enclosure. The following day the void between the fitting and the stem was filled with WEST SYSTEM® 105 Resin and 209 Extra Slow Hardener. 209 Hardener was chosen to allow extra working time for the continuous fill and to minimize exotherm (heat buildup) while the epoxy cured.
A paint pressure pot was used to slowly fill the void with epoxy. The operation required seven gallons of epoxy to complete the fill, all from a single inlet, located at the bottom of the joint. The pressure pot worked well because the fluid pickup tube inside the pot draws off the bottom. This allowed relatively air-free epoxy to be injected into the joint.
Hodgdon’s technicians used clear plastic tubing and an in-line valve so the fill could be stopped if air was seen in the line. This allowed them to refill the pressure pot several times without introducing air into the joint.
Temporary pieces of clear plastic laminate were hot-melt glued in place over holes that had been drilled into the side of the bow. This was crucial for verifying the fill process. Note the large metal fasteners used in the joint design to help spread the head stay loads out into the surrounding hull laminate.
These are just a few examples of hardware bonding done at Hodgdon Yachts. Nearly all of the hardware, the 105,000 lb. lead keel and twenty-four keel bolts, the chain plates, bow thruster tube and stern post tube installed on ANTONISA are glued in place.