
by Steve Gembrowski
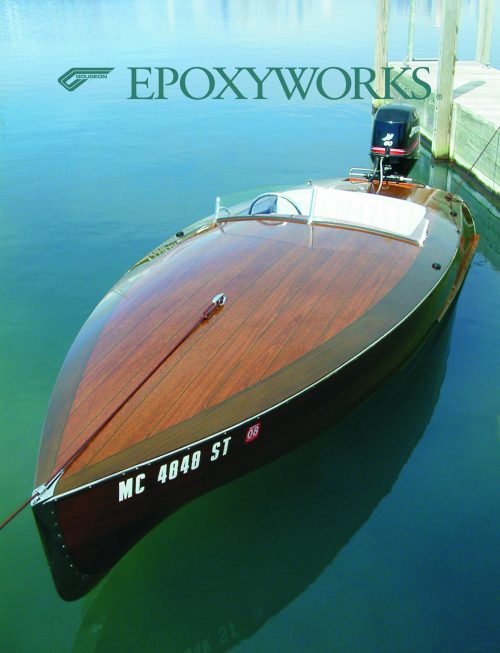
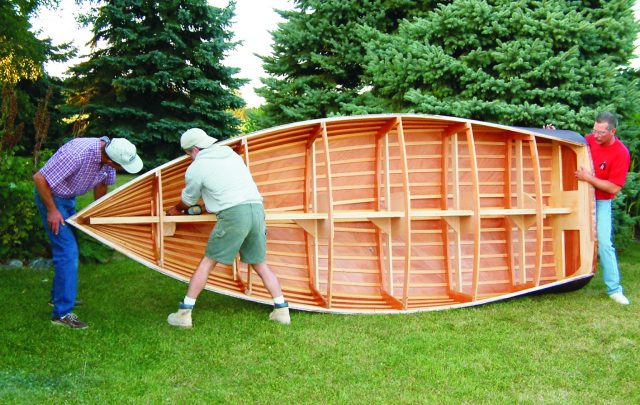
Fifteen years! Not that it took 15 years to build; it was more like a year and a half. I first saw a photograph of RASCAL and decided right then, if I ever build a boat, this is the one. RASCAL was a new design by Ken Basset for a modified V-bottom 14’10” runabout with a beam of 5’4″ and hull weight of 420 pounds. For the next 15 years, RASCAL became one of those projects sitting on the back burner, waiting until I had enough time and money to comfortably build her without having to compromise on engine, equipment or material. I’m sure plenty of builders out there can relate. My first step was to set the standard to which the boat would be built. Considering the time and money investment, the boat design, and the need to push my own skills, I set the bar high: Van Dam quality should do it. Van Dam Custom Boats is a builder of fine mahogany boats in Boyne City, Michigan, whose 100 mph, 32′ runabout, Alpha-Z, was featured in a cover story in Epoxyworks 14.
Pre-coating Rascal’s components
From the beginning, I sanded and triple-coated all components with WEST SYSTEM® epoxy prior to assembly. This process seemed to take forever, but I can only imagine the nightmare it would have been to coat and sand around all the frames and stringers, all those tight little areas up in the bow, while standing on a milk crate and bending over the sheer rail. Then to repeat it three times. The whole project would have ground to a halt right there. Pre-coat. You’ll save time in the long run.
Setting up
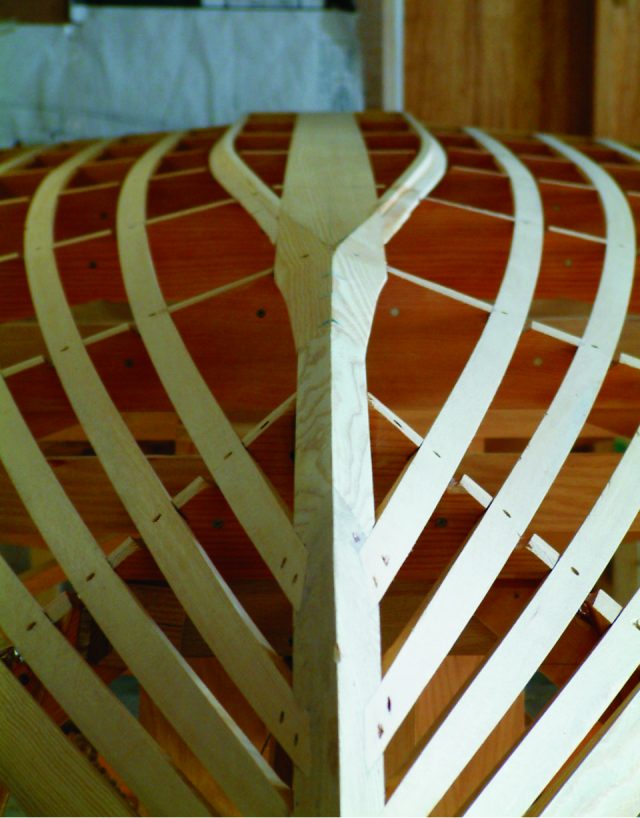
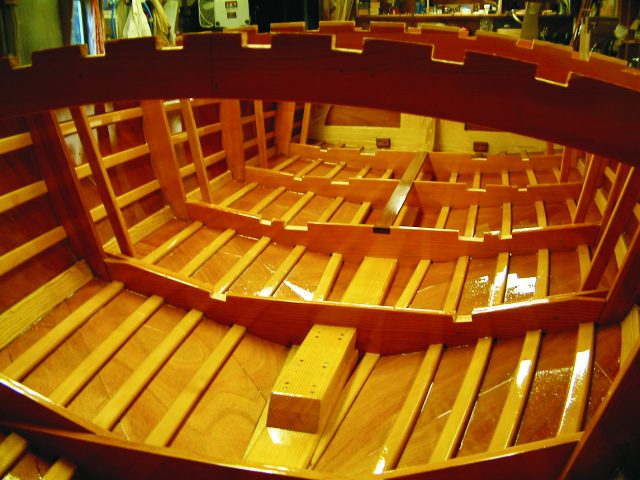
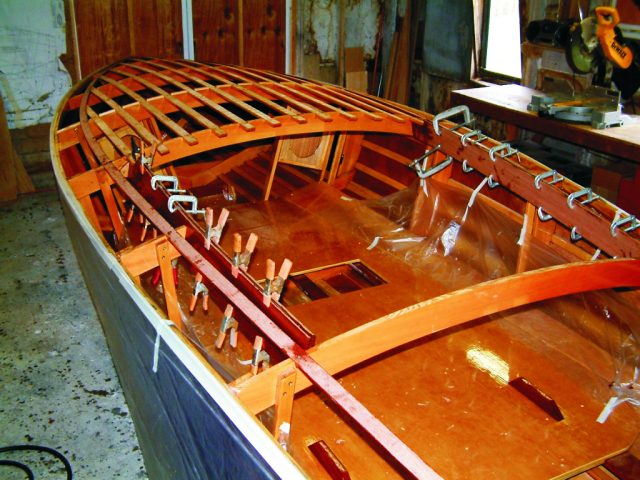
I purchased LVL (Laminated Veneer Lumber, which looks like plywood 2×10) from the lumberyard to use as a strongback, set up the framework, and then turned my attention to the 120+ notches that would need to be cut in the frames to accept the Sitka spruce stringers. I made up a simple jig, a plywood plate approximately 4″×6″ with a rectangular hole cut in the center. The opening in the plate was centered over the notch location and screwed to the edge of the frame. I placed a guide bushing on my plunge cut router, adjusted the depth, and cut each notch in three passes.
Back-up blocks were clamped to each frame to avoid chip-out. If you bevel the frames first, the bottom of each notch will automatically be cut to the same angle. However, I chose not to do this at this time and used a chisel to bevel the bottom of each notch, using the stringer as a guide. I also used this method to cut the notches in the white ash stem. After a little practice, I found I could install a complete stringer in about 25 minutes. Since the stringers were so closely spaced, I faired the entire framework with a board sander and an 8″ Dual Action (DA) sander with 40-grit, then 80-grit sandpaper. Then I coated all contact surfaces with epoxy.
Installing plywood
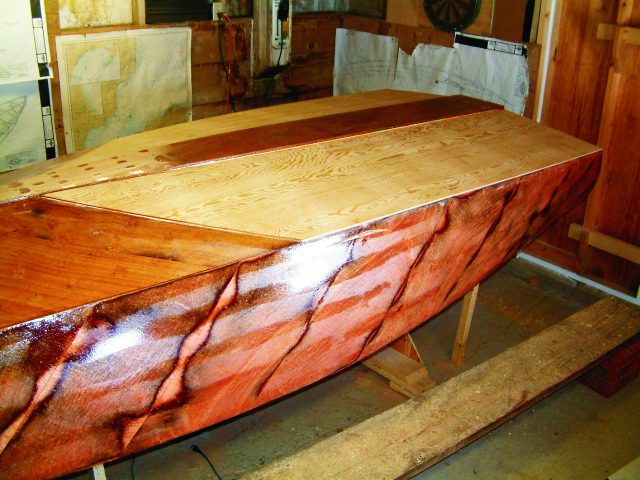
The bottom was covered with ¼” okoume plywood and the topsides with 1 8″ okoume plywood.
This layer was epoxied and stapled in place with ¼” crown staples. I shot each staple through a piece of braided nylon handling material (used to band lumber together for shipping). This allowed for quick staple removal by simply grabbing the tail end of the strap with a pair of pliers and giving a quick sharp tug 90° to the hull surface. Caution: wear your safety glasses as some of the staples will go flying. I again faired the hull and applied two coats of WEST SYSTEM epoxy.
Vacuum bagging the mahogany planks
Now the hull was ready for the ¼” Philippine mahogany. The plans called for the planking to be stapled along its edges approximately every 3″. In my mind, I envisioned a wooden boat that looked as though it had been assembled on a giant sewing machine. The next best thing was to try to match up about a thousand hole plugs, still not what I was looking for. I wanted a blemish-free surface totally free of fasteners. The only way to clamp the planking without making any marks was to vacuum bag it in place. Great…sounds simple enough, but how to bend the plank and hold it in alignment while setting up the vacuum? I would have to devise some type of non-penetrating fastener.
The fasteners ended up looking like 1″ by 1½” mirror clips, similar to those used to hold your bathroom mirror to the wall. These clips were made from scrap plywood, and since they would be under the plastic, the top edges were rounded off with a sander. I found that once one plank was butted tightly against another, using these clips along the “loose” edge was all that I needed to secure the plank. Prior to gluing and mounting the plank, I ran a strip of ½” double back tape around the perimeter of the plank being installed and made sure to seal down all the edges and overlaps tightly. Then I glued and clamped the plank. I then took a piece of ¼” nylon tubing and drilled small holes in it every 3″. I taped this loosely along the length of the plank. The tubing allowed the air to be removed from the extreme ends of the bag and was reusable.
Somewhere along the length of this tubing, I wrapped a piece of landscape fabric and taped it in place to form an “air bridge” from the tubing to the suction cup or vacuum port.
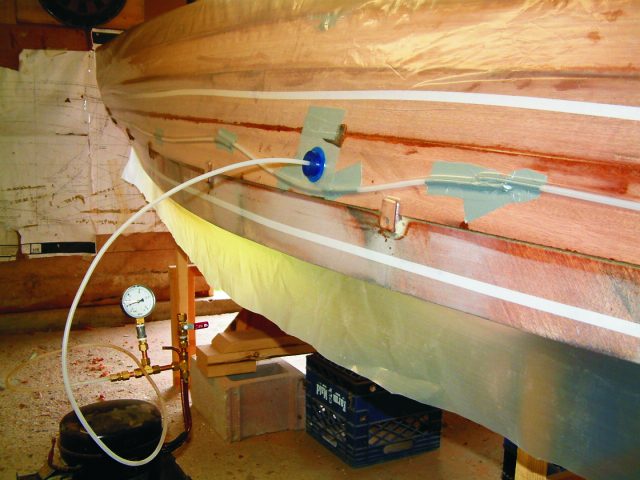
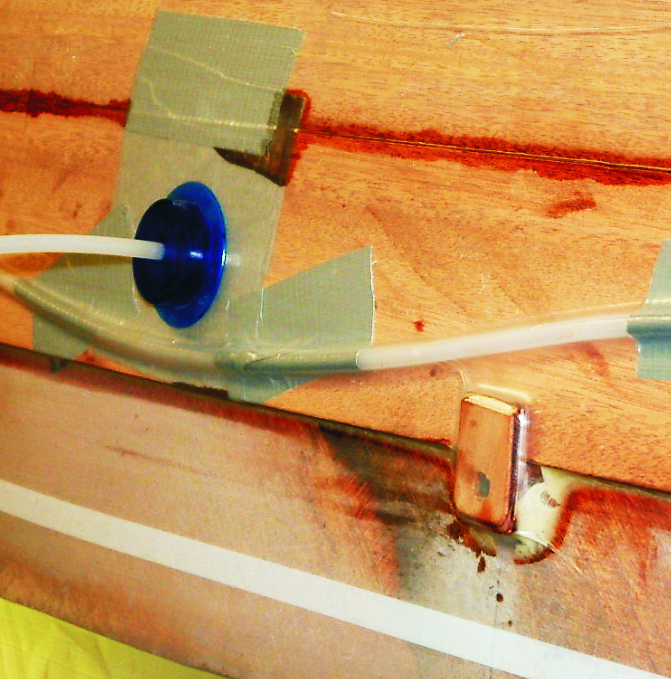
I used builder’s plastic for the bag. (Note: use the clear plastic, not the milky white variety as this type is too slippery.) This plastic does not stretch very much, so I had to get real creative when taping the end of the bag. After the bag was in place, I made a small “x” cut in the plastic at the fabric location and covered it with the suction cup. Then I started the pump and checked for leaks. I had forgotten to mark my frame and stringer locations on the plywood and would occasionally miss the frame with the screw, causing a leak. By the time I found this out, I was already committed to the job and needed to plug the leak. To do this, I crawled inside the hull, listened, and then ran my finger along the frame hull joints until I found the leak. Then I packed the leak full of plumber’s putty or bubble gum, whatever I could come up with. After the epoxy cured, I cleaned up the plank edge with a trim router and moved on to the next plank.
To supply that suction, I needed a vacuum pump. After searching the internet, I found several commercial units, ranging from $100 to $300. I knew someone had to have a cheaper solution. One kit-plane builder had the answer. Turns out that the solution had been sitting in my garage for years. I had an old Kenmore™ dehumidifier. The fan motor was burned out, but the compressor was still good. On the opposite side of that compressor was a vacuum, and that’s what I was interested in. I have had this unit pull up to 22″ Hg (inches of mercury), which is over 1,600 lb per sq ft. (To find out how to build a vacuum pump, visit The Cheap Little Sucker. Read all the links as they tell you what to look for when choosing a compressor. A good source for parts, vacuum gauge, suction cups, double-back tape, etc. is McMaster-Carr; they offer fast service and excellent prices.)
Rascal’s interior
During the winter of 2004-2005, I constructed the interior, disassembled it, and brought it into the basement for finishing. I chose Interlux Goldspar™ polyurethane varnish for two reasons: 1) I wanted the scratch resistance of the hard finish and 2) Since dust was a constant problem, the hard finish allowed me to wet sand all the parts and then use automotive products to rub out and polish the final finish.
I lost some of the high gloss, but I also got rid of the dust flecks. This was a lot of extra work but worth it. I started sanding with 600-grit paper on a rubber block, very wet, then 800-grit, and finished with 1200-grit. All sanding and polishing have to be done within a single coat of varnish; if you sand through to a previous coat, no amount of polishing will make it blend and you will need to re-coat.
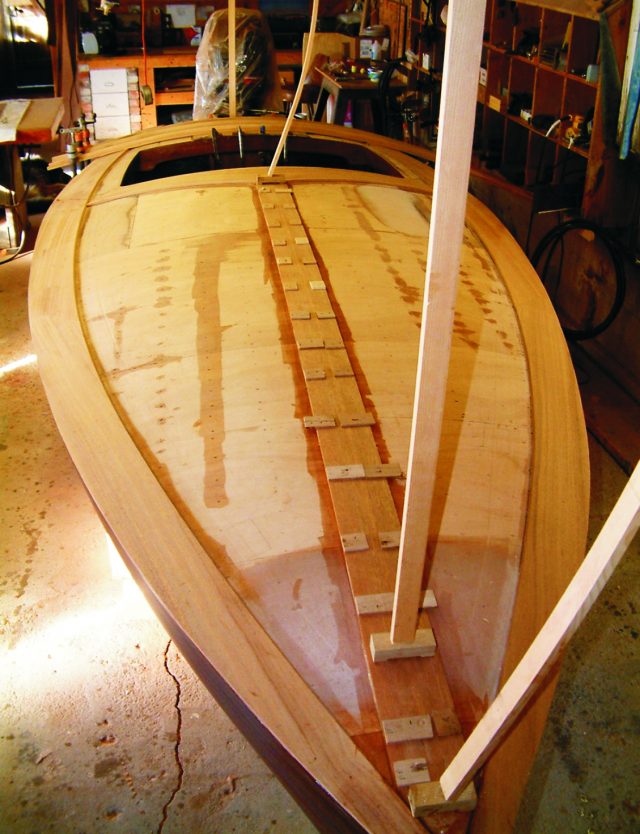
Decks
Deck construction used the same schedule as the topsides. The caulked seams were filled with WEST SYSTEM epoxy thickened with 406 Colloidal Silica Filler and then darkened with 423 Graphite Powder. This mixture was piped into each seam with a zipper-seal bag with a corner snipped off. Next, all deck hardware and stainless steel trim were fabricated, fitted, and installed. After the windshield brackets were installed, patterns were made for the ¼” Plexiglas™ windscreens.
When I was satisfied with all the fits, I removed everything and sent the windshield brackets and stem-head fitting off to the chromer. Be sure to send out this type of work as soon as possible; my work took five weeks and one part had to be sent back to be redone. Needless to say, that part was the last thing installed on the boat before launch.
Finishing Rascal
To finish the hull, I used Minwax™ oil stain, followed by a 6 oz layer of glass cloth and five coats of epoxy. Then I used six coats of Epifanes™ no-sand varnish and finished with two coats of Epifanes spar varnish. I found that I had to plane the sheer very carefully as the glass did not adhere as well as I would have liked. For that reason, I would not recommend the use of the Minwax oil stain under the epoxy. I used the same stain on the deck and there elected to go with an all varnish finish, 11 coats in all.
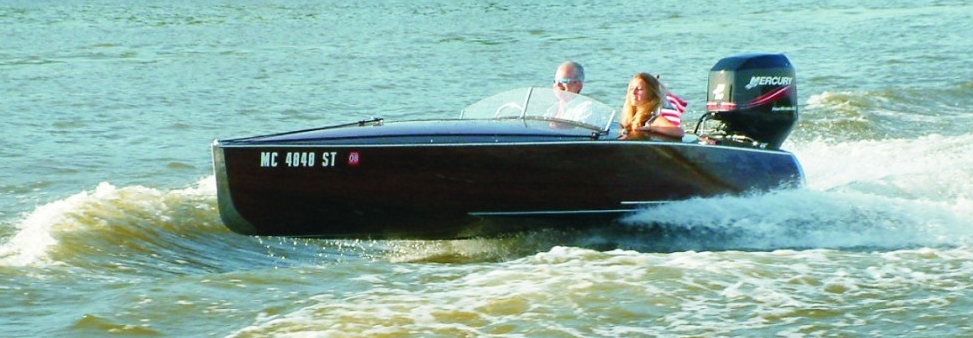
The RASCAL is a real head turner and gets a lot of attention wherever she goes. She took 1st place in the contemporary classic division at the 2005 Presque Isle Harbor Wooden Boat Show. The 4-stroke was initially a little heavy, which I corrected by mounting a hydrofoil to the engine. This made the trim much more effective throughout its range. Handling is very solid and predictable, with a top speed somewhere near 50 mph. Not bad for a fuel-sipping 60 hp motor.
Is she Van Dam quality? In my opinion, not quite. Then again, I’ve always been my own worst critic.