QUV Accellarating Weather Test Machine
By Julie Jezowski
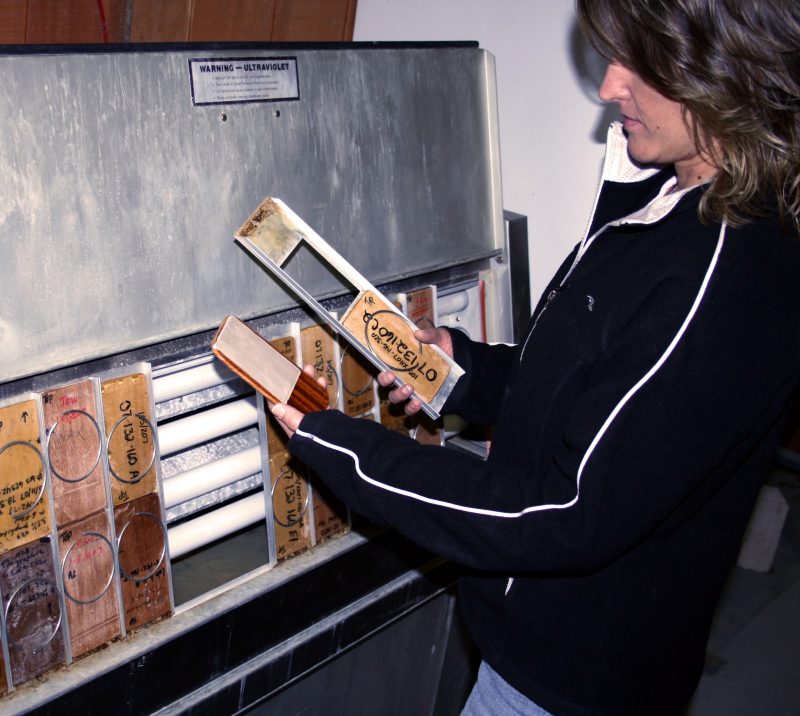
Above: Julie examines a 3″ × 6″ coupons after long exposure in the QUV weather test machine. In a matter of days, the accelerated test subjects the samples to the equivalent of months of normal weather.
I’ve been with Gougeon Brothers, Inc. since 1996, and 13 of those years were in the Order Entry Department where I talked to many interesting customers working on all sorts of projects. In 2007 I became a member of the Technical Department. Now, rather than giving product pricing to customers or advising them on the quantity they may need, I’m able to see how those products evolve from just a mere gleam in someone’s eye to a product we are proud to call our own. For me, being a part of this process means among many other things, handling our testing data. My role ranges from filing it all the way to building databases for the many tests we perform in-house.
One of the tests I have taken on is related to weathering. This test is conducted in our QUV™ Accelerated Weather Test machine. This accelerated weathering chamber produces cycles of UV light, condensation, and temperature change to mimic the environment— think Mother Nature on steroids. It operates aggressively, consistently, and around the clock. We run these tests in accordance with ASTM Standard G154. First, we create samples of 3″×6″ wooden coupons, or any other substrate we deem necessary, then coat them with epoxy, polyurethane, varnish topcoats or other coatings. Along with the test samples, we include a control sample. This allows us to compare how the new materials we’re studying handle the exposure compared to those we’re already familiar with.
We put these coupons inside the weathering chamber with the coated side facing toward the fluorescent bulbs. I know what you’re probably thinking—fluorescent bulbs? Oh no my friend, this is not your average fluorescent bulb. They are UVA 340 lamps, specially designed to simulate sunlight and the critical short-wave UV. Actually, for all of you sun worshipers out there, the bulbs are the same as those used in tanning beds (interesting, yet very disturbing at the same time).

Florida shows surprisingly good correlations for color shift direction and rank order for comparative testing with the UVA-340 lamp. Although UV is only 5% of the sunlight it causes 95% of degradation, which makes it the primary bad guy in weathering.
The secondary cause of degradation is moisture, specifically dew. Because of dew, the average time of wetness in many regions is 45–50%. In addition to dew, of course, there is rain. The reason water has such a negative effect is that it is a natural solvent. It causes chemical reactions and surface damage as well as thermal shock and erosion.
The last, but certainly not the least, factor in degradation is temperature. It can cause deterioration and thermal effects such as physical stress and deformation. A 10°C increase in temperature doubles the rate of a chemical reaction. Yes, doubles! And let’s not forget the whole freeze-and-thaw effect. As you can clearly see, all of these combined conditions certainly can wreak havoc after time.
Observing the effects of these elements on a test sample outdoors can take weeks, months, or even years. Fortunately, the QUV weather test machine enables us to analyze and measure the same results in a fraction of the time. With the accelerated conditions in the weathering chamber, the test samples change rapidly. For instance, it may only take a day or two for slight changes to occur to the surfaces while those same changes may take months outdoors. For this reason, I take readings of each sample frequently with a Micro-Gloss Gloss Meter, in accordance with ASTM Standard D523. The Gloss Meter is a handheld device that directs a light at a specific angle to the test surface and measures the amount of reflection. The lower the number, the less surface gloss the sample has.
As important as measuring gloss is, it is only one of the many measurements we note during testing. Some other changes samples may undergo are cracking, clouding or hazing, chalking, color changes, and peeling, to name a few.
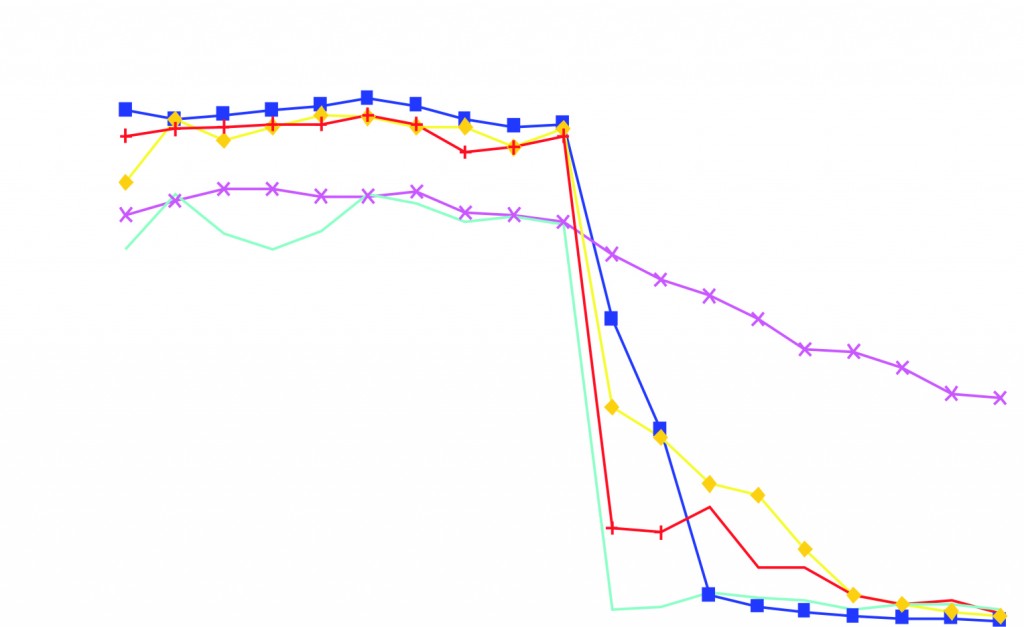
An important item to note is that when testing, we always test to failure. The chart on the previous page demonstrates the importance of running a test to failure. If I’d stopped the test mid-way through, I’d have assumed test sample B was one of the worst. However, as you can see it actually turns out to be the best. It maintained a steady, slowly declining gloss throughout the test and didn’t crash and burn like its competitors.
Here are some general guidelines for coatings I’ve observed while involved in QUV weather testing:
- Gloss finishes are better than satin.
- Flaws such as dirt, dust, missed areas, and runs are all points where failure begins.
- Corners are bad news. Be sure to round and coat them appropriately.
- Two-part systems may cost more, but outperform one-part systems by an order of magnitude.
Weathering testing is critical to us when we are formulating new materials or improving on old ones. It quickly lets us know if we are headed in the right direction, if we need to go back to the drawing board or if it verifies that we are still ‘UV’ light years ahead of our competition.


