Let’s Start Off Simple
Spring 2012, Winter 1998

GET STARTED
FREE PRINT & DIGITAL EDITIONS

Spring 2012, Winter 1998

Building a natural finish wood-strip or strip-plank canoe can be exciting and a bit daunting, particularly if it is your first clear finish canoe. You’ll commit time and money to the project and your expectations may run high. Most people are happy with the results of their first strip plank project, but deep down they wish some aspect of it was a bit better.
This article suggests ways to overcome problems that can plague you as a first-time strip-plank builder. You can eliminate pitfalls if you take the time to build a simpler strip project before building a strip-plank canoe. This is something woodshop teachers often have their students do.
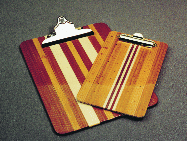
Strip plank clipboards, mailboxes, or canoe paddle blades can be built using the same technique as a canoe. This gives you a chance to practice and gain confidence, and you can learn from your mistakes on relatively inexpensive projects. A simple project like a wood strip clipboard can be fun to build, it’s useful and can make a unique gift. Whether you are building a clipboard or a canoe, a modern strip composite project usually includes these nine steps:
Choose your materials and methods. Before starting your strip plank project, select your building materials, then research and decide exactly how you will accomplish each of the steps.
Before building your strip plank canoe, reading Canoecraft by Ted Moores and Marilyn Mohr is a good place to begin. Gil Gilpatrick’s book, Building a Strip Canoe is another good choice. Both are easy for first-time builders to understand, yet thorough enough that many experienced builders use them for reference. I used both books in researching and building my first canoe.
You may have an idea of how you’d like the canoe to look, but are not sure what woods will create that look. You could experiment by making several clipboards using a variety of wood species. Once they’re edge glued and coated with epoxy, the panel’s color and tone will be evident. At this point, you can set aside any panels you don’t like. Only panels that have the desired look need to be fiberglassed and finished.
Experiment with color schemes and contrast. You can use a variety of wood species to create a colorful piece. Add 4 or 5 narrow strips of contrasting wood for a stunning accent. The photo on page 9 shows the accent strip effect. Canoes are usually built with low-density woods like cedar, spruce or redwoods. Western red cedar and Atlantic white cedar are most popular, but some beautiful canoes are built with Sitka spruce and redwood. Several years ago I purchased clear redwood from a local yard to build my canoe. I bought it because it came in 20′ lengths, offered beautiful wood contrasts from light tan to dark reddish browns, was without knots and was affordable. The clear redwood grade includes heartwood and sapwood (dark and light) and is less expensive than clear/select redwood, which is all dark-colored heartwood.
We can experiment with edge treatments for the wood strips. Basic flat edges that will form butt joints should be sufficient for a clipboard, but the seams are more noticeable on curved surfaces. Bead and cove joints are used on canoes because the joints are less visible and the strips interlock and align better. See Types and sources of strip plank material, page 3.
Because we’re experimenting with flat panels, our mold can be a flat piece of plywood or a few pieces of straight 1″ × 1″ wood strips, set apart to simulate mold frames. Cover the mold with plastic film to prevent epoxy from sticking to it. Naturally, a canoe mold is much more difficult. Don’t skimp on the time or effort it takes to build a canoe mold. It’s an important part of the process and flaws in the mold will show up in the finished canoe.
Coat both edges of each strip with epoxy, slightly thickened with 406 Colloidal Silica. Place each strip tightly against the previous strip. Staple or nail the strips to the plastic-covered plywood mold using a single fastener at each end. Avoid driving the staples or nails in too deep because removing them later may damage the wood. You can avoid damage by stapling through strips of firm plastic or wood. Wipe or scrape away the excess resin before it cures. Allow it to cure overnight.
Again, we can use our test panels to experiment with different glues and determine which best meets our needs. Builders use a variety of adhesives to edge glue wood strips together on small projects like canoes. These include white and yellow carpenter glues, polyurethane adhesives, 5-minute epoxies and of course WEST SYSTEM epoxy. Although some of these adhesives are not marine-grade glues, the builders have faith that the epoxy and fiberglass layers inside and out will keep the wood dry. As a strip plank project increases in scale and worth, strip-plank builders almost exclusively edge glue with epoxy because they can’t afford to take any chances.
We can use our flat panels to develop finishing skills for smoothing the wood surface. Even flat panels will have irregularities that you’ll want to remove. Smooth the surface with cabinet scrapers, sanding blocks or modified vibrator sanders. If you are hand sanding, do it in the direction of the grain to avoid cross scratches in the wood. Use 80-grit sandpaper for rough shaping, and 120-grit for final sanding. Use a vacuum cleaner or bench brush to remove wood and epoxy dust.
Wipe the surface with lacquer thinner or water to expose any flaws and enhance wood color, contrast, and tone. If you don’t like the character of the wood, discard it and try again. I’ll build two or more boards at the same time to increase the chance of getting a panel I like.
On curved surfaces like canoes, many strips edge-glued together give the appearance of fluid curves, but in reality the shape is made of a series of narrow flat segments. To prepare the canoe for fiberglass, you’ll use sanders, cabinet scrapers and/or low angle block planes, to create one continuous smooth surface. Work them carefully. This can and should be time-consuming, particularly if you plan to produce a flawlessly smooth hull.
You can modify tools to improve the outcome and make the job faster and easier. On a bench grinder, shape cabinet scrapers to match the desired shape of the hull. You can use several scrapers with slightly different shapes to scrape away the hard edges of the wood strips on different parts of the canoe.
You can modify a vibrator sander with plastic laminate between the sandpaper and backer pad to create a hard surface behind the sandpaper. This allows the sandpaper to touch only the high spots. This trick works only on flat sections and on convex surfaces like the outside of the hull. Professionals usually combine these techniques to get the job done.
For clear finished strip-plank projects, seal-coat the surface with epoxy a day or two before fiberglassing. This step helps create a good clear finish. The seal-coat lets you see one more time, how the wood will look when fiberglassed. You’ll be able to see any glue dribbles leftover from the edge gluing, and can remove them before you apply the fiberglass. The seal-coat also reduces the chances of air escaping the wood to make bubbles in the curing epoxy, a process called outgassing.
Sand the seal-coat before you apply the fiberglass. Avoid sanding through it, because sanded-through spots may make irregularities in the finished surface.
To apply the fiberglass, carefully lay a dry piece of fiberglass cloth over the prepared surface. Smooth out wrinkles and air pockets. Apply epoxy using clear finish techniques. Remember to apply all of the fill coats on the same day if possible. You should apply each coat while the previous coat is still a bit tacky. This way you won’t need to wash and sand between coats (as you will if you let the epoxy cure hard).
Apply fiberglass to the other side of the panel as soon as possible. This reduces the chance of the panel warping. If the unsealed wood on the opposite side picks up moisture or dries out, the panel will cup or bow. If this happens, add moisture or dry the affected side to correct the warp. Cure the epoxy for at least two days at 65°F or higher.
Most clear finish canoes are fiberglassed inside and out with a layer or two of 4 oz or 6 oz plain weave fiberglass cloth. You can experiment with fiberglass from different sources over the flat panels to determine what works best. If the fiberglass wets out clearly, it’s probably suitable for your project. To avoid problems with fiberglass wrinkles, find a supplier who ships the fiberglass rolled on a tube, rather than folded.
Use stiff sanding blocks and modified vibrator sanders to smooth out any remaining surface flaws. Finish the surface by sanding it smooth with a Formica backed vibrator sander to create a smooth flat surface in preparation for varnish.
Repeat all of the surface preps to the other side of the panel. Trim the board to final size of 9½” × 12½” allowing for a ½” radius on the corners. Break all edges with sand paper rounding them off slightly. Coat the edges with epoxy, allow to cure and sand smooth before varnishing.
Apply one or two coats of varnish to the flat panels to complete the process. Two or three coats are recommended for canoes.
Two different types of clipboard hardware are available. Conventional chrome hardware and a smaller, lower-profile version in brass. Both are available at Rockler Woodworking and Hardware. Attach clipboard hardware with screws and T-nuts.
There is still quite a bit to install on a canoe after the strip-plank hull is finished. the seats, shear clamps, and decks finish the job and because the stressful part is over these can be more relaxing and enjoyable parts of the project.
If you decide to build a strip-plank clipboard, remember to have fun and experiment with wood color and fastener technique. If you can perfect your building methods on small projects like this clipboard, you will be better prepared to take on larger projects.


